
Printing Academy
Welcome to PrintNinja’s Printing Academy!
At PrintNinja, we constantly strive to better our process and ourselves. We love learning more about all the cool things that we can achieve with offset printing. If you share the same passion for advancing your knowledge, here’s an intro guide to the entire offset printing process, complete with videos, photos and expertise from those in the printing business. Exploring the pages in our Printing Academy will help you learn more about the process – so you’ll be able to understand what’s happening when you get your project printed with us. And we think that’s pretty cool!


Freshly updated customer reviews from TrustPilot
Introduction to Offset Printing
This article serves as a basic introduction to offset printing.
Offset printing, also called lithography, uses a large printing press with a series of printing plates that transfer ink onto paper, which is then cut, folded, and bound to form a final product.
When you think of offset printing, think of the word transfer. Each step in this printing technique involves the transfer of images (text and art) from one material to the next. First, your images are digitally transferred onto a set of plates, which collect ink to transfer your images onto a rubber blanket that transfers images onto paper.
There are two primary types of offset printing, sheet-fed and web. The most common alternative to offset printing is known as digital or print-on-demand.
Sheet-Fed Offset

PrintNinja uses sheet-fed presses. These machines use pre-cut sheets of paper, called parent sheets, that are fed through the printing press one sheet at a time. They are best used for short or mid-range runs (250 to 10,000 units).
Pros:
- Highest quality printing
- Wide range of specialty options
- Low per-unit costs
Cons:
- High set up costs
- Medium minimum order sizes
Web Offset

Web offset printing presses use a roll of paper that is continuously fed through the printing press. They are far more complicated than sheet-fed presses and can be as large as an entire building. Web presses are used for high-volume printing (10,000+ units).
Pros:
- Extremely low per-unit cost
Cons:
- Extremely high set up costs
- Large minimum order sizes
- Lower quality than sheet-fed
Digital (POD)

Digital printing (also known as Print-On-Demand or POD) is not an offset printing method, but it’s a good one to understand. Digital printing uses equipment similar to a large home laser or inkjet printer. This approach is best used for small runs (1 to 150 units).
Pros:
- No set up costs
- No minimum orders
Cons:
- High per-unit costs
- Less consistency in color and quality
- Fewer specialty options
What Can You Print with Offset
Offset printing can be used to print on paper, cardboard, plastic, and even chocolate! This printing method is a popular choice for card and board games, record jackets, and multi-page projects. Games and books follow the same printing process, but post-press is where the similiarties end.
Most of our Printing 101 resource pages focus on four-color sheet-fed offset printing since those are the machines used by PrintNinja’s factories. These presses use four colors of ink — cyan, magenta, yellow, and black (CMYK) — to produce the vast majority of full-color projects printed worldwide.

Freshly updated customer reviews from TrustPilot
PrePress
In the pre-press production phase, an expert technician will review your files, manually and through preflight software, for any sign of a problem that may cause production errors. An electronic proof is issued once your PDF files pass the preflight inspection. We provide electronic proofing to all of our customers for free, and all projects go through the process, even if you’ve added hard copy proofing as well. When you receive your electronic proof via email, you may have suggestions from your prepress expert for changes that should be made to your files before sending them into production. You’ll also notice that printer’s marks have been added to your files. These are special marks to indicate different elements such as trim, bleed, and center. If requested, hard copy proofs (for books and games) may also be created and sent to you for approval, usually for color purposes.
Once you have approved your proof and sent your files to press, the next phase in pre-press production is that your files are output through a process called the RIP (raster image processing). During this part of the pre-press production process, your images are separated into four colors, and output onto four metal printing plates – one plate for each of the colors of Cyan, Magenta, Yellow, and Black (CMYK). These thin metal plates are sturdy enough to be used for many thousands of printing impressions, yet also flexible enough to wrap around a rotating cylinder inside the printing press:
Pre-Press Production Chapters:


Freshly updated customer reviews from TrustPilot
Proofs
A proof is an electronic file or physical product meant to give an idea of the way your project will turn out when printed.
Electronic Proofs
Also known as a soft proof, most printers will provide electronic proofs for free because generating them is a necessary step that must be taken before printing. An electronic proof is done for any file that will be printed: interior pages, book cover, game board, game box, cards, instructions etc. A prepress expert will look over your files for a number of issues, usually putting them through pre-flight software to do computerized checks as well.
A few pre-flight fundamentals:
- Image Resolution (300dpi minimum)
- Color Profile (CMYK not RGB)
- Inclusion of Bleed
- Safe-Zone Issues
- Pagination Issues
Prepress experts will double check that everything is accurate and may provide some suggestions if they find problems with your files. They’ll also typically add printer’s marks to indicate where the files will be trimmed, and then they’ll send the final file to you for your approval.
In general, electronic proofs are effective for double checking content, pagination, and layout. However, electronic proofs cannot accurately portray how colors will look when printed.

Hard Copy Proofs – Books and Cards
Hard copy proofs, also known as physical proofs, are highly recommended for those who are printing offset for the first time, and for those who have specific color requirements. This option typically includes one or several press sheets of a project (usually 8 pages of content per press sheet), printed on an offset press using the actual paper and finishes to be used in the final product. Overall, physical proofs give a much more accurate feel for the way that color translates to the printed page.

Hard Copy Proofing – Board Games
Hard copy proofs are not prototypes, although they can act as one. A prototype is typically your minimum viable product while a proof is a closer representation to your final product. Both terms are used interchangeably in the industry, but in our experience a prototype consistent of blank boards and cards printed on computer paper – the best way to start making your game. A hard copy proof is your full printed game and is used to judge your printer’s quality and material, again this can make a great advanced prototype for play testing, but is pricey for a prototype. Due to the complex process of offset game printing, some of your pieces will be printed digitally. Any component that is digitally printed will not be color accurate.

Freshly updated customer reviews from TrustPilot
Printer’s Marks
Printer’s marks are special marks that are added to your PDF files and to the edge of your parent sheets to assist the offset printing press in proper alignment, trimming and color values. These printer’s marks are trimmed off once printing is complete.


Color Bars
Color bars, or color control strips, are printed in the trim area of a parent sheet. Press operators use the color bars to check for ink density, overprinting, grey balance and more. Color bars are so efficient that they can reveal issues with ink hue, rubber blanket, and impression cylinder miscues.

Registration
Registration is the process of precisely lining up cyan, magenta, yellow, and black printing plates so that their overlap produces the full color spectrum. Registration marks (crosshairs) are added to your PDF files and your plates. As printing takes place, the pressman makes sure that both sets of registration marks line up, adjusting their alignment as needed. Once all four colors are printed, the crosshair should be a solid black circle otherwise the press operator will know the job isn’t being printed correctly and will make more adjustments. Without registration, your images can appear blurred, as the four colors may not line up and will exhibit the ‘ghosting’ that you often see in newspaper color photos (since the large web presses used to print newspapers frequently have registration issues).

Freshly updated customer reviews from TrustPilot
Imposition and Pagination
Imposition is the arrangement of individual pages or cards onto press sheets, also known as parent sheets. Our press operators use imposition software to translate PDF files into a format and layout that can be engraved onto printing plates that will be installed into the offset press.
Book Printing Layout
The most common layout has 8 pages per side of a parent sheet, meaning each parent sheet will have 16 total pages when printed on both sides. Small-format projects (6″ x 9″, for example) may have 16 pages per side of a parent sheet, and large-format projects (larger than 9″ x 12″) may only have 4 pages per side.
Below you can see how a typical 16-page section of a book is laid out for printing. This parent sheet will be folded to the size of the final project, and this grouping of pages is known as a signature. Don’t worry! You don’t need to submit your art files in this format. PrintNinja will figure out the proper pagination to ensure that all pages are printed, folded, and bound in the correct order.

Playing Card Printing Layout
Playing cards are similar to books in that there’s an optimal card count for each card size and card stock. Card stock (Blue Core, Black Core, Coreless) parent sheets come in different sizes, which affect how many cards can fit on one sheet. Of course, different card sizes (Poker, Tarot, Square, Mini) will fit differently on each parent sheet. The smaller your cards, the more you can fit on one sheet.

Press Check & Pagination
After imposition, each full parent sheet is printed with a large-format proof printer. These high-end printers produce reliable colors that press experts use to color-match against the offset printed sheets.
The operator will also use this sheet to check for pagination, or the order of pages, by folding the parent sheet to final-product size. This process confirms that all the pages will be printed in the proper order and that they will appear right-side up when bound together. Although most printers use computer systems to automate pagination, sometimes a press operator will override the computer to manually adjust the pagination as needed.

Page Count Explained
For most books, your page count has to be a multiple of four. The easiest way to understand this is to find a piece of paper and fold it in half three times. Each time you make a crease, you increase your page count by four. This folded sheet is how your pages will be inserted and bound into your book as a unit.

There are just a few exceptions to this rule. Board books, spiral bound books, and wire bound books use different binding methods, so they simply require your page count to be a multiple of two.
Freshly updated customer reviews from TrustPilot
Manufacturing Printing Plates
How are printing plates made?
After Imposition, each parent-sheet-sized art file is split out into 4 separate files, one for each color of ink: Cyan, Magenta, Yellow, and Black (CMYK). From there, each separated file is laser-engraved onto its own plate to be installed into the printing press.
These thin metal plates are sturdy enough to be used for many thousands of impressions, yet also flexible enough to wrap around a rotating cylinder inside the printing press:

Don’t be fooled by the color: the coating on printing plates is blue, but this has no bearing on the color of ink the plate will apply.
In the past, many printers used a photographic process to create printing plates, but these days most modern print shops use large Computer-To-Plate (CTP) machines like the one pictured here:

First, a coated thermal plate is inserted into the CTP image setter (large compartment to the right in the photo above), where lasers are used to output the image by heating areas of the plate to different degrees depending on how much ink each area should collect. The plate rolls out of the laser compartment and moves through a special cleaning solution that washes away the heated parts of the coating, leaving a negative of the image.
Watch how your plate is rinsed to reveal your images.
Remember, each parent sheet actually needs 4 plates, one for each color of ink to be applied. Below are 4 used printing plates that were just uninstalled from the press after being used to print a full-color parent sheet. It can be tricky to see which colors of ink are which due to the underlying blue color of the plates, but from left to right you can see the Yellow, Magenta, Cyan, and Black plates used on this job.

Freshly updated customer reviews from TrustPilot
Press
What is a press run, and what does it entail?
Prepress is finally complete. Proofs have been approved, imposition and pagination have been done, and the printing plates have been manufactured. Now it’s time for the next step: the press run. Here, sheets of paper are fed through the press while the plates transfer ink from the rollers to rubber cylinders, and then to the paper itself. This two-step process is why this printing process is called “offset.”
Most offset printing presses function similarly, but the quality of the final product depends on a number of factors – perhaps most importantly, a certified team of press operators and quality control specialists. That’s why we make sure you’re aware of the quality assurance steps our vendors take: there are many quality control checkpoints throughout the entire process from file and production prepress to printing and binding. Perhaps the most vital is checking parent sheets as they’re coming off of the press. Press operators will randomly cross-reference printed sheets with a previously printed proof to confirm color accuracy, making sure that quality stays high throughout the entire print run and that the colors and registration aren’t drifting away from where they need to be as the run progresses.
Press Run Chapters:


Freshly updated customer reviews from TrustPilot
Ink
How is printing ink used?

Now that we’ve covered paper, the other main ingredient we need for the offset printing process is ink! Most full-color offset printing uses 4 colors of ink (cyan, magenta, yellow, and black), applied separately via 4 separate printing plates, to produce millions of colors. This ink makes its way down from the ink reservoir (known as a fountain) onto the printing plate, then onto the rubber blanket, and finally onto the paper itself. The photo below shows four ink fountains on a 4 color press machine.

Ink Fountain
If you look down at an offset press from above, you’ll see four ink fountains: one for each color of ink. Each of these fountains sits at the top of an assembly containing a cylinder that will hold the printing plate and one that will hold the rubber blanket.
Water Solution
Each fountain also has a reservoir of a water-based liquid known as fountain solution. This water solution is rolled onto the printing plate to repel the ink from the areas that will become white space on paper.
Roller
The roller distributes ink onto the plate in an even, controlled manner, creating consistent ink coverage for the entire plate.
Freshly updated customer reviews from TrustPilot
Paper and Cardstock
The whole printing process begins with paper. Paper comes in a variety of weights and finishes, and every printing company offers different options depending on their paper suppliers and presses. You’ll find the widest variety of paper options when working with offset printers because operators are able to calibrate the press based on thickness and coatings. On the other hand, digital printers used for print-on-demand have a limited amount of paper options.
Parent Sheet Size
Parent sheets are large pre-cut pieces of paper, typically designed to fit 4-16 pages of a project on each side or 55 poker cards. They come in many weights and are often pre-coated with gloss or matte.
One of the major factors in the cost of a printing project is how many parent sheets will be used, which is why certain standard sizes (8.5″x11″, 6″x9″, 9″x12″) and page counts (multiples of 16) are usually the most cost-effective choices since they can maximize the parent sheets used.

Paper Weight
Paper weight refers to a particular thickness of paper stock. There are many different weight classifications, including text, cover, index, bond, bristol and more, as well as the metric system classification of grams per square meter. When comparing within a specific classification of paper, a lighter weight indicates a thinner paper.


Make sure to include both weight and classification when comparing paper stocks, especially when comparing quotes from different countries. For example, many US printers may give you a quote for “80lb cover” which is much heavier than “80lb text”. If you’re not sure where to begin, you can always use our industry standards pages to help with your decision.
Card Stock
The GSM (grams per square meter) measurement mentioned in the paper weight section above, applies often to playing cardstock. The higher the number (300gsm, 310gsm, 330gsm, 350gsm) the thicker the card stock. When selecting a paper weight for your playing cards you need to also consider the core, the material placed in-between the two pieces of paper that make up your card (i.e. 300gsm Blue Core, 330gsm Black Core).
 What Does a Card Core Do?
The job of the core is to make your card less transparent and more durable. From lowest quality to highest the cores range from coreless, grey, white, blue, and black. Many card printers use different terms to explain the cores, so be wary of the name and request a sample when possible. You can determine a cards core by ripping the card in half, the core color should be visible.
Selecting a Card Core
Most often board game creators will select a coreless cardstock since their cards will not be handled frequently. On the other hand, our card game creators lean towards blue and black core since their games revolve around cards, which are often held in players hands the entire game.
Paper Coating
Coating is applied during the paper manufacturing process. Coating affects the way that inks are absorbed by the paper, making halftone dots and text stay sharp. Any paper weight can have a coating, and which coating to choose is largely a creative decision. Here are the three most popular options:


Freshly updated customer reviews from TrustPilot
Press Setup
How is an offset printing press setup?
PrintNinja’s custom printing includes a detailed setup to achieve the best results in creating your book, calendar, comic or other product. For your general knowledge and convenience, each step in printing your custom project is detailed below.
Cleaning the Press
First things first, the press must be cleaned from its last use. All printing plates must be uninstalled, and all cylinders, fountains and rollers are cleaned to ensure the next parent sheet has a fresh setup. It is important these three pieces are clean so the alignment is not thrown off by dirt.

Installing the Plates
Four plates are clamped onto cylinders inside the press. One plate is used for each color: cyan, magenta, yellow and black (CMYK). Each time a new parent sheet needs printing, four new plates must be mounted into the press. The cost and time involved in these installations is what makes offset printing impractical for small runs.
Calibrating the Press
The press operator adjusts the press’ output using calibration software. The press operator will adjust the color control using levels, curves and other tools to produce the right color density. Paper thickness and coating are calculated in the software, with the absorption of ink taken into account.
The press runs at a slow speed so the initial sheets can be carefully checked for alignment and color against the press operator’s proof. The operator can then make adjustments to the press as needed. Once there is a proper amount of ink density on the paper, the press speed is increased to full production.

Ready to get started?
PrintNinja can print books, playing cards, board games, calendars, puzzles, and more. Whether you’re ready to print or just starting to budget your project, it’s always a great time to check out our instant price calculator. You can even lock in your price for 90 days!
See Project TypesFreshly updated customer reviews from TrustPilot
Press Check
What is a press check?
Most offset printing presses function similarly, but the quality of the final product depends on a number of factors – perhaps most importantly, a certified team of press operators and quality control specialists. Most printing facilities will have a Quality Assurance department responsible for inspecting all printed parent sheets during the press run, monitoring the final product for defects, and flagging any issues early on in order to deter waste.
On-Site Press Check

There are many quality control checkpoints throughout the entire process from file and production prepress to printing and binding. Perhaps the most vital is checking parent sheets as they’re coming off of the press.


Press operators will randomly cross reference printed sheets with a previously printed proof to confirm color accuracy, making sure that quality stays high throughout the entire print run and that the colors and registration aren’t drifting away from where they need to be as the run progresses.
Game Quality Control
Printed game pieces (game boards, cards, tokens etc.) follow the same quality control measures as books from prepress to pulling printed sheets off the press.
Card game assembly has a few extra steps to ensure consistency. Operators will insert blank pages in-between the full printed card game sheets. When blank cards appear, this signals to operators that the deck they are assembling is ending and a new deck is starting. Each deck once assembled in their packaging is then weighted to make sure a card is not missing or vice versa there’s no extra card.
Game pieces we use have passed safety tests. However, if you need paperwork to present to a retailer or distributor that proves your game is safe to sell then you’ll have to re-run the safety test on your specific game as a whole.
Freshly updated customer reviews from TrustPilot
Printing
What happens in the printing process?
We’ve met all of the pieces: the plates, the paper, the ink, and the cylinders. The press has been cleaned and calibrated, and the plates have been installed. Now it’s time to see a four-color sheet-fed offset press in action printing 8 pages of a real project! Each parent sheet zips through and is printed with 4 colors of ink all in a row, coming out the other end fully printed.
As you can see, this part of the printing process happens very quickly – but don’t worry, quality assurance is still in place during this step. Most printing facilities will have a Quality Assurance department responsible for inspecting all printed parent sheets during the press run, monitoring the final product for defects, and flagging any issues early on in order to deter waste. The quality control team follows the standards set by the printing facility, who ultimately decides the quality the product is required to meet. These quality assurance experts will sign off on color, bindery, and press runs by testing your product at random, during different steps of the process.
Watch parent sheets go from blank to fully printed in a matter of seconds in the video below:
Freshly updated customer reviews from TrustPilot
Cylinders
What are the cylinders used in the printing process and how do they work?

If you look inside the four compartments of the press that hold the ink fountains you will see something similar to the diagram at the right. Each of those four assemblies is made up of many moving cylinders, which are intrinsic to the offset, or lithographic, printing process.
Plate Cylinder
The printing plate – embedded with your file images – is wrapped around the plate cylinder and rotates while water and ink are distributed onto it’s surface. The plate transfers ink to the rubber blanket, which is wrapped around the offset cylinder.
Rubber Blanket / Offset Cylinder
The offset cylinder is home to the rubber blanket that receives ink from the plate above. This cylinder rotates until the rubber blanket makes contact with a parent sheet moving along the conveyor belt, transferring the ink onto it.
Impression Cylinder
The impression cylinder sits directly underneath the rubber blanket
and applies pressure to the paper – moving inbetween both cylinders –
at the same time as the paper is absorbing ink from the blanket.

Inside the Press
This is the inside of one press compartment. The top cylinder is the plate that has already been rolled with water and ink from above. The plate rotates and transfers ink to the rubber blanket, the blue cylinder. The final cylinder, impression cylinder, on the bottom applies pressure to the paper as it passes under the blanket.
Freshly updated customer reviews from TrustPilot
Post-Press
Post-press is everything that takes place after your pages have been printed on parent sheets – and it ends up that “everything” is quite a bit! Books are folded, cut, and bound into your final project before they are ready to be shipped to your front doorstep. For the pre-press of board and card games, cards get trimmed, smoothed, and rounded. Game boxes are printed and constructed, and then all the components are assembled and packaged to create your final product. That’s a lot of things that happen when the printing process is done!
The following articles will teach you more about just what happens in post-press. You’ll learn about folding signiatures, collation sorting, and cover paper finishing. You’ll also learn about on-site quality assurance, book drying methods, and card game production. Read on to become a post-press pro! Of course, if you have any more questions about the post-press process, feel free to contact us: we’re always happy to take questions about what happens after the pre-press and press stages of your printed project’s life but before you recieve your final product.
Post-Press Chapters:


Freshly updated customer reviews from TrustPilot
Folding Signatures
This article will teach you about folding signatures and how they are involved in the offset printing process.
Once the printing is complete, the stacks of fully-printed and dried parent sheets are taken to be folded by the folding machine. Each parent sheet zooms through the machine one at a time entering into gates that are set to the proper fold size. A final fold is applied by a heavy arm – this is called the knife fold – which applies immense pressure on the fold line. The final project rolls out of the machine as a “signature.” The majority of projects are folded by these machines, although extremely large projects or those with unique requirements may occasionally be required to be folded by hand.
Watch parent sheets fly through a folding machine and finish as a signature:
Signatures
The folded groups of pages that emerge from the folding machine are called signatures. Most projects have signatures of 16 pages (8 pages on each side of the parent sheet), but projects 6″ x 9″ or smaller may have signatures of 32 pages, and projects larger than 9″ x 12″ may only have 8 pages per signature.

Freshly updated customer reviews from TrustPilot
Collation/Sorting
The collation process starts with parent sheets being folded into signatures.
Parent sheets are large pre-cut pieces of paper, typically designed to fit 4-16 pages of a project on each side or 55 poker cards. They come in many weights and are often pre-coated with gloss or matte.One of the major factors in the cost of a printing project is how many parent sheets will be used, which is why certain standard sizes (8.5″x11″, 6″x9″, 9″x12″) and page counts (multiples of 16) are usually the most cost-effective choices since they can maximize the parent sheets used.
Once the printing is complete, the stacks of fully-printed and dried parent sheets are taken to be folded by the folding machine. Each parent sheet zooms through the machine one at a time entering into gates that are set to the proper fold size. A final fold is applied by a heavy arm, called the knife fold, that applies pressure on the fold line. The final project rolls out of the machine as a signature. The majority of projects are folded by these machines, although extremely large projects or those with unique requirements may occasionally be folded by hand.
Finally, the stacks of signatures are taken to the collation machine, which collates the separate signatures into their proper page order. The resulting new stacks of ordered signatures are now called book blocks.
Watch the Collation machine stack signatures in page order to make book blocks.
Collation machines like the one pictured below are large enough to handle books with many hundreds of pages, but books with only two or three signatures can also be collated by hand.

Freshly updated customer reviews from TrustPilot
Finish
This article will explain how finish is applied to your cover paper.
The printing process is almost complete. Your book block is now finally ready to be bound, but before binding can happen, the parent sheet that will become your cover needs to have a finish applied to protect it. Finishes can be gloss (high-shine) or matte (low-shine), and come in two distinct types: varnish and lamination.
A varnish is a liquid finish applied on the printing press to your cover paper following the same process as if it were an ink. The varnish style usually matches the coating of your paper (gloss or matte) and protects the ink on your cover. If you choose matte varnish, you can add spot UV to make select parts of your cover matte.
Lamination is the most protective card finish. Lamination is a thin polypropylene film that is applied after the printing process is complete. As seen in the video at the bottom of this page, a lamination machine glues a roll of film onto the printed parent sheet to produce the desired effect.
On rare occasion, you may opt to skip the cover finish. This provides a raw look and feel, but it’s important to note that it provides no protection, leaving your cover more susceptible to damage. If you want a matte finish, we recommend adding a matte varnish instead of opting to skip the cover finish.
Watch a matte lamination finish being applied to cover paper
Freshly updated customer reviews from TrustPilot
Binding Process
This article includes links that will teach you more about the binding process and the difference in binding styles.
The pieces are all in place. The body pages are folded into a book block, and the cover page has had its specialty finish applied. At this point in your project’s lifespan, we’re finally ready to enter the binding process.
Depending on which binding method you have chosen, binding can be as simple as adding a couple of staples, or it can be a complex process involving sewing machines, gluing machines, hardcover cases, and more. There are three popular binding methods: saddle-stitched (stapled), perfect (softcover), or casebound (hardcover). Each of these methods has it’s own pros and cons. Read on to learn the difference in process between each binding method – the more you know about each one, the better you’ll be able to determine which one is right for your printing project with PrintNinja.


There are also other methods of binding such as spiral binding, wire binding, and a special process for board books. For more information on these less common binding types visit our advanced concepts section.
Freshly updated customer reviews from TrustPilot
Saddle-Stitched Binding
This article will teach you about the saddle-stitch binding process and how it impacts your printed project.
Saddle stitching is definitely the simplest form of binding: two staples are inserted into the spine, holding all of the pages together. It’s a much more straighforward process than hardcover/casebound or perfect-bound/softcover book binding!
As the first step in the process, the cover and book block are collated, with signatures placed one inside the other. Most saddle-stitched projects contain 3 or fewer signatures so that there aren’t more pages than the staples can handle – this is why saddle-stitching is an especially popular binding method for comic books: they have fewer pages than, say, a novel.
Next, the collated pages are put through a stitching machine for stapling. The pages are draped across either side of a “saddle” – hence “saddle-stitched” – belt that runs along the entire machine, and the V-shaped belt helps align all the pages at the central fold for a symmetirc binding. The project then moves down the line and staples are inserted at the crease.
Finally, the stapled project is trimmed down to its final size in a guillotine, leaving you with a great looking saddle-stitched project.

Freshly updated customer reviews from TrustPilot
Perfect (Softcover) Binding
The perfect binding process, commonly referred to as softcover binding, results in a book with a glued binding and a squared-off spine.
Smyth Sewing
PrintNinja’s perfect binding process, the collated signatures of the book block are sewn together using the smyth sewing technique. Smyth sewing uses thread to first sew through the folds of each signature and then sew the entire group of signatures (book block) together, resulting in a durable binding that can be opened relatively wide – a great option if you have any pages with continuous spreads.
Note
Traditional perfect binding involves cutting the signatures off at the fold instead of sewing them, resulting in a much less durable binding, with much more content lost in the gutter between pages
Gluing

Next, a tech will place the sewn book block into a clamp that tightly holds the body together while it moves through the binding process. First, glue is applied to the spine and run through a heating process, after which the cover is wrapped around the book block.
Trimming
Finally, the bound books are trimmed down to size using a special cutting machine that trims all 3 edges in the same process.
Watch a short clip of softcover books being trimmed
Freshly updated customer reviews from TrustPilot
Casebound (Hardcover) Binding
This article will teach you about the hardcover and casebound binding project.
Casebinding, commonly referred to as hardcover binding, involves the construction of an exterior case made of cardboard wrapped with paper. Casebinding is a more complicated process compared to other typical types of binding, but your book is safe in PrintNinja’s expert hands.
Case Construction
The first step in casebinding is the construction of the hardcover, also known as the case. First, sheets of cardboard are cut to their proper size to form the rigid skeleton of the cover. From there, printed and finished cover sheets are fed into one end of a case manufacturing machine, while the pre-cut cardboard is fed into the other, and the two are combined through several gluing and folding operations into the final case.
Smyth Sewing
Next, the collated signatures of the book block are sewn together using the smyth sewing technique. Smyth sewing uses thread to first sew through the folds of each signature and then sew the entire group of signatures, (also known as the book block) together, resulting in a durable binding that can be opened very wide.
Trimming
Next, the sewn book blocks are trimmed down to size. With some softcover books, this happens after the cover is applied, but because the hardcover case is larger than the book block, in casebinding the trimming step happens before the book block is glued into the case.
Gluing
Finally, the finished book blocks and cases are placed into a hardcover binding machine where they are glued together into a completed casebound book. First, the sewn book block has glue applied to its spine, and a piece of fabric (called the super) is placed on top of the glue. Farther down the line, the hardcover case is wrapped around the book block. At this point, books with 60 pages or more will also have endsheets added to hold the entire book together.
Ready to get started?
PrintNinja’s hardcover book calculator makes it easy to take the next step in creating your hardcover book. Our calculator is pre-populated with popular options, but you can customize just about anything. You can also save your quote for 90 days, so it’s no problem if you’re not quite ready to print yet.
Get Your PriceFreshly updated customer reviews from TrustPilot
Quality Assurance

Most printing facilities will have a Quality Assurance department responsible for inspecting all printed parent sheets during the press run, monitoring the final product for defects, and flagging any issues early on in order to deter waste.
Book Quality Control
The quality control team follows the standards set by the printing facility, who ultimately decides the quality the product is required to meet. These quality assurance experts will sign off on color, bindery, and press runs by testing your product at random, during different steps of the process.
Game Quality Control
Printed game pieces (game boards, cards, tokens etc.) follow the same quality control measures as books from prepress to pulling printed sheets off the press.
Card game assembly has a few extra steps to ensure consistency. Operators will insert blank pages in-between the full printed card game sheets. When blank cards appear, this signals to operators that the deck they are assembling is ending and a new deck is starting. Each deck once assembled in their packaging is then weighted to make sure a card is not missing or vice versa there’s no extra card.
Game pieces we use have passed safety tests. However, if you need paperwork to present to a retailer or distributor that proves your game is safe to sell then you’ll have to re-run the safety test on your specific game as a whole.
Drying
This article will teach you more about the final step in the process of printing your book: the drying.
The final step in the offset printing process is to dry out your bound books. As you see below, all printed books are compactly stacked on top of each other using that pressure to halt pages from warping. This step is especially crucial for hard cover books; due to the moisture added in gluing and lamination, these covers are prone to curving if there’s no pressure to keep them flat while they dry. Book drying may seem like a boring part of the process as opposed to, say, hot foil stamping, but it’s actually a very crucial part of making your book or other printed project both look great and stay durable.
Many printers will have a designated drying room with controlled temperature and humidity settings to ensure consistency in drying. This insures that if you have multiple runs of books, they’ll be consistent in appearance and durability.
With book drying and the end of your printing process comes exciting news – after your project is done drying, it’s time to think about shipping, storage, and fulfillment of your project!

Freshly updated customer reviews from TrustPilot
Card Game Production
This article will teach you about the process of card game production.
Once both the cards and tuck boxes have been printed onto parent sheets, they are ready to be cut, assembled, and packaged together.
Trimming Cards
The playing card parent sheets are fed one at a time through a calibrated trimming machine. As the sheet makes each turn, blades cut out strips of cards until each card is cut out and stacked in a deck.
Die Cutting Boxes
A tuck box’s unique shape requires the die-cut method to extract the box and it’s unique flaps from the parent sheet. Die-cutting requires an operator to form blades to the box’s shape and use heavy pressure to cut out the design, as seen in the video below.
Smoothing and Rounding Cards
The trimming machine leaves rough edges around the perimeter of the cards and square corners. To shape them, an operator pushes stacks of cards through a “smooth edge machine” installed with the appropriate die size. The pressure of the cards being pushed through the dies leaves the edges smooth and rounds the corners at the same time. Most playing cards have rounded corners to prevent the corners from being damaged; however, some creators do request square corners.

Adding Linen Texture Finish
Linen texture is a specialty finish that adds a tactile crosshair texture. Bicycle branded playing cards are known to have this linen finish. The texture is applied after your cards are printed on a parent sheet and before they are cut to size.
The printed sheet is forced under a heavy metal roller with the crosshair pattern. The weight of the cylinder applies it’s marks to the printed paper. These sheets are then trimmed to size and put through the rounded corner machine.

Assembling Cards into Tuck Boxes
When all the pieces are printed and cut, all that’s left is to assemble them together. Cards are organized on parent sheets in the order that they are to be assembled into each box, so collation is taking place at the same time they are being trimmed.
The cards arrive at the assembly line in crates with each deck completed and separated. Tuck boxes are folded to form and have a glue dot applied to the bottom flap for extra durability. Cards are then placed inside and sealed.
Shrink-wrapping Final Product

Most card games will be shrink wrapped for added protection from theft and dirt. This is a necessary step if you plan to sell your game to retailers, who require your games to be delivered in shrink wrap and sometimes even with hang tags applied.
A shrink wrap machine works in three steps:
- The operator wraps the box in plastic shrink film.
- The film is sealed by a heavy clamp on the machine, with a straight seam line.
- The machine applies heat to the film that release the cold air out of tiny holes, causing the film to shrink to the shape of the box.
Freshly updated customer reviews from TrustPilot
Logistics
This article explains some of the complex process of international shipping logistics.
International trade can be an incredibly complex endeavor. Not only do you have to arrange to get goods from one country to another via some combination of ocean, air, truck, and rail, you’ve got to be familiar with all of the trade regulations and laws that affect commerce between the two (or more) countries in question. You’ve also got to be able to communicate with your counterparties in the other country, doing business across language barriers which may range from mildly confusing to impenetrable. Finally, participants in international trade don’t benefit from many of the legal protections that domestic consumers take for granted, leaving the buyer exposed to potentially catastrophic loss if something goes wrong, even if it’s not their fault. But, when you print with PrintNinja, you can rest assured that we’re taking care of all the logistics for you, from the factory to your front door. We communicate daily with our team in China, so you can feel confident that your printing project is being treated with the utmost respect.
International Shipping Logistics Chapters:


Freshly updated customer reviews from TrustPilot
Air Shipping
Air shipping is the fastest mode of transportation available, but that speed comes with a hefty price tag.
Shipments that are sent from China to the US via air typically take approximately one week to arrive, much less time than ocean shipping, which takes approximately six weeks to get finished goods from the factory to your door. For an additional charge, air shipping time can often be cut down even further and a guaranteed delivery date can be hit, which is never the case with ocean shipments.

Air shipping is the most direct shipping pathway. Once the goods are finished, export documentation and paperwork are submitted, and the goods are delivered to the carrier’s warehouse. From there, they’re loaded onto a plane and flown to the airport closest to their final destination, where they go through import customs. After clearance, they’re taken to the carrier’s local warehouse and dispatched via one of the carrier’s trucks for delivery.
Small air shipments (under 50kg) go through a much faster and simpler customs process, removing one potential obstacle in the logistics timeline. Larger shipments (over 50kg) have to go through a more extensive customs process, similar to ocean shipping.
PrintNinja offers partial expediting services, meaning you can send some small portion of your goods using expensive, fast air shipping, while the bulk of your order travels via more cost-effective, slower ocean shipping.
We also have a Premium Expedited option that can bring the 1-week expedited turnaround down to about 3 days. These shipments must be custom quoted and your timeline must be confirmed with your account manager before your order is placed.
Ocean Shipping
Ocean shipping is the most cost-effective way to get goods around the world, as goods are packed into standardized shipping containers and loaded onto mega-sized container ships. It can take a long time, and the delivery dates can’t be guaranteed, but the process is so efficient that thousands of pounds of goods can be moved tens of thousands of miles for relatively low cost. Let’s walk through the various steps involved in getting a typical ocean shipment from a foreign factory to your door:

Export Customs
Once your goods are finished, the exporter files paperwork and pays documentation fees to get them ready for export. Once this documentation is filed, the goods are trucked from the factory to a shipping warehouse for consolidation into a shipping container.
Shipping Containers
At the shipping warehouse, your goods are loaded into a shipping container. Shipping containers are gigantic steel boxes that are most commonly 8 feet tall, 8 feed wide, and either 40 or 20 feet long. Because these containers are so standardized, they can be loaded and unloaded very efficiently onto oceangoing container ships. Once the container is full, it is sealed and delivered to a bonded customs warehouse for export.

Ocean Liner
Next, the shipping container with your goods in it is loaded onto an ocean liner known as a container ship with thousands of other similar containers, and the ship makes the ocean journey from the country of export to the country of import, where the containers will be unloaded. Modern container ships are so gigantic that they can only dock at a handful of deepwater ports across the world that are equipped to handle their size, making the ports a very scarce resource. This has made labor relations very difficult at these ports, and slowdowns and strikes have happened every few years when union contracts have come up for renegotiation.
Import Customs
Once the container has been unloaded from the ocean liner, it goes through customs in the destination country. This is the most unpredictable stage of ocean transport, as containers are occasionally flagged for a random inspection, adding anywhere from a few days to a few weeks of delay depending on the type of inspection. Once customs have been cleared, the container is delivered to the ground shipping warehouse.
Ground Shipping
At the ground shipping warehouse, the contents of the shipping container are separated, labeled, and shipped out via truck to their final destinations. This is the first step of the process where reliable tracking information is available, as most ocean carriers do not provide the type of high-quality tracking information that many people are used to receiving from UPS, FedEx, or their domestic mail service.
Freshly updated customer reviews from TrustPilot
Customs, Duties, and Taxes
Read on to learn more about how PrintNinja works with customs policies.
The complexity of handling customs, duties, and taxes on any given international shipment depends on the laws and trade agreements in place between the exporting and importing countries. Countries with free trade agreements can make such transactions much simpler, while duties and tarriffs are often in place to intentionally make it harder for certain types of goods to be imported/exported economically.
Customs
Every country has an agency that handles customs and imports. In the United States it’s US Customs and Border Protection, and in China it’s the General Administration of Customs. These agencies are responsible for regulating all shipments into and out of their parent country, enforcing their countries’ trade laws and customs policies, and collecting all applicable duties and taxes.
Duties and Taxes
Duty fees are based on the contents of your shipment and any applicable duties in place on that type of product. Depending on the two countries in question, some goods may be imported duty-free, while others may be subject to steep fees. In some countries a VAT(Value-added Tax) or GST(Goods and Service Tax) is also assessed at various rates, depending on the product being imported.

Freshly updated customer reviews from TrustPilot
Storage and Fulfillment
Read this article to learn more about your storage and fulfillment options once your project with us is printed.
You’ve made it through order placement, production, and international logistics, and your project has finally arrived at your door. So, what to do with the pallets of books that just landed in your driveway?
Do It Yourself
Some folks like to handle everything themselves: warehousing, fulfillment, inventory, tracking and shipping for day-to-day orders, not to mention providing customer service via email or phone. There’s absolutely nothing wrong with going this route, but be sure not to underestimate just how much work DIY storage and fulfillment is, how much space it requires, and how much additional cost it adds.
Third Party Warehousing / Fulfillment
The other option is to use a third-party warehousing and fulfillment service. The most popular is Amazon, through their FBA (Fulfilled By Amazon) program. Please feel free to download the below “Amazon Fulfillment Process” PDF to get a step-by-step guide on printing with PrintNinja and fulfilling with Amazon.
Download Amazon Fulfillment Process Guide Here
There are also many independent warehousing and fulfillment companies (PrintNinja offers this service as well), which will store your books and ship them out on an as-needed basis.

Remember that many third party warehousing and fulfillment companies have huge economies of scale. Their warehouses are so advanced and their freight rates so low that in many cases you can actually save money by going with a third party service.

Freshly updated customer reviews from TrustPilot
Advanced Concepts
The links in this section will help you learn advanced concepts about offset printing.

PrePress
Learn about the difference between CMYK and RGB, color variance, and pantone/spot color.

Press
Learn about what manufacturing variance is and how it impacts your order.

Post-Press
Learn about board book binding, spiral/wire binding, and safety testing your project.

Specialty Features
Learn about all the specialty features we offer, like foil stamping and spot UV, embossing and debossing, and the cloth/PU leather process. Also learn about endsheets, the die cutting process, and newsprint.
- Endsheets
- Foil Stamping Process
- Spot UV Process
- Emboss/Deboss Process
- Die Cutting Process
- Cloth/PU Leather Process
- Newsprint

Distribution
Learn everything you need to know about getting your project out in the world, like ISBN/barcode requirements, copyright information, library placement, and pricing fluctuations.
After you’ve learned about all of these advanced concepts, you’ll be totally ready to understand the process of offset printing your project with PrintNinja. Have any other questions that aren’t addressed here? Feel free to contact us and our customer service team will be happy to help you.
Freshly updated customer reviews from TrustPilot
CMYK Printing vs RGB Advanced Explanation

So, what is CMYK printing?
Without a doubt the single biggest issue we run into here at PrintNinja arises from confusion about CMYK and RGB.
We address this briefly in our PrintNinja Printing Color Guide, but you’ve reached the advanced version so now it’s time to dig a little bit deeper into the physics behind these two methods of creating color, and explain why it can be so frustrating to try and convert between the two.

PrintNinja Tip
RGB creates colors by blending the three primary colors of light: Red, Green, and Blue. It is used by devices that generate light, such as computer monitors, TVs, or LCD screens.
RGB Color Profiles
RGB is known as an ‘additive’ color profile, because you add the primary colors of light together to create new colors:
Green and Blue light combine to make Cyan
Blue and Red light combine to make Magenta
Red and Green light combine to make Yellow
Red, Green, and Blue light combine to make White
RGB has a very wide color gamut, meaning it can produce many colors, because RGB is actually how our eyes perceive color. We have 3 different kinds of ‘cone’ cells located in our retinas, one each for perceiving Red, Green, and Blue light, and our brain combines the signals these cells receive and interprets them as color.
The key thing to remember about RGB color is that RGB can only be used by devices that generate light.
Printed items obviously don’t generate light, they can only reflect the light that hits them. Thus, they need to use a different color scheme, one based on reflecting light instead of producing it. This is where CMYK comes into play.

PrintNinja Tip
CMYK creates colors by blending four colors of ink: Cyan, Magenta, Yellow, and blacK (also known as Key). It is used to print in full color on items that reflect light but do not generate it, such as paper and fabric.
CMYK Color Profiles
CMYK is known as a ‘subtractive’ color profile, because each ink removes a primary color of light from any white light that hits it:
Cyan ink reflects Green and Blue light, but not Red
Magenta ink reflects Blue and Red light, but not Green
Yellow ink reflects Red and Green light, but not Blue
This gives us a backwards way to reflect the three primary colors of light via subtraction:
Cyan and Magenta ink combine to only reflect Blue light
Magenta and Yellow ink combine to only reflect Red light
Yellow and Cyan ink combine to only reflect Green light
Starting with a white piece of paper, which reflects every color of light, we can use Cyan, Magenta, and Yellow inks to subtract specific colors of light to make a wide gamut of colors.
Theoretically, combining Cyan, Magenta, and Yellow ink makes black, but because inks are not perfectly aligned to our RGB vision, we also add blacK ink (Key), which reflects no light, to help provide darker tones and truer blacks.

Issue with Converting RGB to CMYK
Because the CMYK profile is forced to subtract light instead of generate it, it cannot produce anywhere near as wide a spectrum of colors as RGB. Especially vivid primary light colors such as pure Red, Green, and Blue will often appear muted or dulled upon conversion to CMYK.
The illustration to the left compares the gamut of colors achievable with several different RGB profiles vs. the much smaller gamut achievable with CMYK.
This is why many creators who work primarily on computers and tablets, and whose work is most often viewed on computers and tablets, (such as webcomics creators) are often disappointed when they see how their colors look after being converted from RGB to CMYK.
This is also why CMYK can be converted to RGB and reproduced fairly accurately on a computer screen (which is what is physically happening when you set your color mode to CMYK in your graphics program), but RGB cannot be converted to CMYK and reproduced accurately on the printed page (which is what happens when you open an RGB image and hit “print” on your computer).

How to Stay in the CMYK Gamut
If you are using Photoshop or InDesign look out for the ‘out-of-gamut’ warning icon (triangle with exclamation point) that pops up in your color picker tool. This tells you that the selected color will not print accurately using CMYK production, offset printing.
Sometimes the program will suggest the closest color within the gamut. Otherwise, for best offset printing results check out this illustrated guide of CMYK values. If you must use the out-of-gamut color, then we suggest printing it as a Pantone color.
How to Work with RGB and CMYK Profiles
Now that you know the differences between CMYK and RGB, the question arises: what is the best way to work?
The answer largely depends on your primary medium. If you’re creating work solely for print, like a flyer or printed program, you’re probably best starting in CMYK and staying there, since your work will never be viewed on a computer screen by anyone but you.
However, if you work in a medium that is primarily digital (like webcomics), working in CMYK to begin with will really limit the colors you have at your disposal, which for most creators is overly restricting.
In many cases, the best strategy is to work in RGB, then before printing, convert your files to CMYK and make adjustments from there to any colors that have shifted in undesirable ways.
Check out PrintNinja’s guide to converting your colors from RGB to CMYK.
Remember, you can’t physically achieve the exact look of your RGB colors using CMYK values, but if you get your colors looking the way you want them in CMYK mode, you’re going to have a much better idea of what your final printed product will actually look like.
Here’s a helpful guide of known CMYK values that produce vibrant results.
So that’s the long story! Remember, PrintNinja also has pre-press experts that review your files, so if you have more questions, you can always give us a call.
Freshly updated customer reviews from TrustPilot
Color Variance
This article is about color variance in the offset printing process.
Due to the complex nature of reproducing a full spectrum of colors by blending 4 colors of ink (Cyan, Magenta, Yellow, and Black), all 4-color printing is subject to some small degree of color variance. This means that specific colors may look slightly different from the beginning of a run to the end of the run, and differences become more pronouned between different runs.
4-color offset presses are able to reproduce colors far more consistently than digital or print-on-demand presses, but the blending of inks means that there will always be some variance. This variance is most noticeable between different runs of the same project, as in the photo below:

For individual colors that need to be exactly the same every time (e.g. a corporate logo), the color can be guaranteed by the use of a spot color ink. In this process, instead of using 4 separate colors of inks applied by 4 printing plates, the liquid ink is mixed separately until it exactly matches the desired color, after which it’s applied via a separate printing plate designed to apply only this single color. The specific color to be matched is most commonly specified using the Pantone Color Matching System.
Freshly updated customer reviews from TrustPilot
Pantone Spot Color
This article gives a detailed explanation Pantone spot color.
Sometimes, a specific color must be reproduced exactly the same every time it is printed (for example, a corporate logo). If that color were created through the standard application of 4 separate colors of ink (Cyan, Magenta, Yellow, and Black) during the 4-color printing process, it would exhibit very slight color variance between different print runs.
The only way to make sure a specific color looks exactly the same every time it is printed is to use what is known as a spot color. When using a spot color, the ink is pre-mixed to match the specified color, and is applied via its own printing plate. The most common way of specifying the exact color to be matched is by using the Pantone Color Matching System:

Because these colors can be made on their own without needing to consist of just Cyan, Magenta, Yellow, and Black, the color range of Pantone inks is far wider than the standard CMYK gamut, and it can include specialty inks such as metallic or fluorescent colors. Pantone colors are usually indicated by referring to their code: for example PMS 3245 is a bright, seafoam green.
Using spot colors always adds significant cost to an order, since they require prepress, printing plate manufacturing, press setup, and a press run for the extra color of ink to be applied. Metallic and specialty inks are also more expensive than standard 4 color process inks. However, when you need an exact color for branded materials like logos, or a specialty color that can’t be created by CMYK, they’re a great option.
Manufacturing Variance
Learn what manufacturing variance is and why it’s important to understand when printing your project with PrintNinja.
Sheet-fed offset printing quality can’t be beat, but as with any mechanical process, printing, trimming, and binding all exhibit miniscule variances (usually under 1mm) from piece to piece. This is why projects need bleed, for example, so that a cutting variance of 1mm won’t leave unsightly unprinted edges showing. While it’s impossible to avoid, we take all the steps we possible can to make sure your project ends up looking great. It’s also why we include a free overrun – if there are any manufacturing variances you deem too severe, you can discard tem and still be left with the same amount as your original run.
The most obvious and common manufacturing variances can be seen with specialty options such as embossing, debossing, hot foil stamping, and spot UV.
Watch the process of debossing a book cover:
It is difficult to get a spot UV, for example, placed exactly on top of your cover title without some pieces showing a millimeter of variance. It’s not extremely noticeable, but next time you are in your local bookstore take a close look at a few of the titles. Can you spot the variance?

Freshly updated customer reviews from TrustPilot
Board Book Binding
This article explains the process of board book binding.
Board books are books with pages that are each made of thick paperboard rather than thin paper stock. This binding is perfect for children’s books, since the paperboard makes the book durable enough to survive a lot of hands-on attention from small children, while the thick paperboard also makes it easy for little fingers to turn pages without assistance. Most board books also use rounded corners to prevent paper cuts.

The board book binding methodology is not actually technically “binding” at all. Each set of 2 pages is printed, cut, and then glued by hand to blank paperboard. From there, each set of 2 pages is glued together one at a time. Finally, The cover paper is wrapped and glued around the body. Board books traditionally use a laminated finished on all pages, to increase durability and protect them from the intense handling they usually receive when in use.
Because these books are assembled by hand 2 pages at a time, they do not follow the standard page count multiple of 4 rule. Instead your final page count can be an increment of 2.
Freshly updated customer reviews from TrustPilot
Wire and Spiral Binding
This article will teach you about the process of creating wire and spiral binding. Read on to expand your knowledge about this type of binding!

For the process of creating wire or spiral binding, the book block is first trimmed on all four sides. Then, holes are drilled along one side and the pages are secured by either a wire that is clamped through the holes or a spiral that is threaded through the holes.
Because projects using this type of binding do not have to be stapled or sewn through the fold, they do not follow the standard page count multiple of 4 rule. Instead your final page count can be an increment of 2. That is great news if you have a project that has a page count that isn’t a multiple of 4!
This type of binding is most often used for calendars, cookbooks, and activity/workbooks. For all of these types of projects, the wire and spiral binding makes it possible for them to lay flat when open against a surface like a desk, floor, or wall. If you’re printing a project like this, than wire binding might be the right type of binding for you.

Freshly updated customer reviews from TrustPilot
Safety Testing

Safety testing for books is a certification requirement that rises from the Consumer Product Safety Improvement Act of 2008. The act was intended to make sure that products sold in the US were free from harmful materials. PrintNinja offers safety testing services through third-party labs based in Hong Kong. We offer the service for books as well as for games.
Safety testing for books is most commonly required when your book or game is targeted to a young demographic, especially when connected with anticipated distribution through a book retailer. Our board book printing customers, for instance, often submit samples for testing.
Games – especially those targeted to children under 13 years of age – will likely require additional testing or certifications. Games often use small pieces – dice, small tokens, even custom miniatures – that present choking hazards to young children. If you want to market a game to children, you may need to test to additional US standards so that your game is considered safe. Without testing, games can only be labeled for ages 13 and up. (It’s clearly better to design with the tests in mind, because it’s very expensive to fail a test for a game piece that you have tooled up and purchase many thousands of before you get into testing!)
If you are targeting distribution in Europe for books or games, you may also want additional safety tests to verify that your game meets all CE marking requirements.
All of that said – we have never had a product fail a safety test. The likelihood that a printed book would fail a test is quite low. The materials that are used in printing today simply aren’t the kind of materials that are subject to contamination from lead, phtalates, or other dangerous compounds.
The attachment below is an example of the output of a safety testing for books request that we performed in 2017. The test was for a board book, and the output is representative of the output that satisfies insurance companies and distribution partners.
Sample pdf of toxicity testing results.
Freshly updated customer reviews from TrustPilot
Endsheets
Endsheets, or endleaves, of a book refer to the pages at the beginning and end of hardcover books. They are typically made of a thicker stock that fortifies hardcover books and adds durability. Endsheets are printed as a two-sheet spread. One side of the spread is glued down on the inside back and inside front cover of your book.The other half of the sheet becomes the first and last page of your book. These pages are typically printed with a solid color or a pattern, but can be a great place for information, like the maps found on the Tolkien series.


When Endsheets Aren’t Needed
Hardcover books under 60 pages don’t typically use traditional endsheets. Instead, the first and last inside pages are glued to the hardcover case and the first and last pages of your book are part of the book body.

Fabric and Endsheets
Hardcover books are also reinforced with fabric, known as the super. The super is glued to the spine during the binding process to strengthen the spine and prevent pages from tearing. In the image to the right you can see the fabric underneath the endsheet lining the spine for added strength.
Freshly updated customer reviews from TrustPilot
Foil Stamping Process
This article will teach you about the hot foil stamping process.

Hot foil stamping is the application of adding metallic material to a project using heat and pressure.
A key player in the foil stamping process is the hot foil machine. Hot foil machines are run manually by an operator who makes sure each project gets stamped correctly. The operator measures the project and places markers on the machine’s platform in a formation that allows the project to be slipped snugly inside. The formation also takes into account where the foil stamp needs to be placed. Once everything is set up, pieces are hand fed into the machine one by one until each piece has been stamped.
Foil stamping uses a heated metal die to transfer the metallic material; your digital art file is used to create this die, so all pieces will be stamped with the same shape.

Sequential Foil Numbering
Sequential foil uses a specific machine, as seen to the right. Instead of using a single die, these machines use a die with a rotating numbered head so that each piece gets its own unique number.
Hot foil stamping process in action
Freshly updated customer reviews from TrustPilot
Spot UV Process
This article explains the spot UV process.
Spot UV is a liquid varnish applied on top of the printed surface that creates a high-gloss shine. Sometimes called a spot gloss, spot UV can be placed on top of an image such as a logo or title to make it pop out against a matte or uncoated background. It’s a great specialty option to add on to your project and can really make your printed piece stand out from the crowd – the juxtaposition of matte and high gloss makes your project look luxe.
The spot UV varnish is applied using the same offset printing method as your printed pieces. A clean ink fountain in the printing press is filled with the spot UV varnish and a new plate with the spot gloss image is inserted. The printed parent sheets are run through the press and then exposed to ultraviolet light hardening the varnish. What results is a beautiful effect!

When spot UV is applied to a spot without any printing underneath, it is known as a ‘blind’ Spot UV. This is a super cool effect – we especially like using this specialty option on card and board game boxes.
Freshly updated customer reviews from TrustPilot
Emboss/Deboss Process
This article gives a detailed explanation of the emboss/deboss process.
Embossing is the raising of one section of a design above the rest, causing that area of the cover to stick out. Debossing is the lowering of one section of a design below the rest, creating a sunken-in look and feel. This feature adds texture and depth to projects and is often used in combination with other specialty options such as foil stamping.
For the first step of the emboss/deboss process, a custom die is created. The die is installed into a deboss/emboss machine, and markers are set up to ensure alignment. Once the markers are added the operator runs the press and the die is pressed into your project. The high pressure and heat cause the material to drop around or in the shape of the die – your design.
When it comes to hardcovers, debossing is used to create both effects. For example, if you wanted your title to be debossed, the machine would apply the pressure in the shape of your title. If you wanted your title to be embossed, the machine would place pressure everywhere except your title, effectively debossing everything that isn’t supposed to be embossed.
Watch the emboss/deboss process on a book’s title
Freshly updated customer reviews from TrustPilot
Die Cutting Process
The die cutting process is a way to create unique shapes in material. It’s often used artistically on covers to cut windows into a book or on interior pages to create flaps, pop-up structures or interesting shapes. Read on to learn more about the process.

A die, in simplest terms, is a set of steel blades forming the shape of your cut. The die cutting process starts with the creation of the die. Simple shapes like circles and squares are easy, but if your design needs a unique shape then a new die must be made, which can be costly – since our vendors may not have these unique shapes already in stock. Once the die is ready, it’s positioned on a wood block and installed into the press. The tech will measure out the placement of paper underneath the die and cut a few trial sheets to make sure the shape looks as it is supposed to and that there are no issues with the die. The die is then pressed into the material with heavy pressure making the cut.
Short video of a box being die cut
This video demostrates the die cutting process in action, showing you a box being die cut.
Freshly updated customer reviews from TrustPilot
Cloth/PU Leather
Read on to learn about how cloth/PU leather hardcover cases are manufactured and the restrictions of printing on them.
For a unique look and feel, it’s possible to make the hardcover case for a casebound book using cloth or leather instead of printed paper. It’s most common to use faux-leather polyurethane (PU) instead of actual leather, although some companies may offer real leather binding as well. If you want to keep things vegetarian-friendly, however, cloth/PU leather is a great option to choose.
These books are made the same way as standard casebound books, just using cloth or faux leather wrapped around grey board. Casebinding, commonly referred to as hardcover binding, involves the construction of an exterior case made of cardboard wrapped with paper – in this case, we would use cloth/PU leather in place of paper. Casebinding is a more complicated process compared to other typical types of binding like softcover or saddle-stitch, but your book is safe in PrintNinja’s expert hands.
It’s important to note that it’s not possible to print on cloth or faux leather with the offset press, so if you want an image or word on your cover, foil stamping is a good alternative.


Freshly updated customer reviews from TrustPilot
Newsprint
The creators of many projects that we work on want to mimic the feel of old-fashioned newsprint. Golden-age comics were made on newsprint, and it has an undeniably artsy quality with its imperfections and tendency to yellow over time.
To be as cost-effective as possible for newspapers (which are designed to be thrown away), it is very thin, low-quality paper with the tendency to oxidize and tear very easily. In fact, it’s so thin that you generally need to use a web press to print it, since the paper would be too thin to go through a sheet-fed press when cut into parent sheets. This means that it’s not possible to use newsprint for most runs of under 10,000 pieces. Plus, you might run into some unhappy customers when your project falls apart before your customer even gets to read it!
However, by using an uncoated paper stock and designing a bit of discoloration into your project, you can get all of the benefits of the newsprint look while keeping the durability and quality of a thicker sheet-fed paper stock, as in the below project:

Using this newspriting desing instead of actual newsprint is a great way to get a vintage feel without vintage durability.
Freshly updated customer reviews from TrustPilot
Do I Need An ISBN?
Do I need an ISBN? It’s a question that we get all the time. For most people, the answer is “definitely.” A single International Standard Book Number is $125 (at the time of this writing) and is an excellent investment in your publishing future.
Basically, an ISBN is not required for face-to-face sales, sales on your own website, distribution to crowdfunding backers, etc. It is, however, required by bookstores, Amazon, book distributors like Diamond, libraries, and so on. (Your friendly local comic book shop or local coffee shop might buy a few of your copies as a kind of community benefit.)
The ISBN (International Standard Book Number) is required for each version of your book: new editions, softcover and hardcover versions all need a unique identifier. The only place to purchase your own ISBN is www.isbn.org.
PrintNinja does not resell or provide ISBNs. We recommend that you only purchase ISBNs from the source above. The original purchaser of the ISBN becomes the “publisher” and that information is public. If you purchase an ISBN from a reseller, you will not be listed as the publisher on your self-published book!

Once you have an International Standard Book Number you can generate a free barcode online. You do not need to purchase the barcode separately. When designing your cover or dust jacket, you can put the barcode and International Standard Book Number wherever you want, so be sure to include them in your art when you submit your files. Just make sure it’s 300dpi (ideally a vector PDF file). Otherwise, it may appear too blurry to scan.
If you have a hardcover book, you can opt to put the ISBN on a dust jacket or on a sticker on the outside of shrink wrap. (We’ve done both.)
The same advice goes for board games and card games – if you think that you want to give online distribution a try, the $125 fee is a small price to pay.
Copyright and Trademarks
This article is about copyright and trademarks and how they impact the printing of your project.

Copyright
A copyright protects original works of authorship. Before you begin distributing your books, you will need to register for copyright protection. A copyright exists the moment your work is created. However, you need to register your copyright through the Library of Congress, who records your copyright claim and the date of its creation. This registration is public information and will hold up in the court of law.
Fan art is more complicated when it comes to copyright law. If your work falls into this category, be safe and make sure you understand the law.
Trademark
Trademarks protect items that define your artwork such as your title, words, phrases, symbols and logos on your book. Unlike a copyright, that exsists the moment art is created, a trademark must be applied for. Be aware that this can be a lengthy and expensive process, and that trademarks require continuous commercial use to keep in force.
Registered Trademark
The R symbol stands for a registrated trademark. As soon as you sumbit your application for a trademark you may use the TM symbol on your project. Only when your application has been approved, or registered, can you use the R symbol.
Freshly updated customer reviews from TrustPilot
Library Placement
A great way to get your book in front of consumers is through library placement, a market that’s not as easily accessible for indie authors as you may believe. Librarians do not have a reliable source for finding suitable self-published books for their library, so it’s up to you to prove your books are quality products that fit their collection.
Avoid reinforcing the self-publisher stereotype by dumping your books into the donation bin. First, you’re better than that! Second, those books do not get the treatment you want—they end up on a sale shelf when you want your book to be prominently displayed, front and center. Instead, find the appropriate person (typically in the Collection Development or Acquisitions Department) to contact, and ask about the proper steps to donate your project or pitch your book for order.
If you want your book to be ordered rather then donated, you will likely need a level of credibility attached to your name. The best way to do this is through reviews. Try to get trade publications, blogs or social media leaders talking about your book. Send established blogs your book for free in exchange for a published review. There are many routes you can take, so get creative!

It’s important to note that genre does make a difference. Writing a genre that has a lot of consumer demand, such as adult fiction, makes it easier for librarians to see the value in your project, whereas a Trading Spaces makeover book may appear outdated and will likely be dropped from the shelf. The more potential for circulation your book offers, the longer the shelf life it will recieve.
Before taking any of these steps, however, make sure a library placement program is right for your project. There may be better options available for you to get your book in the hands of consumers, so explore your options before committing to any one distribution or publicity strategy.
Freshly updated customer reviews from TrustPilot
Pricing Fluctuations
This article expains pricing fluctuations and how they will impact your project.
You may have noticed that quotes you recieve from printers almost always have expiration dates. Some printers won’t even quote your shipping until after your project has printed, leaving you with uncertainty about your total costs – which is not a good feeling! PrintNinja not only allows you to lock in your quote for 90 days. Not only that, but we also quote your shipping right up front so there are no surprises later – so you can rest easy knowing that what you see is what you get.
Pricing fluctuations are a result of the constantly-shifting nature of so many aspects of the printing business, not to mention the extra fluctuations that come with international commerce and logistics when printing overseas. Here are just a few of the factors that can change costs across the industry:
- Labor rates in China
- Material costs (such as paper and ink)
- Logistics costs (including ocean shipping rates, ground shipping rates, surcharges, and fuel costs)
- Currency fluctuations (which significantly alter the costs of importing and exporting on a regular basis)
Understanding these factors will help you understand your quote from PrintNinja.

Freshly updated customer reviews from TrustPilot
Glossary
B
Barcodes– Black and white bars that hold information about your project, including price.
Binding– The assembly of separate pages into a finished book or booklet by adhering the edges together by smyth sewing, gluing, or stapling.
Bleed– The area past the trim line used to conceal cutting variances for artwork that extends to the edge of the page.
Board Books– Special type of children’s book that uses thick paperboard.
C
Case Binding– Binding method for hardcover books, with a cover that is made out of a strong board material called a case.
CMYK– The four color values used in offset printing: cyan, magenta, yellow and black (also known as “key”).
Collation– The process of organizing pages together in number order to produce a book body.
Color Bar– A strip of colors printed in the trim area of a parent sheet that press operators use to verify color balance.
Color Variance– Slight differences in color between runs and within a run that is inherent in the offset printing process.
Copyright– A protection of your original work of authorship.
Computer-To-Plate (CTP)– Plate producing technology that uploads images to a software application that outputs images directly onto a printing plate using lasers.
D
Debossing– Using high pressure on paper to give a “sunken in” look in order to emphasize parts of a design with texture and depth.
Die Cutting– A specialty feature that creates unique shapes with steel blades that cut through paper.
Duties– Import fees charged based on the contents of your shipment, transportation mode, and destination.
E
Electronic Proof– File review by a pre-press expert who generates a PDF proof with printer’s marks.
Embossing– Raising parts of a sheet of paper with high pressure in order to emphasize parts of a design with texture and depth.
G
Gloss– A coating that adds a reflective shine to paper.
H
Hard Copy Proof– Printed pages of your project using the same materials as your final product to produce an example before printing.
Hot Foil Stamping/Sequential Foil Numbering– Specialty options that use heat to transfer metallic foil onto a printed sheet.
I
Image Setter– Compartment found in the computer-to-plate machine where laser beams bounce off mirrors onto the plate to output the image.
Imposition– A custom layout that fits as many pages as possible on a single parent sheet to decrease waste.
Impression Cylinder– A rotating cylinder in the press machine that applies pressure to paper as ink is being rolled onto the surface.
Ink Fountain– Fountains in the printing press that distribute ink onto a roller.
ISBN (International Standard Book Number)– A number pertaining to your book that distributors use to sell and track your product.
L
Lamination– A film applied to a printed sheet to protect the printed surface. Comes in two styles, gloss or matte.
Library Placement– Distribution technique where your books are circulated through libraries.
M
Manufacturing Variance– Very slight differences between copies within a print run: inherent in the offset printing process.
Matte– A coating that gives a dull shine to paper.
O
Offset Printing– High quality way to produce larger quantities of printed pieces cost-effectively.
P
Pagination– The process of arranging pages for a book.
Pantone Matching System– A universal color matching system that is categorized by numbers.
Paper Coating– A coating applied during paper manufacturing for appearance purposes such as gloss, matte, or uncoated.
Paper Finishes– Liquid applied after the printing process to provide protection for ink such as varnish, lamination or no finish.
Paper Weight– The thickness of paper stock.
Parent Sheets– Large pre-cut sheets of paper that are fed one at a time into a sheet-fed printing press.
Perfect Binding (softcover)– Binding method used for trade paperbacks and softcover books, results in books with a square spine.
Plates– A metal sheet installed into the press that indicates where ink will transfer onto paper.
Print-On-Demand (POD)– Digital printing methodology that prints books on an as-needed basis.
PrePress– Everything in the production of a print project that happens before the project goes to press (file review, proofing, imposition, plate manufacturing).
Printer’s Marks– Marks placed on your digital files or printed sheets that determine different elements such as trim, center, registration, color.
Printing Press– Machine that uses a series of plates that transfer ink onto sheets of paper.
Proofs– A proof is a presentation of your file’s quality either digitally or printed.
R
Registration– The process of precisely lining up CMYK colors so that their overlap produces one single color.
RGB– Color model where red, green, and blue light are used to create a variety of colors.
Rubber Blanket– Rubber sheet in the printing press that transfers ink to paper.
S
Saddle Stitching– Simplest binding method in which pages are folded and stapled together.
Sheet-Fed Printing Press– A printing press that uses pre-cut sheets of paper that are fed through the printing press one sheet at a time.
Signature– Folded parent sheets of eight, sixteen, or thirty-two pages.
Smyth Sewing– A sewing process that threads signatures together to create a book body by sewing through the fold of the signatures.
Spot Color– Special pre-mixed ink, often specified by use of a PMS (Pantone Matching System) color number.
Spot UV/Spot Gloss– A liquid varnish that can be applied to provide a high-gloss shine.
T
Trim Marks– Marks that show where pages will be trimmed.
Trimming– The cutting of the three sides of your book to remove registration marks and color bars, to give the book smooth edges, and to open folded pages.
U
Uncoated– Paper that does not have a matte or gloss coating and therefore feels raw and natural.
V
Varnish– A type of liquid finish applied to a printed sheet to protect the ink. Comes in two styles, gloss or matte.
W
Web Press Printing Machine– A printing press that use a roll of paper that is continuously fed through the press.
PrintNinja Process
Want to know what happens when you place an order with us? Check out all these links for information on how your project goes from dream to reality when you print with us. With information on our Satisfaction Pledge, how we determine the quote for your project, and how your project is packaged and shipped to you, you’ll understand the PrintNinja process works.
The PrintNinja Process


Still have more questions about the PrintNinja process? Feel free to reach out to us. Just give us a call or an email and one of our friendly customer service ninjas will answer all the questions you have. We can help you figure out how best to create your project, and answer any concerns about pricing or quoting that you might have.
Freshly updated customer reviews from TrustPilot
Satisfaction Pledge
At PrintNinja, we believe you should know exactly how we can ensure your happiness as a valued client – and that’s why we provide our PrintNinja guarantee.
Our Promise
When you place an order with us, the final result will be accurate to the specifications found in your quote and be constructed with the best possible methods using only the highest quality materials.
If anything on our end of the process does not match what you chose, we’ll make it right with a refund or reprint, with the exceptions outlined in the section below.
On projects where only a portion of the order is affected, such as damage during shipping, we reserve the right to offer a prorated refund or reprint reflective of the amount of copies damaged.
We trust you to bring us exactly what you want, and you can trust us to make it happen. That’s how our PrintNinja guarantee works.
Some Exceptions
Even the smallest, most straightforward printing job is made up of several unique elements that can’t all be considered equal when it comes to customer satisfaction. Because of this, there are a few exceptions to what we can guarantee.
Color Matching
Due to the variances inherent in the color offset printing process, we cannot guarantee the colors on your final project will match what you see on your monitor or your own test copies.
The way to get the best idea of how your colors will come out is a hardcopy proof, but even then projects will exhibit small color variances due to the nature of 4-color (full color CMYK) process printing.
We also kindly ask that all files be submitted in CMYK format. If not, RGB colors will be converted during the proofing process which will result in changes to the colors’ appearance.
Prepress Check Overrides
PrintNinja prides itself on our extensive series of prepress checks, which are designed to catch the vast majority of common technical (non-creative) printing issues.
You may send your project to press without fixing the issues PrintNinja has brought to your attention, but if you choose to do so then we cannot cover any problems that arise from those issues with our guarantee.
Delivery Dates
Due to fluctuations in weather, port conditions, and random customs inspections, we can never guarantee exact delivery dates for standard shipments. All turnaround times given are approximations.
For expedited shipments, we have a Premium Expedited option that can bring the 1-week expedited turnaround down to about 3 days. These shipments must be custom quoted and your timeline must be confirmed with your account manager before your order is placed.
Creative Decisions
Your project’s words and images, and how they’re organized and prepared for production, are a matter of your own creative decisions.
While our team of printing experts can work with you to resolve certain graphic and layout issues before printing, we honor the idea that the content and design you finally submit to us is exactly what you want to us to produce.
Because of this, our PrintNinja guarantee does not cover typos or any other content-related problems, and PrintNinja does not check for these issues in our prepress checks.
Freshly updated customer reviews from TrustPilot
Quoting Options
At PrintNinja we believe in providing no-nonsense quoting options, which is why we strive to make the process as automated and easy as possible without sacrificing communication. We have a few quoting options below that you can explore further to learn which is best for your project and how to request them. In fact, for many of our options, we provide unique calculators that can provide you with instant quotes. For extremely complex options, you can reach out to us and we’ll provide you a custom quote. No matter which of our quoting options you choose, a PrintNinja account representative (a.k.a. one of our friendly customer service ninjas) will reach out to provide personal assistance. Click on the photos below to learn more.
Quoting Options


Freshly updated customer reviews from TrustPilot
Still have questions about the quoting process? Feel free to reach out via phone or email and we will help you answer any questions you may have about our quoting options.
Calculator Quote
Our online instant quote calculator is the best way for you to get a quote for your project. Our PrintNinja IT team built this calculator in-house, which gives us the power to improve upon it constantly. We are always working on ways to add more specialty options and create a better user experience. It can handle all basic book options and a handful of specialty options. To get started you will find the “Calculate Price” button in the upper right hand corner of our website.

How To Use Our Calculator
Once on our calculator page you can fill in your project needs from top to bottom. There are 6 sections: binding, size, cover, inside pages, quantity, and proofing. When all 6 sections are filled in, this is the big moment, you may select the “Calculate” button at the bottom of the page. You will be directed back to the top where you will find your product cost in the right hand sidebar, as seen below. You can use the calculator as many times and for as many options as you would like, so don’t be timid.

We encourage you to play around and see how different options affect your price. Just remember, with great power comes great responsibility. Double check your specs and make sure you have an understanding of the material you’ve selected.
Shipping Calculation
Under the product price you will see a shipping price section. Currently the calculator can handle shipping cost for any packages sent to the United States and Canada*. Fill in your zip or postal code and select the “calculate shipping” button. If the final destination is in another country you can select the appropriate location from the dropdown menu to alert us that we need to provide you with a custom shipping quote.
*With the door-to-door calculated price to Canada, you will notice a 6% import fee, this includes all duties and taxes.

The “calculate shipping” button will unveil a standard and expedited shipping section, as seen above. If you want standard shipping then click the bubble before “Standard”. If you would like to see a price for expedited shipping then fill in the blank box with the number of books you would like expedited. Click “submit” and select the bubble to see the price added to your total, as seen below.

This is your grand total. You will also see a break down of cost showing how much of your grand total is shipping and in this case a 10% sales tax, since the order is being shipped to Illinois. Once you have a price you are happy with we suggest clicking the “Lock in this Price for 90 days” button. Due to price fluctuation it’s common that cost can shift on a monthly basis.
If you are raring to go you can select, “Place your order online now” and then celebrate!

Specialty Add-ons box
Adding Specialty Options
We have a handful of specialty options programed into the calculator, but there are many options whose cost depends on your order size. If you want to add a specialty option that is not visible on the calculator, you can do so by clicking on the “Lock in this Price for 90 days”, that will display a red box, as seen to the right. Fill in the “Specialty Add-ons” text box to your heart’s content!
No Clue What To Select?
If you are struggling to choose material, sizes, paper weights then click on the learn more links. They will provide unlimited information on each specific option. We also suggest visiting our Industry Standards page to view a list of sample material and sizes that you would find in your local book or comic store.
Sample Packs
Our last recommendation is to order one of our standard sample packs by visting our standard sample pack page. We also offer our deluxe sample pack if you have specific samples that you would like to see.
If An Option Isn’t Appearing
9 out of 10 times if an option isn’t appearing it’s because the combination you are selecting isn’t possible. For example, 10 pt. paper is not an interior option on the calculator unless you have spiral or wire binding selected. The calculator is wise, trust the calculator.
Ready to try for yourself?
Calculate QuoteFreshly updated customer reviews from TrustPilot
Game Quote
This article will teach you more about the game quote process.
PrintNinja characterizes games into two broad categories. “Card Games” and “Board Games.” If your game is cards and a box, you can instantly calculate the prices on our card game calculator. If your game is a classic “board game” with a board, play pieces, cards, instructions, a big box, and so on, please continue to our board game section for information about generating a budgetary quote.
PrintNinja Tip
It may take some time to get all of the pricing together (sometimes as long as a week or so for complex projects) but our ninjas will send it to you as soon as it's received.
Below is a walkthrough of specs that you’ll come across on the quote forms, it may help to consider these answers before using our request forms.
Basics
How many units would you like to order?
We require a minimum of 500 units for board game orders.
Where would you like these games shipped?
To provide you with an accurate quote we need, at least, the zip code of the final destination.
Would you like electronic or a hard copy proof?
We offer electronic and hard copy proofs for custom games. However, we do not create standalone prototypes of board games without a full production run.
Card Games

We can produce a variety of sizes. The most commonly used size is the poker card 2.5″ x 3.5″. We offer Poker, Tarot, Bridge, Euro and tons more, just ask!
PrintNinja Tip
If your game requires a unique size we may need to make a custom die, which can be expensive. If you are trying to be cost effective we recommend choosing a size that we currently offer.
How many cards do you need in a deck?
We can fit 55 poker sized cards on a parent sheet. If your game requires 65 cards then we will have to use another parent sheet, which increases price. It might be worth it to cut out 10 cards. However, don’t sacrifice playability for cost!
PrintNinja Tip
If you are trying to be cost-conscious the best way to save money is by matching the number of cards in your game to a multiple of the number of cards that fit on a single parent sheet.
What type of material would you like your cards to be made from?
280gsm blue core is our most commonly used option and is what you will commonly see in games on the shelf of your local game store. We also offer coreless 350gsm stock, plastic PVC cards, as well as an imported 330gsm black core stock that is primarily used for casino-quality cards.
What finish type and style would you like applied to your cards?
There are two types, varnish or lamination. Most cards have a varnish, but if you need your cards to be water resistant then lamination is your best bet. For additional protection, we also offer plastic PVC cards to make your game completely waterproof.
There are a few style choices, gloss, matte, and gloss or matte linen. Most cards you play with have a gloss style. Linen is a textured effect added after the finish is applied and is commonly found on playing cards.
Do you need packaging?
You probably need a box. We can determine the correct size but let us know if you want a tuck box, deck box or a two piece box. If you want your cards arranged specifically, such as 3 rows of 36 cards each, then let us know and we can create the right size packaging.
PrintNinja Tip
There is a 110 card limit for tuck boxes. If you have more cards you will need to request a deck box or two-piece box.
Color?
Let us know if you would like to print in full color CMYK or in black and white. Additionally, you can add on specialty options like metallic ink or spot (Pantone) colors!
Board Games

Typically table top games come with a board but we also offer rubber playing mats, paperboard tiles and other surfaces.
What size is your board or playing surface?
We can print boards of all sizes! The preferred unit of measurement is inches.
Do you need your board to fold?
We can create half-folds, quarter-folds etc. so that your packaging can be more compact.
What finish type and style would you like on your board?
The finish types are varnish or lamination, most games use a varnish. If you need a water resistant board then lamination is a better choice. Style options are gloss or matte, this is a creative choice, but most games use gloss.
PrintNinja Tip
Pieces

There are an infinite amount of components that can make up a board game. Here are a few common options we offer.
For most pieces we will need to know these four measurements:
How many of each piece do you need?
What size do you need your pieces to be?
What color pieces do you need?
We offer many stock colors including black, blue, green, red, white, yellow, and more! Standard color options vary based on the piece material.
PrintNinja Tip
If you need another color we can supply that but it will be more expensive than using colors we have in stock.
What material would you like your pieces made out of?
For most pieces we offer wood, plastic, or resin. We also offer marbles, stones, timers, spinners, markers, and more!
Keep in mind some pieces require additional information, like dice:
- Number of sides? 6, 12, 20 etc.
- Face type? Pips, numbered etc.
Instruction Booklet

What size do you need your booklet to be?
We can do multi-page booklets or a single front and back sheet of paper.
PrintNinja Tip
There are many creative ways to get around the instruction book. If your game requires cards many creators will add an extra card to their deck with printed instructions. If your order contains a two piece box you can print your instructions on your packaging.
How many pages do you need?
Just like printing a book the more pages you have the more expensive your project will be.
What size would you like your booklet?
Please make sure your size is able to fit inside your packaging.
What type of binding?
Saddle-stitching is the most common binding, but perfect, spiral/wire, and unbound accordion folding are available options as well.
What paperweight and finish do you need?
A lighter paperweight (55lb, 70lb) works great, but if your instructions will be handled often then we suggest a heavier weight (85lb, 105lb) for more durability.
What type and style of finish do you need?
The finish types are varnish or lamination, most instructions use a varnish. If you need a water resistant booklet then lamination is a better choice. Style options are gloss or matte, this is a creative choice.

Sample Pack Request
If you are unsure how to answer some of these questions then request a sample pack. Be specific when telling us what you are looking for so we can customize a package to answer your particular questions.
Ready to try for yourself?
Calculate Game QuoteFreshly updated customer reviews from TrustPilot
Custom Quote

For complex projects that cannot be quoted using our online calculator, we offer our custom quoting form. Before using this form, see if our online quote calculator can handle your project. The online calculator will provide you with a quicker – and often less expensive – quote.
Though ost requests and research can be handled on our online pricing calculators, PrintNinja is happy to provide a custom printing quote when our calculators can’t quite capture the intent or vision of the user. (It happens all the time!)
Maybe you want a book with gilded edges or a cloth cover. Maybe you need one book with a hardcover and a softcover of the same edition (split binding). We can help with all of those requests – PrintNinja is a full custom printer and we enjoy custom projects. It’s one of the things that sets us apart from other printers. All of the situations above will require conversations with our account managers. Those conversations help us understand exactly what you’re looking for and whether we can supply it.
If you don’t see what you’re looking for on our calculator then contact us through the custom price quote form. Consult our calculator page to make sure you are providing all the information we need.
Ready to try for yourself?
Most custom quotes take approximately 1 week for us to price.
Calculate Custom QuoteFreshly updated customer reviews from TrustPilot
Freight Forwarding Quote
For very large or heavy orders, PrintNinja can often decrease your shipping cost by using our network of third party freight forwarders.

How To Request A Freight Quote
You can request a freight quote through our online calculator. Once you input all the information for your project and calculate your shipping cost you will see an estimated shipping weight, as seen to the right. If the weight is higher than 2500 lbs the calculator will provide a freight forwarding option. If your weight is lower then 2500lbs, our standard or expedited shipping is perfect for your project.
PrintNinja Tip
Freight quotes take us approximately 1 week to price.
What’s The Difference?
Our ‘standard’ shipping option goes via an ocean shipping pathway provided by UPS. All of our standard orders come in to the USA through our port in California and then are split out and shipped to you via UPS Ground and UPS LTL services.
However, with heavier or larger orders (typically over 2 cubic meters in size or 2500lbs in weight), it can be much more cost-effective to use a company known as a freight forwarder that will choose the most efficient combination of ocean, truck, and rail to get your shipment directly to you from the factory in China.
Because the route taken will vary widely depending on the size of the order and the destination, all freight forwarding quotes must be custom quoted.
The Downsides:
- Freight forwarding typically takes an extra week to arrive compared to our standard shipping option.
- There are no tracking numbers available with a freight forwarding company as there are with UPS, FedEx, or DHL.
The Upsides:
- Make no mistake, once your order gets above 2 cubic meters in size, we can save you a lot of money by using our freight forwarding network. Almost all of our very large orders use this option.
See if your order weighs more than 2500 lbs.
When you configure your project on our calculator, you may see a warning on our shipping page indicating that your project requires a custom shipping quote. If so, you can still save your printing quote, but we will follow up about a custom quote for freight forwarding.
Get StartedFreshly updated customer reviews from TrustPilot
Turnaround Times

Prepress Time Detail
Proofing, production, and shipping are three separate processes. Once you have paid and uploaded your files and we receive them, you will get a digital proof the next business day before we close. Files sent after hours or over the weekend are received on the following business day. We will work with you until your proof is right; sometimes this takes several times back and forth. We recommend you budget a week to make sure your files are correct and ready for press, but this can vary based on your experience and ability to make fixes to your files. Once digital proofing is complete we will create any physical proofs or press hardcopy proof sheets you have ordered. (Book hardcopy proof sheets take two weeks to produce and ship, and game and board book hardcopy proof sheets take 3 weeks.) Once proofing is complete and you approve the proofs we proceed to production.
Production Time Detail
Production turnaround times start from the day you go to press, which is usually one to two days after you approve your final proof. Production varies based on project type, project complexity, binding type, and project size. The timeline estimates above are for modest sized orders (fewer than 2000 units) with average complexity. While we are usually well inside these timeline estimates, getting your book right is the main priority. If you have a large order, many specialty options, or a high page count please anticipate a longer production timeline.
Once your order is printed and bound our Quality Control staff inspect a random sampling of your order and confirm it matches your proofs. We then pack them and ship them according to the method or methods you have paid for.
Shipping Time Detail
Shipping is where you have control. We offer budget shipping via ocean container and that takes 6-8 weeks after your book is finished printing. We also offer expedited shipping via air freight that takes 7-10 days after production. You can ship via one or both of these methods, and our calculator (internal link to calculator home page) can give you an instant price for splitting your shipment in this way. These timelines are also estimates, and PrintNinja does not have control of customs, port strikes, ocean currents, and other rare occurrences that can extend your shipping time.
PrintNinja always recommends padding your timeline and ordering as early as you are able. While we will do all we can to meet a requested timeline, we cannot offer guarantees, and we never want to sacrifice the quality of your project. Our estimates are just that, estimates, and while the majority of our projects fall within those listed turnaround times, delays are possible when custom manufacturing your unique book or game.
Freshly updated customer reviews from TrustPilot
Upcoming Chinese Holiday Schedule
Chinese Holiday Schedule 2020
Ching Ming Festival – April 4th
Labour Day – May 1st
DragonBoat Festival – June 25th-26th
Mid-Autumn Festival – September 22nd-24th
National Day Holiday – October 1st-8th
Chinese New Year – Feb 11-17, 2021
Have any more questions about how Chinese Holidays affect printing turnarounds? Feel free to contact us.
Freshly updated customer reviews from TrustPilot
Placing an Order
Once you’re ready, there are two ways to place your order with PrintNinja:
- You can use the payment link from your quote PDF. If you can’t find your quote, you can always request another copy from your account rep.
- You can place your order directly through our pricing calculator by clicking the “Place Your Order Online Now” button.
If you’ve saved a quote with us, you can conveniently find a payment link on your quote underneath the grand total. Clicking that link will take you to a secure payment page that accepts most major credit cards or PayPal. Once you have submitted your payment you will receive a follow-up email with your receipt.
Payment and Placing Your Order
Prices shown on our quotes are in USD and include all taxes and duties for delivery to addresses in the USA. Orders delivered to other countries are subject to any applicable taxes and duties charged by the destination country.
PrintNinja accepts a variety of payment options:
- Visa
- Discover
- Mastercard
- American Express
- PayPal
Read more about our payment process here. If you still have questions about how to place your order, feel free to contact us. One of our friendly customer service ninjas will help you answer any questions you have about placing an order with PrintNinja.
Freshly updated customer reviews from TrustPilot
Payment Methods
This article will outline PrintNinja’s payment methods for you.
Congratulations! You are ready to place your order and make your dream a reality. Before we move on to prepress you need to submit a full payment. Once you submit payment, we guarantee your pricing won’t change (even shipping prices). Many other companies will change freight pricing on you in the middle of your order, but with PrintNinja you know up front exactly what your costs will be.
If you’ve saved a quote with us, you can conveniently find a payment link on your quote underneath the grand total. Clicking that link will take you to a secure payment page that accepts most major credit cards or PayPal. Once you have submitted your payment you will receive a follow-up email with your receipt.
If you received a custom quote from one of our account reps, this is what your payment link will look like:

If you received a quote via email by locking a quote in on our calculator, then your payment link will appear on the second page of your quote like this:

Prices shown on our quotes are in USD and include all taxes and duties for delivery to addresses in the USA. Orders delivered to other countries are subject to any applicable taxes and duties charged by the destination country.
PrintNinja accepts a variety of payment options:
- Visa
- Discover
- Mastercard
- American Express
- PayPal
Payment Processing Errors
If you’re receiving an error when trying to make payment, 99% of the time the error message is your bank denying the transaction. Typically it’s because your card has a daily spend limit that you are surpassing. You can clear this up by calling your bank or having your PrintNinja account rep split your payment so you can pay over multiple days. Still have questions about PrintNinja’s payment methods? Contact us and we will help you answer any questions.
Freshly updated customer reviews from TrustPilot
Artwork Upload Links
After your payment is made in full, the next step is to submit your files to us for prepress. You can find your artwork upload link on your quote PDF.
If you received a custom quote from one of our account reps, this is what your artwork link will look like:

If you received a quote via email by locking a quote in on our calculator, then your artwork link will appear on the second page of your quote like this:
The link will take you to our file upload system. You will see a confirmation message on your screen once your upload is complete. Do not exit out of your screen until you see the confirmation message.
Before You Upload
Please ensure that you have reviewed all your files to verify that they are print-ready, including reviewing PrintNinja’s artwork setup guides.
Please Note: Make sure your files are no larger than 400dpi, higher dpi files do not improve print quality. Our printing machines max out at 400dpi. Submitting a file with a higher dpi may delay your electronic proof as it takes longer for our prepress reps to download.
Once you upload your files, we will generate an electronic proof by the next business day for your review.
If you need to upload new files after reviewing your electronic proof, it may take us up to one additional business day to generate each successive proof.
Also, please remove spaces and special characters from your filenames, as this causes issues with our uploading system.
What You Can Upload
Our preferred format is PDF, but we can also accept a wide variety of other formats.
Got a Bunch of Files?
If you need to upload more than five files at once, you may want to combine them into a single ZIP file and upload that file instead. You can also upload your first five files, return to this page and repeat as needed.
Possible Errors
The number one error is uploading files that are too large (anything over 2GB). If this is the case, you can save your pages in chunks since we can accept multiple files at a time. Make sure to label your files appropriately such as, Cover.pdf, FirstHalf.pdf, SecondHalf.pdf. You can also use our alternative method below.
Alternative Uploading Methods
For larger files or other errors with uploading your file you may use an outside service like Dropbox and email the download link to customerservice@stage.printninja.com or to your account rep.
Freshly updated customer reviews from TrustPilot
Prepress
This article will help you learn more about the prepress process with PrintNinja.
You will be assigned a prepress guru who will provide you with an electronic proof approximately 1 business day after you have submitted your payment and uploaded your artwork files. The primary goal of prepress is to make sure your files are print ready and that everything will come out the way you intend. We do this by running your files through a pre-flight test.
Your designated prepress expert will share their knowledge with you throughout this process so you won’t be left in the dark. Any changes they make to your files will be documented and explained, as well as any changes they suggest that you make to your files.
For a comprehensive check list to assist you with preparing your files for print, visit our file setup resources page.
Creative Decisions
Our prepress experts will always inform you before making any technical changes to your files (e.g. color conversion). However, we will never make any creative adjustments to your files and we do not review files with these considerations in mind:
- Spelling or grammar
- Graphic design
- Plot
- Stylistic choices of any kind
You are responsible for all creative choices.
After the process you will receive an email with your electronic proof and notes from your prepress ninja specifying anything that we recommend you change in your file before we go to press. We will go through as many rounds of prepress as you need until you are satisfied with your electronic proof.
If you are new to commercial print production, we suggest giving yourself some extra time to work with our prepress experts to review your files and make any fixes necessary. This might be anywhere from a few days to a few weeks depending on your experience and the print-readiness of your artwork.
Freshly updated customer reviews from TrustPilot
Electronic Proofing
Once we’ve received your files, the next step is to move on to electronic proofing. We provide electronic proofing to all of our customers for free, and all projects go through the process, even if you’ve added hard copy proofing as well. When you receive your electronic proof via email, you may have suggestions from your prepress expert for changes that should be made to your files before sending them into production. You’ll also notice that printer’s marks have been added to your files. These are special marks to indicate different elements such as trim, bleed, and center.
To view your proof, you’ll be directed to an interface that looks like the one pictured below:

Once your files are ready to go to press, you can approve the proof through the link sent to you. If you click the “Approve” button please know that you will no longer be able to see your electronic proof. If you want to make changes later you can contact your prepress rep. However, production usually starts within a day or two after your approval, so if you need to make changes let your prepress rep know immediately.
If you’re using electronic proofing, your approval serves as an agreement between you and us as the standard for your final product. If you’re using hard copy proofing, then your approval means we’ll proceed to making your hard copy proof. However, it’s important to remember that electronic proofs do not show you how your colors will turn out. For a more accurate indication of how your colors will look when printed offset, we recommend adding hard copy proofing to your order.
Freshly updated customer reviews from TrustPilot
Hard Copy Proofing Sheet
(If you haven’t added a hard copy proofing sheet to your order, you can skip this step.)
Production of your hard copy proof will take place once you’ve approved your electronic proof. In most cases, you will receive your press sheet(s) in the mail as a rolled parcel. However, if your project is a hardcover book and you’ve elected to add the cover to your hard copy proof, your press sheet(s) will arrive folded along with your hardcover proof.
Your proof sheet will arrive at your door approximately two weeks after you approve your electronic proof. From there, you have the opportunity to make revisions to your files based on the physical proof. If revisions are made we will provide additional electronic proofs. You may also purchase another round of hard copy proofing, which will take another 2 weeks from your electronic proof approval.
To approve your hard copy proof sheet, email or call your account rep. Once approved full production of your project will begin within 1-2 business days.
For most standard size projects (up to 8.5” x 11”), you may select up to 8 pages to be printed for your hard copy proof sheet. We recommend you choose the 8 inside pages with the colors you’re most concerned about. Email your account rep the page numbers of those you would like to see printed. These 8 pages will be printed on a parent sheet using the same paper stock as you’ve selected for your final project.
For cost on hardcopy proofing visit our proofing options page.
Freshly updated customer reviews from TrustPilot
Production
Your production timeline will vary depending on the scope of your project. Visit our turnaround time page to determine how long your project will take. Once we approve your proof, your project will begin production.

Press
Your pages will be printed on a four-color sheet-fed printing press and run through a drying process. This phase can take approximately 1 week or longer depending on your order size. For an in depth walkthrough about the parts and process of running a printing press visit our Printing Academy press section.
Post-Press
Your dried printed pages will then be folded, cut and bound to form your final product, which can take 1-4 weeks depending on your binding option. To learn the difference between each binding process visit our Printing Academy post-press section.
Potential Delays In Your Production Timeline
- Larger orders (typically over 3,000 units) may require additional production time.
- Specialty options such as foil stamping, spot UV, embossing, debossing, and more may require additional production time.
- Orders that are in production over the Chinese Holidays may require an extra week or two in production.
- Finally, if we run into any quality assurance issues during production, we will let you know immediately. In most cases we force the factory to fix or redo any work that isn’t up to our incredibly high standards, but this may require additional production time.
Still have more questions about your production timeline? Feel free to contact us.
Freshly updated customer reviews from TrustPilot
Quality Control
This article will teach you about PrintNinja’s quality control, and how we make sure your final project matches your proof.

On-Site Quality Assurance
When it comes to quality assurance, PrintNinja has a secret weapon: Jack, our on-site quality control expert. Jack works full time at the printing factory, doing press checks and personally reviewing every project page by page to make sure your final project matches your electronic proof.
Overrun Offer
As with any manufacturing process, printing and binding carries a small defect rate, usually well under 2%. Knowing this, PrintNinja adds a 2% overrun to every order we create to combat any variances that may occur. We will send you the overrun pieces for free, even if there are no issues.

Our Leverage
PrintNinja’s standards are incredibly high and all of our factories understand our commitment to quality. If something goes wrong in the production process, we catch it on the spot and force the factory to fix it or even start again from scratch if needed. Working with PrintNinja means that even a small print run gets the same attention to detail and is backed by the same leverage as a huge printing company.
Freshly updated customer reviews from TrustPilot
Safety Testing
We have a relationship with a laboratory that is certified to run many safety tests for books, games, and other printed items. The most common test we run is the toxicity test, which tests your ink and paper for lead and mercury.
Process
For the toxicity test we will print extra books during your press run and send them to our lab. The paper and ink will be burned into their natural chemical form and tested for unwanted material.
Price: $350
Adding a toxicity test to your order will add approximately one week onto your turnaround time.
Required Testing
Safety testing is mandatory for games that will be marketed to children under 13 years of age. If you plan to print “AGES 8+” on your game you will need to have paperwork stating you have passed a toxicity test before your game can enter the US Market.
If you want to be cost conscious then you can skip the safety test by not including a playing age on your game. However, if you plan to sell to retailers they will require that a play age is listed on the box. In this case you can skip the toxicity test by printing “AGES 13+”.
The safety testing procedure for card games are the same as for books, the paper and ink is tested. If you have components like meeples, wood cubes etc. there are more tests that need to be run and therefore a higher price associated.
All our paper and game pieces have been tested and have passed, but you will need to run the tests on your game to acquire the paperwork as a formality to sell your game to retailers.
Freshly updated customer reviews from TrustPilot
Packaging
We work with our printing facilities to package your order as securely as humanly possible, making your project’s journey halfway across the world as safe as a trip across town.
Protective Measures for Packaging Your Order
Here’s a snapshot of how we package your books. Our heavy duty packaging includes bubble wrap, packaging paper, corner protectors, and shipping bands. If your order is large enough to be palletized, we apply protective measures to the entire shipping pallet rather than the individual boxes.
In the video above, you can see one of our associates carefully wrapping a spiral-bound book order in bubble wrap, folding up the sides, and securing the bubble wrap around the books with tape. Then, he adds heavy-duty packaging paper as a second layer outside of the bubble wrap. After that, he adds corner protectors on each corner – these will protect the corners from damage if they are bumped during the shipping process. Finally, he places the order in a sturdy corrugated cardboard box and wraps the order with shipping bands.
Still have questions about the packaging process? Feel free to give us a call or shoot us an email, and one of our friendly customer service ninjas can help answer any questions you may have about how we package your order to protect it during the shipping process.
Freshly updated customer reviews from TrustPilot
Shipping Methods
This article will teach you about PrintNinja’s shipping methods.
We have established trade channels to get books from the factory right to our customers’ doors with as little hassle as possible. We offer freight forwarding, air shipping, and split shipping. We take care of all customs paperwork and processes for customers in the USA and Canada and for customers in other countries, we guide you through the import process step-by-step.
Expedited (Air)
Expedited shipping is sent via air freight, and
is the fastest option we offer. It’s more
expensive than standard shipping, but it only
takes approximately 1 week for your project to
travel from China to your door.
We also have a Premium Expedited option that can bring the 1-week expedited turnaround down to about 3 days. These shipments must be custom quoted and your timeline must be confirmed with your account manager before your order is placed.
Standard (Ocean)
Standard shipping is sent via ocean liner and takes
approximately 6 weeks to get your project from
China to your door once production is complete.
However, timing can never be guaranteed for
standard shipments, since they have to go through
an extensive customs process at both the import
and export stages.

Hybrid Shipping Method
If you need part of your project fast, but still want to save money overall, you can choose our partial expediting option. A portion of your project will be sent via air, while the rest arrive via ocean freight. Our online instant quote calculator can handle calculating shipping cost for this option.
Go to the Shipping Calculation section for a walkthrough.
Split Shipping
We can ship your order to multiple addresses. For example you can send a portion of your order to our warehouse for storage and a portion to your home address. Many companies take advantage of this option to send large portions of their catalog order to all their stores.
If this option is right for you, please let us know before you place your order. You can email your account rep or let us know through our “specialty add-ons” form found on our calculator after you lock in your quote. We will need to know how many units you would like to send to each address.
Tracking Numbers
You will receive a tracking number right away for any expedited air copies. However, standard (ocean) shipments don’t have tracking information available until they have cleared customs in the USA (approximately five weeks into the shipping process). Once they have cleared customs and been delivered to the UPS warehouse, you will receive a tracking number for the final leg of your shipment.
Potential Delays
With the exception of our guaranteed delivery date service available for expedited orders, all of our shipping times are approximate. For standard speed (ocean) shipments, your order may arrive before, during or after the estimated timeframe provided. Shipping time will vary based on weather conditions, port and boat capacity, labor fluctuations, customs approval and other factors.
To be completely safe, we recommend adding a few weeks onto your expected delivery date to account for the many unforeseen events that can take place in international ocean shipping. For example, occasionally one of our shipping containers will be flagged for a random customs inspection by Customs and Border Protection, adding a 1-2 week delay that is out of our control.
Freshly updated customer reviews from TrustPilot
Customs, Taxes, and Duties
This article will teach you about the shipping logistics that come into play when you print with PrintNinja.
All customs, duties, and taxes for orders being delivered to the US and Canada are included in our pricing, and we handle all necessary importing paperwork. All other orders shipped to locations outside the United States may be subject to import taxes, customs duties, and fees imposed by the destination country.
For many other destination countries, we can guide you through the complex world of customs. We may also provide you with a freight carrier who can coordinate the shipping through the customs process. When you recieve a quote from us, you will see a notice if we have specific importing systems for your country. The note will contain information regarding what information (Passport, Driver’s License, Business Number etc.) you will need to provide to our carrier and what fees (Goods and Sales Tax, Value-added Tax etc.) will be charged.
For some countries we are not able to provide a carrier because we do not have a connected route. In this case you will need to provide your own freight carrier.
The following countries have easy and mostly painless import processes, which we’re happy to handle for you. Our shipping capacity is not limited to the following. If you need to ship somewhere not listed below, don’t hesitate to ask how we can make that possible for you -we’ll figure out how to handle the shipping logistics!

Australia
Australia charges a 10% Goods and Service Tax, which is not included in our quotes. PrintNinja cannot collect this directly, instead it will be collected by our freight carrier before delivery. They will need a copy of your Australian Business Number, Passport, or Driver’s License in order to collect and file this Goods and Service Tax on your behalf.
You need an Australian Business Number, Passport, or Driver’s license, but no customs broker. Carrier will collect 10% Goods and Service Tax.
Canada
Your PrintNinja quote will include a 6% Import Fee, which covers all brokerage fees, duties and taxes. We handle 100% of the shipping and import requirements needed to deliver your project to your door.
New Zealand
New Zealand charges a 15% Goods and Services Tax, which is not included in our quotes. PrintNinja cannot collect this directly, instead it will be collected by our freight carrier before delivery.
The freight carrier will collect 15% Goods and Service Tax, you don’t need a local broker or to provide the carrier with any information.
United Kingdom
You must have or apply for a valid Economic Operator Registration and Identification (EROI)—a fancy way of saying import-and-export business ID#—at least 10 days before the shipment is delivered.
Our freight carrier will need your Economic Operator Registration and Identification number to complete delivery of your books. Delays in providing this information to the carrier may result in storage charges, so please have your Economic Operator Registration and Identification number ready in order to receive delivery.
Books are duty free and VAT rated 0%, but games are duty free and VAT rated 20%.
Warehousing and Fulfillment
But wait, there’s more to learn about shipping logistics! You can choose to do split shipping and send a portion of your order to our U.S. warehouse. There are no taxes or duties to be paid on these copies, and we can fulfill any orders you have in the U.S. market. Check out how our warehousing and fulfillment service could benefit you
Freshly updated customer reviews from TrustPilot
Delivery Process
This article will teach you about the delivery process when you print with PrintNinja.
This is the final countdown! After all those weeks of waiting, your order is about to be delivered to your door. Below you will learn what to expect based on the shipping method you chose.

Expedited (Air) Delivery
Expedited shipments will be delivered by a uniformed FedEx or UPS delivery person. Please note that for expedited shipments, your signature is required to complete delivery. However, if your schedule isn’t flexible enough to allow you to be home at the time of delivery, you can sign for your order in advance on the UPS or FedEx website.
Standard (Ocean) Delivery
If you’ve selected the standard shipping method, you will not receive a tracking number from us until your packages have crossed the ocean and are scanned into the shipper’s warehouse, approximately 5 weeks after production has been completed.
If your shipment is under 50 Packages: Your shipment will arrive in individual cartons shipped via UPS Ground and will be delivered by a uniformed UPS delivery person. A signature is not required for delivery, and delivery changes can be made on the UPS website.
If your shipment is 50 packages or more: Your shipment will be palletized (bundled together onto one or more shipping pallets) and shipped via the UPS LTL network. UPS LTL uses third party trucking companies rather than uniformed UPS drivers, and the delivery driver will typically call you to set up a delivery appointment. Please note that drivers are not equipped to break down pallets.
If you’re not sure whether your shipment is 50 packages or more, you can always ask your account rep who will be happy to let you know.
Freight Forwarder Delivery
If your order is large (over 2500 lbs), it will be palletized and shipped via a third party freight forwarder rather than through UPS. This is an incredibly cost-efficient freight pathway, but unfortunately there are no tracking numbers provided since the forwarding company can use any combination of ocean, rail, and truck to get your shipment to its final destination. As with UPS LTL, you can expect to receive your packages from a local trucking company, who will call you in advance to set up a delivery appointment. Please note that drivers are not equipped to break down pallets.
Still have questions about the delivery process? Feel free to contact us and one of our friendly customer service ninjas will help you answer any questions you might have.
Freshly updated customer reviews from TrustPilot
Printing Options
What kind of printing options are available to you?

Custom Printing and Binding Options
The first step after deciding to print your own project is to figure out how you want the final product to look and feel. Even on simple jobs the number of offset printing services and options that PrintNinja offers can quickly become overwhelming – but don’t fret!
Thankfully, we’re here to explain everything and make sure your project turns out exactly the way you envision it. PrintNinja offers a multitude of printing options ranging from different paper thicknesses, materials, and additional specialty options – like spot UV, foil stamping, embossing and debossing, and matte varnish – to give your project a little extra flair. Here, you’ll learn more about all of the choices available to you – whether you’re printing a book project or a custom card or board game, we provide choices that will make your final project look amazing. Read on to see all the variety of options and figure out what the best combination is for your printed project.
Select one of the following information pages for more detail, what your options are, and how they’ll impact the end product.
Freshly updated customer reviews from TrustPilot
Book Printing Services
Read on to discover all the book printing services we offer.
Here at PrintNinja, we offer a breadth of different options for you to build into your project. From binding to paper to other specialty options, you’ll be able to choose a combination of options that will result in the perfect printed project for you.
If this list of book printing services seems overwhelming, we recommend that you request a deluxe sample pack that includes recently printed books and a printing guide. In the meantime, peruse our book printing services by selecting an option below.
Book Printing Services


Freshly updated customer reviews from TrustPilot
Binding Types
PrintNinja offers several professional types of book binding for your project. All of our books are printed and bound with expert care and attention, and the sky’s the limit when it comes to customization. When you’re ready to get started, check out our calculator to get an instant price.
Saddle Stitching
Saddle-stitching is the simplest binding method, in which pages are folded and stapled together. This type of binding is used for single issue comic books, as well as lookbooks, workbooks, booklets, calendars, and many magazines and catalogs with smaller page counts.
Learn More about saddle stitching.

Perfect Binding (Softcover)
Perfect binding is the binding method used for softcover books and trade paperbacks. Pages are folded, gathered, sewn, and then glued into a cover, forming a squared-off spine.
Learn More about perfect binding.

Case Binding (Hardcover)
Case binding is the technical term for hardcover book binding. Pages are folded, gathered, and sewn, and a ‘case’ is made by gluing and folding a printed sheet around 3 pieces of greyboard. The pages are then glued into the case with a few extra pages called endsheets, forming an entire casebound book.
Learn More about case binding.

Board Book Binding
Board books are a special type of binding often used in children’s books. Pages are printed on thick paperboard and assembled one by one into a book block with a printed spine.
Learn More about board book binding.
Wire Binding
In wire binding, pages are trimmed and assembled, holes are punched along one side, and wire is clamped down through those holes. Wire binding lays completely flat and is often used for cookbooks and manuals.
Learn More about wire binding.
Spiral Binding
For spiral binding, pages are trimmed and assembled, holes are punched along one side of the pages, and a plastic spiral is threaded through those holes. Spiral binding lays completely flat and is often used for cookbooks and manuals.
Learn More about spiral binding.
Freshly updated customer reviews from TrustPilot
Saddle-Stitching
Saddle-stitching is the least expensive and simplest binding method available. In the saddle-stitching process, parent sheets are cut, folded, and stapled together to form a finished booklet. This type of binding is used for single issue comic books, workbooks, shorter catalogs, cookbooks, and booklets of all kinds.
How Saddle-Stitched Binding is Made
To create a saddle-stitched piece, printed parent sheets are first cut and folded using a folding machine. Then the folded pages are fed through a special machine, which inserts two staples into the spine of the booklet.
Design Considerations
Unlike most other binding methods, saddle-stitching doesn’t come with any design-specific restrictions. Since the pages open completely flat, images can extend across two pages (known as a double-page spread) without the chance that any content will be lost in the gutter.
Cover Design
Covers for saddle-stitched projects are the exact same size as the inside pages of the project.
Production Time
After being sent to press, saddle-stitched projects take one to two weeks to manufacture, after which they are shipped out to you via your chosen shipping method. Be sure to check our turnaround time page to see how much time your project will take based on your proofing and shipping options.
Freshly updated customer reviews from TrustPilot
Perfect Binding
In perfect binding (also known as softcover binding), pages are folded, gathered, sewn, and glued into a cover to form a squared-off spine. Perfect binding is the preferred binding method for graphic novels, trade paperbacks, softcover children’s books, coloring books, catalogs, literary journals, and quarterly magazines. Keep reading to learn more about how PrintNinja’s superior softcover binding method will ensure your softcover book is built to last.
What Is Perfect Binding?
In traditional perfect binding, sheets are printed, folded, and assembled into their proper page order. From there, the side of the book block is cut off, and the pages are glued into a cover to form a squared-off spine.
However, this methodology leads to perfect bound books that don’t open flat, and with pages that can fall out over time.
PrintNinja uses a more sophisticated method, where instead of cutting the book block, the pages are smyth sewn together before being glued into the cover. This methodology provides a far more durable finished product, since the pages are both sewn and glued, and the books can open much flatter, so much less content is lost in the gutter between pages.
Perfect Binding Cover Design Considerations
Because the book block is glued into the cover, perfect bound books have a 10 millimeters area on the inside covers that will be glued to the first and last inside pages. It’s important to keep that in mind when designing your inside covers, because artwork may be lost in the glued area.
Cover Design
Because perfect bound projects have a spine width that varies based on number of pages and paper weight, every perfect bound cover has different size requirements. You can use our perfect binding cover template to design your cover.

PrintNinja Tip
Ready to Get Started?
You’d be surprised just how many options you can quote instantly on our book pricing calculator. Save a quote today so you can lock in your perfect bound book price for 90 days.
Get Your PriceFreshly updated customer reviews from TrustPilot
Case Binding
What happens in the case binding process?
If you’re deciding on a cover type for your project, you may be wondering how different covers are made. Case binding, also called hardcover binding, gets its name from the hard outside “case” used to cover books. Hardcover books are bound differently than softcover books and can encompass different types of paper. Case-bound books with fewer than 60 pages are expertly hand-assembled, while those with higher page counts are assembled by machine.
How Case Binding is Made
As with other binding methods, casebound books start with printed parent sheets, which are cut, folded, and gathered. Then, the pages are smyth sewn into a book block. Cloth is then added to the spine area, where it will be glued into the case.
The case (the hard cover of the book) is made next. Assembly teams glue and fold a printed sheet (your cover, spine, and back design) around three pieces of board.
Finally, the inside pages (the book block) are glued into the hard cover (the case). In books with 60 pages or more, endsheets are also used to firmly secure the book block to the case.
The final assembly process varies according to different page counts. Lower page counts are hand-assembled, while higher page counts can be machine-assembled. While the gutter and binding of hand-assembled books is more visible, every case-bound book we produce always meets our high PrintNinja quality standards.


Design Considerations
Your inside covers will consist of pages glued to the inside of the hardcover case. Authors may wish to include blank pages to preface their work, so be sure these are incorporated into your submitted artwork if you see fit.
If your project exceeds 60 pages, you’ll also have an opportunity to design endsheets. Remember, these special pages secure the book block to the cover. Your design options for these are virtually endless! Some authors select endsheets in solid colors, while others choose eye-catching designs suited for their book’s overall tone or theme. This decision is entirely yours to make!
You have many options to consider for your cover design, too. Again, your cover design is printed on a single sheet and glued around three pieces of board. You will therefore need to envision your book’s cover, spine, and back of your book, and come up with a design with proper measurements. Your design will also leave a little extra space for bleed, fold cover, and hinge.
Finally, you can also consider a dust jacket to give your hardcover an extra-professional feel and an added layer of protection. If this sounds like a lot to think about, fear not! We’ll walk you through all of these considerations in our case binding cover layout guide to make sure you’re entirely satisfied with the design of your hardcover.
Production Time
After being sent to press, case-bound projects take approximately three weeks to manufacture. Then, they are shipped out to you via your chosen shipping method. Check our turnaround time page to learn about projected time frames based on proofing and shipping options.
Ready to Get Started?
PrintNinja’s hardcover book calculator makes it easy to take the next step in creating your hardcover book. Our calculator is pre-populated with popular options, but you can customize just about anything. You can also save your quote for 90 days, so it’s no problem if you’re not quite ready to print yet.
Get My PriceFreshly updated customer reviews from TrustPilot
Board Book Binding
Board books are made via a special binding process that produces a book with very thick paperboard pages, suitable for children’s books for young children, or for projects like art books and creative books that seek to emulate this feel.
How Board Books are Made
Unlike other books, board books are not ‘bound’ in the traditional sense. Instead, during the board book binding process, 2-page spreads are printed on parent sheets, then cut, assembled, and glued together by hand, one set of pages at a time.
PrintNinja’s board books use the highest quality construction, with an extra sheet of board between the printed sheets for added thickness, durability, and climate tolerance to prevent the books from warping (a very common problem with board books).
Design Considerations
Unlike most other binding methods, board book page counts do not have to go in increments of 4. Because they are assembled by hand instead of via a folding process, they can be in increments of 2 (both sides of a sheet of paper).
Finally, board books typically have a lamination finish (which is usually reserved for covers) throughout their inside pages. This lamination can be gloss or matte, and it serves to increase the durability of the overall book.
Board Book Binding Artwork Setup Guide
Production Time
After being sent to press, board book projects take three weeks to manufacture, after which they are shipped out to you via your chosen shipping method. Be sure to check our turnaround time page to see how much time your project will take based on your proofing and shipping options.
Freshly updated customer reviews from TrustPilot
Wire and Spiral Binding
What is the most typical usage for wire and spiral binding?
In wire and spiral binding, holes are drilled along one side of the printed pages, and then either a wire comb is clamped down into the holes, or a plastic spiral is threaded through them. Wire and Spiral binding both lay very flat and are often used for cookbooks and manuals.
How Spiral and Wire Binding is Made
To create a wire or spiral bound book, parent sheets are first printed, cut and assembled (but not folded, unlike other binding methods). Holes are then drilled into the binding edge of the document. For wire binding, these holes are straight up and down, and for spiral binding they are drilled at a precise angle that depends upon the size and thickness of the book and the plastic spiral used. From there, either wire comb is threaded and clamped down by hand (for wire binding) or spiral is threaded through the holes by hand (spiral binding) to create the final product.
Design Considerations
The most important thing to remember when designing a wire or spiral bound project is that holes will be drilled 10 millimeters inside the trim line on the bound side of the document. Because of this, we recommend keeping all important content at least 10mm inside of the trim line on the side that will be bound, since any content inside those 10 millimeters may be obscured by the holes drilled or by the binding itself.
Another thing to consider with wire and spiral bound projects is that unlike most other binding methods, your page counts do not have to go in increments of 4. Instead, they can be in increments of 2 (both sides of a sheet of paper), since wire and spiral books do not have to be folded in the binding process.
Finally, wire and spiral pages can have finishes (which are usually reserved for covers) throughout their inside pages. Many manuals designed for outdoor use or cookbooks designed to be spill-resistant will use a lamination on every page.
Cover Design
Covers for wire and spiral bound projects are the exact same size as the inside pages of the project.
Production Time
After being sent to press, wire and spiral bound projects take three weeks to manufacture, after which they are shipped out to you via your chosen shipping method. Be sure to check our turnaround time page to see how much time your project will take based on your proofing and shipping options.
Freshly updated customer reviews from TrustPilot
Book Paper Options
Paper options for your book printing project are classified by weight, coating, and finish. All papers are manufactured with a weight and a coating, while finishes are applied after printing.

Book Paper Weight:
Paper weight is the thickness of a chosen paper stock, stated as a number and a category. The units GSM, pound (lb), and points (pt) are commonly used to describe the weight, or thickness of paper stock. However, these terms are not interchangeable and will result in significantly different paper thicknesses.
(e.g. 85lb text, 12pt cover)
Click here for more information on each of the paper weights offered by PrintNinja.
Book Paper Coating:
Paper coating is the chemical coating applied to a paper during the manufacturing process.
(e.g. coated gloss, coated matte, uncoated)
Click here for more information on each of the paper coatings offered by PrintNinja.
Book Paper Finish:
Paper finish is applied to a finished printed product to seal in the ink and increase durability, stated as a finish style and type. Finishes are usually only applied to your book’s cover pages.
(e.g. gloss lamination, matte varnish, UV varnish).
Click here for more information on each of the paper finishes offered by PrintNinja.
Freshly updated customer reviews from TrustPilot
Paper Weight

The PrintNinja sample pack allows you to feel available paper stocks
The term paper weight is seen frequently in the printing business and is used to describe the thickness, or caliper, of paper stock. At PrintNinja, we offer a wide variety of quality paper stocks to ensure your project comes out just like you imagined. There are many phrases used to describe paper weight and it is important to understand these before printing your project.
GSM vs. pound (lb.) vs. points (pt.)
The units GSM, pound (lb), and points (pt) are commonly used to describe the weight, or thickness of paper stock. However, these terms are not interchangeable and will result in significantly different paper thicknesses.
- GSM stands for Grams per Square Meter and is an exact measure of how heavy or thick a paper is. GSM is used across all paper types and makes comparing different types of paper easier.
- Pound is the weight of 500 parent sheets of a particular type of paper and is generally used for describing text or offset stock. To learn more about parent sheets, visit our paper and cardstock guide.
- Point is a term most commonly used to describe cover stock and card stock. One point is equal to 1/1000 (.001) inches. For example, a 10pt. cover stock will measure 0.010 inches thick.

The average comic book uses 70lb. text paper stock
Text (offset) vs. Cover Stock
The terms text and cover stock are named for how the paper is generally used. Text stock, also called offset stock, which is usually measured in pounds (lb.), is most often used on internal pages. Cover stock, measured in points (pt.), is commonly used on cover pages. However, this is not a steadfast rule and text and cover stocks are often used for both. The term cover stock is generally used to describe paper that is 135-300 GSM.
The primary difference between these is the paper thickness, cover stock being thicker and more rigid than text. It is important when noting paper weight to take into account both the numerical weight as well as the type of paper. For example, 100lb text stock sounds thicker than 65lb cover, however, cover stock parent sheets are much smaller which means an equally thick parent sheet will weigh less.
Paper Weight Comparisons
Unfortunately, because of the complexity of paper thickness, there is no equation to convert various paper types to weight. However, we’ve created the chart on the left comparing the most common paper stock weights.
PrintNinja’s Available Paper Stocks
55lb. text
The lightest of our paper stocks, this is typically used for the pages of novels, or for workbooks (80 GSM metric weight). For reference, this is approximately 20lb bond, which is the thickness of average computer or copy paper.
70lb. text
The thickness of an average comic book page, 70lb. text is also used for catalogs with high page counts (105 GSM metric weight).
85lb. text
This versatile, medium weight paper is commonly used for magazines, catalogs, and booklets of all varieties. It is also our recommended inside paper weight for hardcover books with page counts higher than 60 (128 GSM metric weight).
105lb. text
This stock is typically used for the inside pages of children’s books, as well as coffee table and art books. It is also our recommended cover stock for single-issue comic books and many other saddle-stitched projects (157 GSM metric weight). It is also commonly seen used in brochures.
Please note, when 105 lb. paper is paired with a “Matte” finish for interior pages, occasionally there will be some “shiny areas”. Please see below for an image example:

This issue only occurs on pages with large blank areas opposite heavy colored pages. There is sometimes a minor ink transfer that is removed and in turn alters the finish.
135lb. text
The heaviest of our text stocks, 135 lb., is suitable for the inside pages of children’s books or coffee table books that want an extra-heavy page feel. It also works well as a cover stock for many saddle-stitched projects (200 GSM metric weight).
If your artwork contains heavy ink usage that crosses the gutter of your pages, we recommend a lighter weight paper, as the 135 lb stock is more prone to ink cracking than our lighter options. Please see below for an image example:

10pt. cover
The lightest cover stock we offer, 10pt. cover is a great fit for catalog covers, and is often the best choice for the cover of any perfect bound project 6″ x 9″ or smaller (250 GSM metric weight).
12pt. cover
A medium weight cover stock often used as the cover paper for trade paperbacks, graphic novels, and many perfect bound projects larger than 6″ x 9″ (300 GSM metric weight).
14pt. cover
The heaviest cover stock we offer, 14pt. cover gives a rugged, durable feel and is often used for any project that will be handled a lot, for very thick perfect bound projects of any variety such as catalogs or graphic novels, or for oversized projects larger than 8.5″ x 11″ (350 GSM metric weight).
Now that you fully understand common paper weight terms, as well as how they are used and measured, see how your paper choice affects the price of your project with our instant quote calculator. If you don’t see what you’re looking for or need help feel free to contact us. Or, if you want to continue learning about paper options such as coatings and finishes, see our Paper Options page.
Freshly updated customer reviews from TrustPilot
Paper Coating
PrintNinja offers various different paper coating options. These coatings are applied during paper manufacturing, as opposed to paper finishes, which are applied after printing. Each coating comes with unique advantages detailed below.

Coated Gloss
Coated Gloss
Gloss coating applied during manufacturing, giving your project a reflective shine. Coated gloss papers are our most popular variety, and are commonly used to convey professionalism. This results in rich colors and crisp resolution, making images “pop.” Catalogs, magazines, and children’s books are all examples of projects best printed on with coated gloss. However, fingerprints may become apparent on these types of projects due to their high shine.

Coated Matte
Coated Matte
Matte paper also has a coating applied during manufacturing. Unlike gloss coating, matte coating gives a diffused sheen, which boosts the contrast of photos and offers a smoother presentation than uncoated. These type of matte papers are often used for art books, lookbooks, literary journals, graphic novels and any other project requiring a more subtle shine.
Like What You See? Get Your Price.
Once you’ve chosen your paper coating, you’re one step closer to instantly calculating your price. Check out our calculator to configure your project and see your price.
Get StartedFreshly updated customer reviews from TrustPilot
Paper Finish
PrintNinja offers various types and styles of paper finish. Paper finishes are applied after printing, and are usually only applied to a project’s cover. Finishes each have a type (e.g. varnish or lamination) and a style (e.g. gloss or matte). If you’re not sure, we recommend ordering a sample pack so you can see your options in person.


PrintNinja Tip
Like What You See? Get Your Price.
Once you’ve chosen your paper finish, you’re one step closer to instantly calculating your price. Check out our calculator to configure your project and see your price.
Get StartedFreshly updated customer reviews from TrustPilot
Specialty Paper Options
In need of specialty paper options? We can help.
Choosing the paper stock that will bring your story to life doesn’t have to stop at the standard. In addition to our standard paper types, we offer a multitude of specialty paper options, cuts and styles to help your project express its unique personality and stand out in the crowd.
Select one of our specialty paper options below to learn more.
Specialty Paper Options


Freshly updated customer reviews from TrustPilot
Textured Paper
Add some tactile pizazz to your book’s cover or interior pages with one of our textured paper finishes! Our standard and non-standard texture options will help give your book a feel that’s one-of-a-kind.

Standard Textures
Standard Textures
Making a hardcover, wire-bound, spiral-bound, softcover or saddle-stitched book? Consider printing your cover on one of our three pre-made textured papers to add some additional visual and tactile interest. For wire-bound, spiral-bound, softcover and saddle-stitched projects, these textures are available in weights starting at 120lb text and are perfect for that durable-yet-classy look. Hardcover projects can utilize ONLY the 120lb stock. When using textured cover stock, we recommend abstaining from laminated finishes as they have a tendency to obscure the appearance of the texture.
In addition to our textured cover stock, we also have a linen texture available that can be added to your interior pages. This texture is made by physically imprinting our standard paper and is the perfect option for anyone looking to spice things up on a budget. Our linen texture looks best when added to paper between 85lb text and 10pt cover, which is the sweet spot for getting the most noticeable textured effects on every page. Feel free to check out all of our available paper weights.


Custom Textures
Custom Textures
If you’re looking for a specific texture outside of the standard textures we have readily available, we also have special custom-made textures that are manufactured with patterns pre-engrained in them as part of the paper-making process. We have 3 options available for pre-textured cover stocks. 1# Eggshell (off white) #2 Felt and #3 Stucco. These are available in the following weights:
120 lb text, 12 pt, and 14pt
Because these custom textures are uniquely crafted and made-to-order, they are notably pricier than their standard texture counterparts and will require a custom quote.
We can also apply a linen texture to a variety of our stocks. This texture is applied to existing stock and can be applied to the following weights:
85 lb uncoated, 95 lb uncoated, 105 lb coated(matte or gloss) and uncoated, 135 lb coated(matte and gloss)
10 pt coated(matte and gloss) and uncoated, 12 pt coated(matte and gloss) and uncoated
12 pt 1 sided gloss coated, 14 pt coated (matte and gloss) , 14 pt 1 sided gloss coated

Uncoated
Uncoated
Uncoated paper has no coating applied. This choice is well suited for projects where the paper will be written on, such as workbooks, coloring books, calendars, training manuals, or any materials covered in text. It can also be used to achieve the look of a golden or silver age comic book, which were historically printed on newsprint. A large amount of textures and finishes are available for uncoated paper.
Pricing
Request pricing for this add-on while locking in your price on our quoting calculator. We’ll reach out to you with a custom quote (or questions) within 1 business day of receiving your request.
Freshly updated customer reviews from TrustPilot
Off-White Paper
Interested in an off-white paper look for your project? We can help.

Off-White Inside Book Paper Stock
In addition to our normal white paper, we also offer uncoated paper stocks to give your book a unique, raw feel. We have a range of paper weights from 55 lb to 135 lb.
Though it doesn’t quite have the same feel, a cheaper alternative many creators pursue is to print on normal uncoated paper and simply design their art files with an off-white color background. This way the finished product looks as though it was printed on a non-white paper. Ultimately the choice is yours, so feel free to request samples of this paper option in your PrintNinja sample pack today.
Pricing
Request pricing for this add-on while locking in your price on our quoting calculator. We’ll reach out to you with a custom quote (or questions) within 1 business day of receiving your request. Of course, if you’re not sure if this option is right for you, feel free to reach out to one of our friendly customer service Ninjas! We’ll be happy to talk with you and help you determine whether this is the right choice for you.
Freshly updated customer reviews from TrustPilot
Eco-Friendly Printing Options
Want to reduce your carbon footprint and choose some eco-friendly printing options for your project? We got you.
FSC Paper
We work with facilities that are CoC-certified to print with environmentally-friendly Forest Stewardship Council (FSC) certified paper. We can substitute FSC paper for any of our standard paperweights.
Please Note: FSC certified paper does require a large minimum as unique lots of paper are ordered specifically for the job you intend to print. To quote for FSC paper we require Minimum Order Quantities in the following range:
For less than 60 inside pages we require 10,000 units.
Between 60 and 100 pages, 7,500 units.
Between 100 and 200 pages, 5000 units.
More than 200 pages, 2000 units.
Learn more about FSC certification.
Pricing
Request pricing for this add-on while locking in your price on our quoting calculator. We’ll reach out to you with a custom quote (or questions) within 1 business day of receiving your request.

Soy Ink
Another great eco-friendly printing option we offer is soy-based ink.
Complement your FSC paper with our soy-based inks for an environmentally friendly alternative to our standard inks.
The ink is derived from combining refined soy-bean oil with other natural resins and waxes. The upcharge for soy ink is modest, and you can indicate your environmental sensitivity in your advertising materials and on the book itself. And if you think you have to give up quality for sustainability then THINK AGAIN: because soybean oil is naturally clearer than most petroleum-based inks, your colors will look just as bright if not brighter on your pages.
Freshly updated customer reviews from TrustPilot
Pop-Up Spreads

Creating a pop-up book is no longer out of your reach! We can provide pop-ups, pull tabs, and flaps for an interactive experience. To move forward we need a few pieces of information:
- Sketches with size information and a rough idea of how you want your pop-up to be elevated.
- Files of your design with dielines so we can see how the paper needs to be creased, perforated, slotted or strengthened.
- In some cases we may need a basic paper prototype.
If this is out of your skill zone, no worries! We have relationships with experienced paper engineers who will work on the mechanics so you can focus on creating the artwork. There is an extra cost associated with this option, but it will yield the highest quality product.
PrintNinja Tip
Pop-ups are no longer just for children’s books. If you’ve been looking for a way to have your corporate or brand books stand out try adding a one page pop-up spread.

Paper Engineering for Pop-Up Books
File Submission Guidelines
In order to produce a pop-up book we need your files to be marked up appropriately so we know where to fold and add glue. This is a technical task, so we have partnered with expert paper engineers who can take your flat PDF files and work out the mechanics, make a prototype, and add die lines.
Like what you see? Get a quote.
Since pop-up books are incredibly unique, you’ll need to request a custom quote. Let us know as many details as possible about your pop-up book, such as size, page count, number of pop-ups, and order quantity. Once we get your request, we’ll reach out for any additional details needed to get your custom quote. We may request to see some designs in order to better determine the cost.
Get StartedFreshly updated customer reviews from TrustPilot
Custom Edges
Want to add something special to your PrintNinja project? Consider adding custom edges. Learn about the variety of custom edges options that we offer here!
Custom Edges Options


Freshly updated customer reviews from TrustPilot
Painted Edges

Painted Book Edges Fore-Edge Splatter
There are many types of edge treatments that can be applied to your book. A popular choice is painting a solid color or applying gilt — a metallic color, typically gold or silver — on the paper’s edge.
Edge coloring is a great way to catch the eye of a potential customer and our artisans can accommodate any color of your choice to make it pop.
Important Consideration
Adding painted edges to your project will increase your production timeline by 3-5 days. Before you can worry about that, you’ll need to make sure your book has a thickness of at least 8mm to achieve the optimal apperance.
Pricing
Request pricing for this add-on while locking in your price on our quoting calculator. We’ll reach out to you with a custom quote (or questions) within 1 business day of receiving your request. Of course, if you’re not sure if this option is right for you, feel free to reach out to one of our friendly customer service Ninjas! We’ll be happy to talk with you and help you determine whether this is the right choice for you.

Painted Book Edges Fore-Edge Splatter
Design Inspiration
Get creative and your possiblities will be endless. The book in the photo to the right combined the following specialty features to give it a creatively unique style:
- Painted Edges (Splatter)
- Faux Leather Cover
- Off-White Paper
Deckled Edges
What are deckled edges? Are they right for your project with PrintNinja?

Deckled Paper Edges Book
Also referred to as feathered edges, deckled edges are rough and irregularly cut edges of a book’s interior paper. In the past, deckled edges were a product of the binding process and could only be trimmed off for a hefty price. Thanks to modern binding technology, it’s now possible to easily create the appearance of smooth edges, which has turned deckle-edged books into a rare sighting. But, if you still want that vintage feel, this can be a great way to add that aesthetic to your project.
Deckled paper can give your book a refined, bespoke look and feel that stands out next to modern books.
Pricing
Request pricing for this add-on while locking in your price on our quoting calculator. We’ll reach out to you with a custom quote (or questions) within 1 business day of receiving your request. Of course, if you’re not sure if this option is right for you, feel free to reach out to one of our friendly customer service Ninjas! We’ll be happy to talk with you and help you determine whether this is the right choice for you.
Freshly updated customer reviews from TrustPilot
Gilded Edges
What are gilded edges? And are they right for your project?
Edge gilding is the process of applying a metallic foil to the outer edges of your book. Typically gilt service is offered in gold or silver, but our expert artisans will gild your books in any foil color of your choice. This is a great way to conjure up luxury, elegance and overall a special aura surrounding your project.
Important Considerations
A gilt edge can only be applied to perfect binding and case-bound books. Your project should have at least 1cm of thinkness on the paper edge of your book, otherwise the giltting effect will not be very visible. Please note, this specialty option will add 3 -5 days onto your production turn around time.
Pricing
Request pricing for this add-on while locking in your price on our quoting calculator. We’ll reach out to you with a custom quote (or questions) within 1 business day of receiving your request. Of course, if you’re not sure if this option is right for you, feel free to reach out to one of our friendly customer service Ninjas! We’ll be happy to talk with you and help you determine whether this is the right choice for you.

Freshly updated customer reviews from TrustPilot
Perforated Pages
What are perforated pages? Are they right for your printed project?

Perforated Pages
Perforated pages are a great option when you need a page to be easily removed. There are tons of potential reasons why you might include them in your project: you can perforate your coloring book so the pages can be stuck on the fridge, or perforate a document that needs to be removed and mailed away. You can also add a perforation to a page in a spiral or wire bound notebook to avoid ugly torn edges. You can even combine perforated printing with our easel stand covers option to create a desk calendar with daily, tear-away pages! PrintNinja gives you the option to add this feature to individual pages or an entire book.
Use our custom calculator to request this option be included in your quote. Of course, if you’re not sure if this option is right for you, feel free to reach out to one of our friendly customer service Ninjas! We’ll be happy to talk with you and help you determine whether this is the right choice for you.
Like what you see? Get a quote.
Request pricing for this add-on while locking in your price on our calculator. We’ll start working on your custom quote within one business day of receiving your request.
Get StartedFreshly updated customer reviews from TrustPilot
Rounded Corners
What are rounded corners? Are they right for your PrintNinja project?

Children's Board Book Rounded Corners
Rounded corners are the unsung hero of specialty paper options. They can serve many purposes for your project. The shape reduces the wear and tear of corners since they are less likely to be bent than a pointed corner. These types of corners are standard for board books and a great option for any children’s book as they protect children from accidental paper cuts. Since pointed corners are considered the norm, rounded corners can add a creative style to your project.
PrintNinja can round the corners of your book and card game by .25″ radius (typically books) or .125″ radius (typically cards).
Pricing
Request pricing for this add-on while locking in your price on our quoting calculator. We’ll reach out to you with a custom quote (or questions) within 1 business day of receiving your request. Of course, if you’re not sure if this option is right for you, feel free to reach out to one of our friendly customer service Ninjas! We’ll be happy to talk with you and help you determine whether this is the right choice for you.
Freshly updated customer reviews from TrustPilot
Gatefold/Centerfold
Interested in adding a gatefold or centerfold to your printing project? We can help.

Gatefold Centerfold Open
A gatefold or centerfold is an oversized page that is folded into a magazine or book – typically found in the center of your project – that opens into six panels (3 pages back and front) or eight panels for a double gatefold. Gatefolds encourage the reader to unfold the page making it a perfect place for important information, beautiful artwork, or advertisements.
Design Considerations
Make the most out of your centerfold with specialty features. A popular choice is the addition of perforated edges to allow the reader to pull out a poster or form. Another common option is spot UV, an enhancement that adds visual appeal and a tactile sensation.
We offer many specialty paper options to help fulfill your objective.
Pricing
Request pricing for this add-on while locking in your price on our quoting calculator. We’ll reach out to you with a custom quote (or questions) within 1 business day of receiving your request. Of course, if you’re not sure if this option is right for you, feel free to reach out to one of our friendly customer service Ninjas! We’ll be happy to talk with you and help you determine whether this is the right choice for you.
Freshly updated customer reviews from TrustPilot
Extra Press Sheets
Interested in ordering extra press sheets as a contributor reward tier for your crowdfunding printing project? We can help.

Uncut Parent Sheet Press Sheet
Full, uncut press sheets make a great commemorative gift or Kickstarter reward. If you’d like, we can print extra sheets from your print run and ship them to you separately. Typical press sheets are 16 pages of a book or 55 cards of a card game.
Unlike physical proofs, since these are set up for your actual print run you cannot choose the individual pages that are on the press sheet.
Pricing
Extra press sheets are a somewhat affordable add-on: 5 press sheets for $100.
Add $50 for every 5 press sheets beyond that.
List this item in our add-on box while locking in your price on our calculator. We will get back to you with a quote within 1 business day of receiving your request. Of course, if you’re not sure if this option is right for you, feel free to reach out to one of our friendly customer service Ninjas! We’ll be happy to talk with you and help you determine whether this is the right choice for you.
Freshly updated customer reviews from TrustPilot
Die Cut and Adding Flaps
What does it mean to die cut your book? Can you add flaps to your book? Are either of these options right for you?

Die Cut Flap
Die cutting your book adds an extra special custom look to your project. Whether you’re cutting a hole through the cover, or flaps for a children’s book, this special option is versatile and fun. Die cut your dust jacket to show the hard cover underneath, cut a window through the whole book, cut an area to be hidden by a flap. Want your book die cut in the shape of a Ninja? We can do that! (We’d love to do that.) Your imagination is the limit on this flexible added feature.
Pricing
Request pricing for this add-on while locking in your price on our quoting calculator. We’ll reach out to you with a custom quote (or questions) within 1 business day of receiving your request. Of course, if you’re not sure if this option is right for you, feel free to reach out to one of our friendly customer service Ninjas! We’ll be happy to talk with you and help you determine whether this is the right choice for you.
Freshly updated customer reviews from TrustPilot
Double Lamination
What is double lamination? Is it right for your book project?

Lamination and Dry Erase Workbook
If you’re looking to provide your audience with a fun interactive experience, consider adding gloss or matte lamination to both sides of your interior pages.
As a protective coating, lamination is often reserved for a book’s outer cover, a.k.a. the most vulnerable part of your book to general wear and tear. However, when added to your book’s interior pages, double lamination also provides each page with a surface that can be easily drawn on and wiped off for repeated use. This is a great feature to include for workbooks and activity books, or if you’re just really messy.
This treatment is an exclusive option for wire and spiral bound books.
Pricing
Request pricing for this add-on while locking in your price on our quoting calculator. We’ll reach out to you with a custom quote (or questions) within 1 business day of receiving your request. Of course, if you’re not sure if this option is right for you, feel free to reach out to one of our friendly customer service Ninjas! We’ll be happy to talk with you and help you determine whether this is the right choice for you.
Freshly updated customer reviews from TrustPilot
Endsheets
Endsheets, also known as endpapers or endleaves, are the pages at the beginning and end of hardcover books that are used to glue the inside pages (known as the “book block”) to the hardcover.
Hardcover book endsheets are usually made from uncoated paper stock which is slightly heavier than the paper used for the inside pages. When you’re using our instant calculator to price your book, keep in mind that the endsheets are already included in your price for books with 60 or more pages. Endsheets generally aren’t necessary for books with less than 60 pages, but if you’d like to add them you can enter that request in our “additional info” field when you save your quote. We will update your quote with that cost included and send you an updated price and spec information.

Design Considerations
Typically, endsheets are either left blank, printed with a solid color, or printed with a pattern. However, PrintNinja is not limited to those choices and can print anything you’d like on your endsheets. If you opt for custom artwork on your endsheets, keep in mind that the endsheets and the inside pages will be glued together on the innermost 10mm. Thus, these pages are not well suited for designs that span both pages.
Like what you see? Get your price.
You’d be surprised just how many options you can quote instantly on our book pricing calculator. If there’s anything you don’t see, let us know and we’ll get you a custom quote in around one business day.
Get Your PriceFreshly updated customer reviews from TrustPilot
Measuring Your Book Size for Printing
This article will teach you how to determine your book size for printing.
Since the first project rolled off PrintNinja’s presses in 2009, we’ve printed over six million copies of books, cards, games, and more. From tabbed catalog pages to book covers that double as drink coasters, we’ve just about seen it all. During the prepress process, one of the most common questions we are asked is how to properly measure your book. No matter what type of project you are printing, it is critical to understand the correct measurements of your book so that it turns out exactly like you imagine.
To measure the size of your book, all you need is a:
- Book
- Ruler
- Sturdy flat object (such as a book or piece of cardboard)
- Flat surface
Start with the height, which is the dimension parallel to the spine. Lay your book on a flat surface and hold the piece of cardboard against your book at the bottom of the spine. Place your ruler against the cardboard and measure to the top of your book, making sure to account for the extra length at the end of the ruler. Then do the same for the the width, which is the dimension perpendicular to the spine. You can see these steps illustrated in the photos. Measure to the nearest 1/8 of an inch.
If you’re printing a hardcover book, the cover extends approximately 1/8″ past the interior pages on all sides. This means that the cover of a 6″ x 9″ hardcover book will be closer to 6.25″ x 9.25″, so plan accordingly.


PrintNinja Tip
Once you have your book measurements figured out, make sure to check out our instant quote calculator to lock in your price for 90 days. Or, if you need some help with your project, contact our print experts for information.
Common Book Sizes:
- Comic Book: 6.625″ x 10.25″
- Magazine / Catalog: 8.5″ x 11″
- Children’s Book: 8.5″ x 11″ or 11″ x 8.5″
- Paperback Novel: 5.5″ x 8.5″ or 6″ x 9″
- Hardcover Novel: 6″ x 9″
- Booklets: 8.5″ x 11″
- Art Book: 8.5″ x 11″ or 9” x 12”
- Photo Book: 8.5″ x 11″ or 9” x 12”
For a more comprehensive list of standard book sizes, materials, and bindings, visit our industry standard pages.
What’s next?
We can customize just about anything, but if you’re looking for a more comprehensive list of project types, standard sizes, materials, and bindings, visit our industry standard pages.
Learn MoreFreshly updated customer reviews from TrustPilot
How To Count Internal Pages For Book Printing
How do you determine the interior page count for your printing project?
For years, PrintNinja has been a foremost source for offset printing services and information. As such, our expert team sees their fair share of misunderstandings throughout the printing process. Whether you’re printing a novel, coloring book, booklet, or art book, one of the most common errors we see during the quoting process is the incorrect counting of internal pages.
Our instant quote calculator is the perfect tool for pricing your project; however, if the page count in incorrect, the price you calculate may be misleading. Here we explain the proper way to count the internal pages of your project so that your printing experience goes as smoothly as possible.
When you’re ready, we’d love to help you self-publish your book. In the meantime, we’re available to answer questions about self-publishing, the printing process, or file setup. Click here to contact us, we’re always happy to help.
Counting Your Pages
The process of counting pages is quite simple and doesn’t require any fancy tools or calculators, but without a clear understanding of how interior page counts work, it is easy to miscount.
Your book will follow the same interior page count style you’d find in any novel, children’s book, or similar printed text. Page 1 always starts on the right side and each side of the sheet counts as one page. So, when you flip page 1 over, you’ll find page 2 on the back (now on the left-hand side). Page 3 is on the right, and when you flip it over, page 4 will be on the left, 5 on the right, and so on.
If your printed project contains any blank pages, they will still factor into your overall page count. Sometimes, if a chapter finishes on a right-hand page (an odd-numbered page), authors will add a blank page directly after it so the next chapter still begins on a new right-hand page. As with every printed project, formatting options for books are entirely up to the creator!
PrintNinja Tip
Why Are Page Counts For Printing In Multiples Of Four?
Most types of binding require books to be printed with interior page counts in multiples of four. This is because the pages of your book will be printed on large sheets, called parent sheets. The sheets either hold 8, 16, or 32 pages, depending on the size of your book. Do you notice how these numbers are all multiples of four? This ensures you won’t be left with any blank pages when the parent sheets are folded. Take a look at the image below for reference: the parent sheet has 8 pages per side (16 total).
After printing, sheets are folded and inserted into your book as one whole unit. As the diagram indicates, three sides of the pages are trimmed to allow for flipping. Since each set of four pages is actually just one large sheet of paper, folded and trimmed, books must have pages in multiples of fours. With that said, blank pages can be strategically added to the front or back of your book to satisfy this requirement without impacting your pagination, or the order in which your pages appear.
The multiple of four rule only applies to saddle stitched, perfect-bound, and case-bound (hardcover) books.
Exceptions to the Multiple of Four Rule
The multiple of four rule does not apply to wire bound projects, spiral bound projects, and board books. These books are bound differently, and folded sheets are not used to create the pages. Pages for these projects must only be in multiples of two.
If you’re publishing a board book for instance, your project will be printed using a different technique. Operators will print 2-page spreads and glue them to paper boards. Spiral and wire binding, which are popular for projects like activity books and cookbooks, are also printed using 2-page spreads. They are cut and drilled prior to being bound with the spiral or wire.
Interior Page Count Minimums and Maximums
It’s not the size of the book, but what’s in it that matters most! Still, if you’re wondering whether your project is a bit on the short side (or conversely, too long), you may be curious about internal page count minimums or maximums.
There’s almost always a solution for printing a book of any page count, it’s simply a matter of choosing the options to best suit your project. For instance, a saddle-stitched book with 85lb text paper can contain a maximum of 44 pages. However, if you use thinner paper – 70lb text, for instance – the page count increases to 68. If you need more pages, feel free to explore our additional binding options.
Perfect-bound books, on the other hand, always have minimum interior page counts. They too, vary based on the paper weight. The purpose is to create a volume thick enough to accommodate a spine.
Most importantly, keep in mind that you’re not locked into any single binding type. There are plenty of options available to suit each creator’s needs! To learn more, take a peek at our binding options. If you’re not sure if your interior page count, weight, and binding align, contact us and we’ll be happy to help out
Full Color vs. Black and White
This article will explain the differences in full color vs. black and white printing.

PrintNinja offers two types of printing: full-color CMYK printing (also known as 4-color process or 4/4) and black and white printing (also known as black-only or 1-color process or 1/1).
CMYK Printing
Full-color CMYK printing uses four colors of ink: Cyan, Magenta, Yellow, and blacK (also known as Key) to create millions of colors. Though different from digital RGB printing, CYMK printing can create many colors, and creates a beautiful, quality finish that digital printing can not provide.
Black (K) Only Printing
Black and white or black-only printing just uses one color of ink: black (also known as Key, or K).
Black and white printing is more cost-effective since it requires less setup, but it’s important to note that the black produced using only K will not be as deep as Rich Black, which is produced using all four colors of CMYK.

When you’re setting up your files for print, be sure to review PrintNinja’s Printing Color Guide. It addresses the most common color pitfalls and mistakes customers make, including RGB vs. CMYK, standard black vs. rich black, spot colors / color matching, and more.
Freshly updated customer reviews from TrustPilot
Book-Specific Specialty Options
What types of specialty book covers does PrintNinja offer?
These are our book-specific specialty options. If you don’t see see what you’re looking for in one of our specialty book covers, we bet you can find it in our most popular add-ons section. Select an option below to learn more.


Freshly updated customer reviews from TrustPilot
Variant / Sketch Covers

Variant Covers
Prevalent with comic books, variant covers refers to a comic printed with multiple covers. The purpose of these covers is to encourage fans to acquire multiple copies in order to complete their collection.
You can print as many variant covers as you like. X-Men #1 published the issue using five different images that formed a single image when laid side by side.
Pricing for variant covers are based on the number of designs you have.
Pricing
Quoting Calculator
Sketch Covers
Sketch covers are blank comic book covers often printed as special editions. The surface is generally uncoated so other artists can easily draw their own cover art. Your original cover artwork will still make an appearance as the first page inside the sketch cover. As you can see in the photo to the right the creator decided to make the sketch cover on the backside of their book.
Pricing
Quoting Calculator
Project Tip
You can combine multiple specialty options for a truly one-of-a-kind product at a fraction of the cost. For example, you can order a split bindery run with variant covers on both binding types, one of which, could be a sketch cover.
Pricing
Quoting CalculatorFreshly updated customer reviews from TrustPilot
Dust Jackets
What kind of dust jackets does PrintNinja offer?

Dust jackets, or book jackets, were originally used to protect the hardcover case of casebound books. Today, they are an art form all their own. PrintNinja’s are printed on 135lb text paper, and are finished with either a gloss or a matte lamination.
If you’re not sure where to start, check out our dust jacket template, plus information on how to set up the artwork for your project’s dust jacket.
Design Considerations
Dust jackets are detachable covers that wrap around your book and are held into place with folded flaps. These flaps, also called panels, make for a perfect place to print a book blurb, information about the author, or even reviews.
This is a unique specialty feature because it is an opportunity to provide the reader with another piece of art, other than what is found on your cover. A dust jacket is a great way to upgrade your book or provide a limited edition.


Ready to Get Started?
You’d be surprised just how many options you can quote instantly on our book pricing calculator. Save a quote today so you can lock in your price for 90 days, and make sure you select the checkbox to let us know you’d like a dust cover.
Get Your PriceFreshly updated customer reviews from TrustPilot
French Folds
What are french folds? Are they right for your PrintNinja project?

For perfect bound books, we can create covers that fold over at the ends like the flaps of a dust jacket. French folds (sometimes known as double gate folds) are a great way to add extra information to your cover and give your book a polished, unique feel.
Pricing
- $300 for orders of 2000 copies or less.
- $500 for orders of over 2000 copies.
Request pricing for this add-on by checking the appropriate box on our quoting calculator. More complex or extensive specialty options can be requested while you lock in your quote.
Ready to set up your file?
File setup is the same as setting up a normal cover, only you would add extra artwork for the folds on the left and right of the cover spread, similar to the flaps of a dust jacket. Keep in mind that there’s a small centering variance inherent in the printing process, so the folds of the flaps might be a millimeter or two off from your artwork. The size of your french fold flap is up to you. The example photo above shows a 6×9 inch book with 3 inch flaps.
Freshly updated customer reviews from TrustPilot
Cloth and Faux Leather Covers
What type of cloth and faux leather covers does PrintNinja offer?
Looking to upgrade your book? Cloth and faux leather covers add an element of luxury to your project. Paired with our other specialty options like foil stamping and debossing, PrintNinja gives you the tools to create a book worthy of any library.
Create Limited Editions
Cloth and faux leather covers are a great way to create a deluxe edition of your book. We can add cloth or faux leather to part of the total run of your book. For example, you could order 1,000 copies and have 100 made special as a deluxe edition. It’s a great way to add another reward level to your crowdfunding campaign, or to thank your closest supporters.
Please note: Due to the variations inherent in the dyeing process, the fabric and leather colors and textures will vary between print runs. You can order samples of our swatches on our specialty printing options sample page.
Cloth Cover Options


Faux Leather Cover Options


Looking for pricing?
If you’d like to price your cloth or faux leather covered book, start by filling out our hardcover book calculator and you’ll be able to request your specialty cover after you save your quote. We’ll then follow up with you custom quote within 1 business day of receiving your request.
Get StartedFreshly updated customer reviews from TrustPilot
Folder Pockets
What kind of folder pockets does PrintNinja offer? Are they right for your project?

Adding pockets to your inside front and back covers is a great way to increase the practicality of your project. By default they are 4″ tall and the width of your cover, so the size of paper that they can hold depends on the size of your book. Books that are 9″ x 12″ or larger are able to fit standard 8.5″ x 11″ sheets of paper. The pockets are made using our 10pt stock and will use the same coating as your cover unless otherwise noted. Folder pockets are a great option if your project has punch-outs or is accompanied by many small pieces, adding a folder pocket may provide a convenient way for your customer to store these parts of your project. Or, if your project contains any sort of extra handout (perhaps you’re printing a textbook), this is also a great option.
Pricing
Request pricing for this add-on while locking in your price on our quoting calculator. We'll reach out to you with a custom quote (or questions) within 1 business day of receiving your request.
Request PricingFreshly updated customer reviews from TrustPilot
Hole Drilling
Need hole drilling for your custom printed project? We can help.

We can drill custom holes for your documents so that they can easily be inserted into three-hole binders. This is a great option if you’re printing a looseleaf textbook – one where instead of having a traditional softcover or hardcover book binding, students provide their own three-hole binders. This allows students to not have to carry around a huge binder with them all day long – they can pick out the section that they’re using for day and simply insert it in their binder. This is also a great option for calendars or any project that you want to hang – having a pre-drilled hole makes it much easier on your customer to hang up your calendar symmetrically. No more wrestling with a level trying to find the perfect spot to stick in the push-pin!
Pricing
- $100 startup plus 10 cents per unit.
List this item in our add-on box while locking in your price on our calculator. We will get back to you with a quote within 1 business day of receiving your request. Of course, we’re happy to talk with you if you’re not sure if this option is for you. Contact one of our friendly customer service ninjas today!
Freshly updated customer reviews from TrustPilot
Split Binding
This article will teach you about split binding and help you determine if it’s the right option for you.

If you’re interested in printing two or more versions of your book you can save money by doing a split binding run instead of placing separate orders. The interior pages for every copy are printed all at once before being separated for the different bindery runs, so the inner “guts” of your book project will need to be exactly the same in every version (the hardcover version can’t have a different copyright page than the softcover, for instance). However, you can include variant covers within both bindery runs.
Not sure if this option is right for you? Feel free to give one of our friendly customer service Ninjas a call. We can tell you more specifics about doing a split binding run, and can guide you through the process of figuring out whether split binding is right for your project.
Pricing
Request pricing for this add-on while locking in your price on our quoting calculator. We'll reach out to you with a custom quote (or questions) within 1 business day of receiving your request.
Quoting CalculatorFreshly updated customer reviews from TrustPilot
CD/DVD Sleeves
What type of custom CD and DVD sleeves does PrintNinja offer?

Clear PVC CD DVD Sleeve
For certain projects, including a DVD or a CD with your book just makes sense. Maybe your book is about understanding a certain software, and you’d like to include a CD-Rom with the book so the user can follow along. Or, if your book is a compilation of lyrics from your original music, you may want to include one of your CDs so readers can read along with your lyrics as they listen. Or maybe your book is a children’s storybook, and you’d like to add a DVD with a short animation of your story on it so that children can easily watch your story on the go!
Have a CD or DVD you’d like to include with your book? Add a clear PVC sleeve to your inside front or back cover for easy storage. Please note that PrintNinja cannot create CDs or DVDs, so you will need to obtain those on your own and manually insert them.
If you will be using PrintNinja’s warehousing and fulfillment services, though, then you can save time by sending your CDs or DVDs to us and having us insert them into the custom CD and DVD sleeves in each order.
Pricing
- $0.30 per unit.
Freshly updated customer reviews from TrustPilot
Boardless Case Binding
What is boardless case binding?

Boardless Case Bound
Boardless case binding is a little known binding option that’s unique and charming. This special cover option has the finish and construction of our case bound books without the rigid board inserted between the covers. The end result is a pliable soft cover with a pronounced durable edge. An excellent alternative for children’s books or journals that is sturdier than a softcover, but friendlier than its case bound cousins.
Boardless case binding can be matched with our other materials and finishes for an extra special outcome. Ask for gloss or matte lamination, pair it with foil stamping or a spot varnish. Heck, we can even replace the paper with our cloth or faux leather. Stand apart from the pack with this delightful option.
Contact us for a custom quote to add this feature.
Pricing
Request pricing for this add-on while locking in your price on our quoting calculator. We’ll reach out to you with a custom quote (or questions) within 1 business day of receiving your request. Of course, if you have any other questions, we can help you figure out if this binding style is right for you.
Freshly updated customer reviews from TrustPilot
Rounded and Backed Case Binding

A rounded and backed case binding gives your spine a classic rounded shape. This older style of bookbinding was used to accommodate hand-sewn signatures and build a shoulder and hinge for the boards of the cover. Modern rounded spines are more of an aesthetic choice that can give your book a classical old-world look and feel. As seen in the photo, a rounded and backed case binding will give your project a vintage aesthetic. You can even pair it with a raised band spine to really lean into your book looking older.
Ask for a custom quote to add a rounded and backed case binding to your project. Of course, if you’re not sure if this option is right for you, feel free to ask one of our friendly customer service Ninjas for their thoughts – we’ll help you out!
Please note: The rounded spine area will be about 1-2mm wider than the standard spine width, so design accordingly.
Pricing
Request pricing for this add-on while locking in your price on our quoting calculator. We'll reach out to you with a custom quote (or questions) within 1 business day of receiving your request.
Quoting CalculatorFreshly updated customer reviews from TrustPilot
Raised Band Spine
What is a raised band spine? Is it right for your PrintNinja project?

The raised band spine is a decorative feature that imitates an old book binding technique. Back in the old days when books were bound by hand, bands of thread would be used to hold all of the page signatures in place. Those bands wrapped around the spine to add stability and structure. Modern books don’t require this method, but the raised bands are still used to imitate those classic old tomes. Simulated with leather or wood, these ridges accent the spine on leather bound books.
- Faux Leather Casebound
- Minimum Spine width of 25mm
Combine this with the rounded and backed spine for a rich antique aesthetic. Ask to add the Raised Band Spines with our faux leather option and give your project a shot of class and legitimacy. Add in gilded edges, why dontchya, and go whole hog, Mr. Fancy Pants! Your project will look like it came straight out of a Dickens novel.
Contact us for a custom quote to add this feature.
Pricing
Request pricing for this add-on while locking in your price on our quoting calculator. We'll reach out to you with a custom quote (or questions) within 1 business day of receiving your request.
Quoting CalculatorFreshly updated customer reviews from TrustPilot
Accordion Books
What are accordion books?

Multifold Book With Hardcovers
Although we love a good old-fashioned smyth sewn book, we certainly aren’t limited to printing books with traditional turned pages. As the name suggests, accordion-style books (also known as leporello books) involve printing on elongated pieces of paper that are then glued together at the ends and folded into an accordion-style pleat. The folds alternate between the front and back so the paper stacks nicely on top of itself in its folded state.
Recommended Material
All of those folds make this style of book more vulnerable than our traditional book bindings, so we recommend using a paper stock of 105lb, which ensures the book will be both sturdy and flexible.
Pricing
This style of binding requires a custom quote. You can request pricing using our contact page. To make sure we can get you an accurate quote as soon as possible, make sure you include the following information:
-Size of each panel of the accordion book (this will also be the size when the book is completely folded up)
-Total unfolded size: this will be your panel size multiplied by the number of panels.
-Whether you want a gloss or matte finish
-Number of accordion books you’re looking to order.
(Please note that like all books, our minimum order quantity for accordion books is 250. If you’re looking for a smaller quantity, we recommend contacting Chicago Pressmen and asking about their brochure options.)
Freshly updated customer reviews from TrustPilot
Padded Covers
What are padded covers? Are they right for your book project?

To give your book some extra heft, we can build a cover that incorporates a thin layer of foam padding between layers of soft cardstock. This gives a plusher, heavier feel and protects the cover from minor dings and dents – making it a great option for children’s books, letting them withstand even the toughest of playdates. Not only is this option is perfect for giving a softer feel to children’s books, padded covers can also be used for adding protection to cookbooks, photobooks, or any other type of project that will see heavy use.
Pricing
Request pricing for this add-on while locking in your price on our quoting calculator. We’ll reach out to you with a custom quote (or questions) within 1 business day of receiving your request. Of course, if you’re not sure if this option is right for you, feel free to ask us! Just reach out to one of our friendly customer service Ninjas, and they’ll gladly help you determine if this option is right for your book project.
Please note: this option can only be applied to casebound hardcover books.
Freshly updated customer reviews from TrustPilot
Easel Stand Covers
What type of easel stand covers does PrintNinja offer?

Easel Stand Cover
Sometimes your project needs that practical element to make it all come together – and our easel stand option is a great practical element. This cover option can transform a cookbook into countertop companion – so that your customer can easily execute your great recipes with a sauce-coated spatula in one hand and an overflowing measuring cup in the other. Use this cover style to ceate a daily calendar that can be displayed on your customer’s desk – or stowed away in a file cabinet drawer for convenience. This combination of a wire binding and a collapsable cover transforms your project into a versatile tool.
Contact us for a custom quote to add this feature.
Pricing
Request pricing for this add-on while locking in your price on our quoting calculator. We’ll reach out to you with a custom quote (or questions) within 1 business day of receiving your request. Of course, if you’re not sure whether or not this option is right for you, we’ll be happy to talk to you and figure it out with you. Just give us a call and one of our friendly customer service ninjas will get back to you.
Freshly updated customer reviews from TrustPilot
Foam Covers
What kind of foam covers does PrintNinja offer?

Wanting to print a book that is both fun and durable? Foam books are your dream come true. Our foam books are made of child safe EVA foam, which allows them to be cut into custom shapes and withstand even the roughest of play dates. You can even get these books wet without damaging them. Plus, no fear of errant paper cuts!

Die-cut Foam Books
EVA foam is easy to cut allowing customers to create one of a kind shapes for their products. Reach out to our Ninjas to see if one of our foam covers can be cut into the design you want!

EVA Foam Color Options
Think our foam books can’t get any better? Think again! EVA foam is available in an array of colors allowing even more options to make your project one of a kind. From bubblegum pink to sky blue to sun yellow, we have so many color options that you’ll be sure to find one that is perfect for your children’s book project.
Ready to try for yourself?
To get a quote for this option, simply fill out our custom request form with your book specs. We will get back to you with a quote within several business days of receiving your request.
Request custom quoteFreshly updated customer reviews from TrustPilot
Aqueous Coating
What is aqueous coating?

Aqueous Coating
Varnishes work great for playing cards, comics, catalog mailers, and all sorts of other saddle-stitched projects, but any product that warrants frequent use will be much more susceptible to scratches and scuffs. That’s why we offer aqueous coating, for those projects that need a little extra protection. It also provides a very particular textural feel – kinda like velvet. If you’re interested in having a really unique texture to your project, this coating might be the right finish for you.
Applying an aqueous coating will help protect your cover against the signs of every day wear-and-tear, keeping your items looking just as good as when they first came out of the box. It also seals in the ink on the paper for extra preservation from air exposure, which is an important design consideration for collectible items like limited-run comics or exclusive card game expansion packs.
Pricing
Request pricing for this add-on while locking in your price on our quoting calculator. We’ll reach out to you with a custom quote (or questions) within several business days of receiving your request. We can also talk with you about whether we think aqueous coating is the right type of finish for your product.
Freshly updated customer reviews from TrustPilot
Golden Tape Binding
What is golden tape binding? Is it right for your PrintNinja project?

Little Golden Books are a publishing house beloved for the children’s stories. Among their book portfolio, they include classics like The Poky Little Puppy, The Little Red Hen, and The Saggy Baggy Elephant. Despite how iconic their stories are, they may be most remembered for the golden binding. If you’re trying to create a book that emulates the style of Little Golden Books, golden tape binding may be the perfect option for you.
That nostalgia can be added to your project with a gold metallic sticker. This option is especially great for hardcover children’s and art books. Manufacturing only allows the sticker to be adhered to hardcover (casebound), perfect (softcover), board book bindings and dust jackets.
Dark ink can be printed on the tape to mimic the Little Golden Books pattern or to display your title. To avoid any visibility issues, light color is not printed on top of the golden tape.
Have more questions about our golden tape binding option? Feel free to contact one of our friendly customer service ninjas. We’ll be able to guide you through whether or not this option is right for your project.
Freshly updated customer reviews from TrustPilot
Proofing Options
Electronic Proofing
If you are an experienced printer, working on a tight schedule, or just looking to save some money, electronic proofing is our fastest and most cost-effective option.
Our electronic proofing process begins with an in-depth file review completed by one of our pre-press experts. Once your files are print-ready, we’ll generate a PDF proof with printers’ marks that will show you how your project will look, and you get to look it over one last time before sending it to press.
Electronic Proofs are fast and cost-effective, but they won’t show you how your colors will turn out when printed.
If you are new to printing or are concerned about making sure your colors translate to print in the way you think they will, we highly recommend that you do hard copy proofing for your project instead.
- Electronic Proofing Cost: $0
- Electronic Proofing Turnaround: 1 Business Day

Hard Copy Proofing Sheet
For those who want to see the way their colors will come out when printed offset, we offer affordable hard copy proofing as well as electronic. Hard copy proofing for games is produced differently.
Our standard hard copy proof sheet is one offset-printed parent sheet, which for most projects (8.5 in x 11 in or smaller) means 8 pages of content. Larger projects can only fit 4 pages on a parent sheet.
This sheet will be printed on the same paper stock and the same offset printing press that your final product will be printed on, so we recommend you choose the inside pages with the colors you’re most concerned about.
For an extra $150, you can also add a hard copy proof of your cover.
Additionally, you can add extra press sheets for $150 each if you need to see more than 8 inside pages.
- Hard Copy Proofing Sheet Cost: $250* (add $150 for cover)
- Hard Copy Proofing Sheet Turnaround: 2 Weeks“]
*In certain instances, the hard copy proofing sheet process varies as follows:
- Board Book Projects: $350, 3-week turnaround, includes one offset-printed board book
- Card Game Projects: $450, 2-3 week turnaround, includes up to 55 standard-size offset printed cards
- Board Game Projects: Depends on included components, 2-4 week turnaround
- Sequential Foil Numbering / Textured Paper: Add $50 per option
- Foil Stamping / Emboss / Spot UV: Add $100 per option
- Specialty Finish (Glow / UV Pearl / Anti-Scratch): Add $100 per specialty finish
- Dust Jacket: Add $150
Freshly updated customer reviews from TrustPilot
Specialty Packaging Options
We offer several specialty packaging options at PrintNinja. From sleek custom slipcases that will provide your printed project with the utmost protection, to shrinkwrap that will make your project retail ready, we can help you find the perfect packaging option for your project with PrintNinja. Custom slipcases are a durable yet elegant style of packaging fit for any project from magazines to hardcover books. We can shrink wrap your books or games before shipping them to you, keeping them sealed and ready for sale. We also offer custom shipping packages – we can print your logo and any useful information on ready to ship packages, allowing you to send your fans more than your merchandise. This is a great way to brand your business, or, if you’re fulfilling orders from a Kickstarter campaign, a great way to ship in any extra tier prizes along with your final project. No matter your packaging problem, we can help you find a solution and get your project to your customers in style with one of our specialty packaging options.
Specialty Packaging Options


Freshly updated customer reviews from TrustPilot
Custom Slipcases
Custom slipcases not only protect your books from dust, light, and damage, but they turn your project into a beautiful display that stands out on any bookshelf.
PrintNinja can handle just about any slipcase size from magazines to DVD’s to coffee table books. Because slipcases are so customizable, the best place to start is by submitting a request for a custom quote. We’ll be able to help you determine the best dimensions so your project will fit into your slipcase comfortably.
If you order a custom slipcase for your project, we will ship your books inside their slipcases. This helps reduce your shipping costs and protects the slipcovers in transit. We never ship slipcases separately because they can be damaged in transit.

Specialty Options for Slipcovers
You can customize your slipcase with any amount of specialty features and graphics of your choice.

Get Inspired
Some creators choose to repeat their cover artwork onto their slipcover, but you can also create entirely new artwork. B-Squad: Soldiers of Misfortune chose a new design for their slipcover and combined many specialty options to add value to their project, including anti-scratch matte lamination and sequential foil numbering.
Like what you see? Get a quote.
Request pricing for this add-on while locking in your price on our calculator. We’ll start working on your custom quote within one business day of receiving your request.
Get StartedFreshly updated customer reviews from TrustPilot
Shrink Wrap
What type of shrink wrap packaging does PrintNinja offer?

Shrink Wrapped Comic Foil Stamping
Shrink wrap is commonly used to stabilize products, unitize them, keep them clean or add tamper resistance. A lot of creators shrink wrap their comics for easy transportation to and from cons while keeping their product sanitary and adding mystery for the reader who wants to know what is inside.
Board and card games are very popular items to shrink wrap as they have many pieces that are critical to the game’s play. For the purpose of easy opening, we offer shrinkwrap that includes a pull tab, allowing the player to unravel your game’s shrinkwrap in one pull.
PrintNinja can shrink wrap any size book or board game and does so after assembling all components inside of your board or card game.
If you are planning to use a warehouse and fulfillment service we recommend shrink wrapping your product to avoid warehouse gunk damaging your project.
Shrink Wrap Packaging Pricing
$100 startup.
Plus: 25 cents per unit for projects 8.5 inches x 11 inches and smaller.
Plus: 35 cents per unit for larger projects.
List this item in our add-on box while locking in your price on our calculator. We will get back to you with a quote within 1 business day of receiving your request.
Freshly updated customer reviews from TrustPilot
Custom Shipping Packages
What type of custom shipping packaging is available to you?

Custom Shipping Box for Books and Games
PrintNinja offers custom shipping boxes to help you represent your product and brand at all times. There are two sizes available: 10″ x 6.5″ x 3″ (seen in the photo) or 12″ x 12″ x 2″. You choose the color and information you would like on your package and we will assemble your box and product together.
Shipping Options
PrintNinja offers many shipping options for you to choose from. We can assist you with split shipping, freight forwarding, and even warehouse and fulfillment services, which includes pick and pack.
Crowdfunding Tip
When thinking about your rewards, you can cut down on cost if your reward can fit into the same packaging as your book or game. For example, rewards that can fit inside a book could include a postcard, poster, stickers etc. When adding rewards on the go, most creators overlook packaging and end up wasting money shipping two boxes to the same address.
Custom Shipping Packaging Pricing
Request pricing for this add-on while locking in your price on our quoting calculator. We’ll reach out to you with a custom quote (or questions) within 1 business day of receiving your request.

Custom Shipping Box for Books and Games
Product Packaging
Product packaging sells your game for you. Our team can calculate an accurate box size for all of your components so your items are secure and shipping costs are minimal. We can also help you stand out, here are some options we offer:
- 2 Piece Box-paperboard-tin
- Tuck Box
- Deck Box
Add Ons:
- Handles
- Foil Stamping
- Spot UV
- Emboss/Deboss
- Shrink Wrap
Freshly updated customer reviews from TrustPilot
Custom Game Printing Services
Interested in custom game printing? We can help.
When you choose to print your game using the offset printing method you open yourself up to a world of endless possibilities. Select a category below to learn more about our materials, components, customization and more.
If you’re interested in reading more about custom game printing, be sure to check out our custom board game hub. This part of our site contains all the information you need to know about creating a board game – beyond just the standards listed here, this hub also contains detailed information on all the types of materials and packaging types we offer for your game. We’ve also analyzed board card games to figure out what makes them work – and how you can apply these principals to your custom card game. There’s lots more to explore, like special features you can add-on to your card game to make it stand out. Check it out!


Freshly updated customer reviews from TrustPilot
Game Boards
It’s not a board game without a board! Well, sort of – for those free-spirited designers we offer two alternative playing surfaces alongside the traditional option: playmats and tiles. Of course, boards are the most common playing surface. Select a category below to learn more about your playing surface options.


Freshly updated customer reviews from TrustPilot
Size of Boards
This article will teach you more about the standards for board game sizes.

For an accurate quote, you’ll need to provide us with the width and height of your board in it’s unfolded state on our quote request form. Based on this number and the panel/fold style you select, we will determine the size of your board in it’s folded formation. Keep in mind the larger your board the bigger your box will have to be.
If you need a large board we suggest checking out our playmat playing surface option. This material can be folded over more times than a board, making it possible to fit into a smaller box.
Example Sizes of Popular Board Games
- Scrabble: 15″ x 15″ double panel – 1/2 fold.
- Candy Land, Chutes & Ladders: 15″ x 20″ double panel – 1/2 fold.
- Monopoly, Clue: 20″ x 20″ double panel – 1/2 fold.
- Risk: 20″ x 30″ four panel – 1/4 fold.
Freshly updated customer reviews from TrustPilot
Board Game Folding Options

Your game board is going to have to fit into the box with your other game components – so you need to think about your board game folding options as you design your board. In fact, board size (both folded and unfolded) should be one of the earliest design decisions that you make and one that you regularly test during your board game playtesting period. The number of folds can be changed based on the content of your game and the design – but once you know that you’re going to fit into a 12″x12″ box so that your game can sell to retail stores, you should plan on developing your board into that outside dimensional envelope.
Once you’ve come to the appropriate box size, you’ll need to think through your total artwork size and the multiple ways to fold your game board. Generally speaking, the folds don’t impact playability – so you can make artistic and gameplay decisions with the board. Think of a game that you have liked in the past and how your game is going to be played. Is this a coffee table game? A kitchen table game? Something to play on a bus? The size and number of folds can dramatically change the cost and the playability of the final product. Below, we have five panel styles (fold options) that make it easier to fit your board into two piece box. The following panel options work with all our thickness options.
All of the board game folding options shown below are appropriate for square/rectangular boards. Different board shapes – hexagonal, circular, etc. – can be quoted separately. Costs on non-rectangular boards are difficult to estimate without seeing artwork. Every shape other than rectangular has higher labor requirements for scoring, cutting and gluing.


Freshly updated customer reviews from TrustPilot
Board Finishes and Thickness
This article will teach you about board game finish and thickness.
Finishes are applied on top of your printed boards for the purpose of adding protection and artistic style. The finish type (varnish or lamination) protects the ink and prevents scratches. The finish style (gloss or matte) adds an aesthetic appeal to your project. Keep in mind, game boards, tiles, and tokens have different finish requirements because of their thickness.

Board Finishes
When choosing a board finish, you only need to select a style (gloss or matte). Gloss adds a reflective shine, while matte adds a duller shine and smoother touch.
Since our boards are generally produced from (at least) 2mm high-density paperboard they require lamination because it’s the best finish for thicker material. Not only that, but game boards take a beating so we’ve decided to make the most protective finish, lamination, the default board finish.
Tiles and Token Finishes
Token and tiles are produced from (at least) 1.5mm greyboard, a thinner option than game boards, so you’ll be required to pick a finish type (varnish or lamination) and a style (gloss or matte).
Varnish is the most common finish type used for thinner material, but don’t feel you have to stick to the trends, your tokens may deserve the most protective finish (lamination) that also makes your pieces *water resistant.
Gloss or matte is ultimately a creative choice, gloss adds a reflective shine, while matte adds a duller shine and smoother touch.
*water resistant is not water proof.
Matte (Anti-Scratch)
Anti-scratch matte lamination is highly recommended if you’re using a matte style finish and your board artwork has a large coverage area of dark ink. Matte is prone to showing scratches on dark ink, so if you have pieces (meeples, pawns, etc.) that are moved around the board often, we recommend adding anti-scratch matte-lamination or choosing gloss.
Thickness Options
The thicker the piece the more durable. Beyond that, this is your creative choice, but if you’re struggling here are the industry standards of each piece:
- Game boards: 2mm
- Tiles: 1.5mm
- Tokens: 1.5mm
Freshly updated customer reviews from TrustPilot
Playmat

Our custom playmat option is produced by printing your CMYK or black and white design onto cloth, then gluing and sewing that fabric onto a rubber slip resistant mat.
The biggest benefit of a playing mat is the ability to have a larger surface for your game. The photo to the right shows a 30″ x 30″ mat 1/16″ thick that can easily fold into a tidy square and fit inside a 13″ x 11″ x 3″ box.
If the creators of Twister could do it all over again they’d probably use our playmat.
If you’re interested in reading more about creating board games, be sure to check out our custom board game hub. This part of our site contains all the information you need to know about creating a board game – beyond just the standards listed here, this hub also contains detailed information on all the types of materials and packaging types we offer for your game. We’ve also analyzed some of your favorite board games to figure out what makes them work – and how you can apply these principals to your custom game. There’s lots more to explore, like special features you can add-on to your game to make it stand out. Check it out!
Freshly updated customer reviews from TrustPilot
Cardboard Mats/Tiles

Cardboard mats and tiles are interchangeable terms, they are both used primarily to build a game board surface. Perfect examples of this function are, Settlers of Catan using large hexagon mats and Labyrinth using 32, 2″ x 2″ tiles.
Tiles vs Tokens
Generally, tiles are considered to be larger pieces, unlike tokens that are mostly used to represent resources. When deciding between mat/tiles or tokens, consider whether you need many little pieces to act as counters or a few large pieces to create a board. If you need a handful of small pieces you should look into our token options.
Material and Printing
Cardboard mats and tiles are produced by applying printed paper to high-density paperboard then cut to size and shape. Based on your printing choice we can wrap both sides of the tile with your artwork (two-sided printing) so players can flip the tiles and use each side. Or, the cost-effective option, is gluing your design to one-side (one-sided printing) and leaving the cardboard backing exposed.
Custom Tile Shapes
Our default tile shape is square, but we have the machinery and know-how to die cut your tiles into other shapes. If you’d prefer another shape (i.e. hexagon) enter the width and height of the furthest points on your shape and let us know your custom shape request in the additional info box at the end of our quote form.
Multiple Variants
Cardboard mats are used to assemble the playing field. If your playing field is one large grassy area then you may just need one piece of art printed on each tile. If your playing field is an ever-changing universe like Labyrinth the A-maze-ing game, then you’ll need to let us know the number of different artwork for each specific tile in our board game request form. The more varieties of artwork you need the more printing plates we may need to create (also based on size and number of tiles) which will increase your cost.
Freshly updated customer reviews from TrustPilot
Playing Card Dimensions
We offer standard card sizes and can also print customized card dimensions and shapes. Select a style below to see the size, common uses and more.
If you’re interested in reading more about creating card games, be sure to check out our custom card game hub. This part of our site contains all the information you need to know about creating a card game – beyond just the standards listed here, this hub also contains detailed information on all the types of materials and packaging types we offer for your game. We’ve also analyzed popular card games to figure out what makes them work – and how you can apply these principals to your custom card game. There’s lots more to explore, like interviews with card game creators who have printed with PrintNinja, and special features you can add-on to your card game to make it stand out. Check it out!
Card Dimensions


Freshly updated customer reviews from TrustPilot
Poker Style Playing Cards

Poker style cards are the most commonly used playing card. The style name, poker, originated from the popular game of poker, but now refers to the card size 3.5″ x 2.5″.
Poker Card Packaging
A standard poker deck (52 cards) is typically packaged in a flip top tuck box. Up to 110 cards can fit into a custom tuck box. Once your card count exceeds 110 cards, or 220 cards in two decks side by side, you will need a two-piece box to contain your deck. The flip top tuck box is not able to contain more than that amount without tearing.
Poker Card Material
There are three card materials to choose from – card stock, plastic or foil stock. The standard stock for the game industry and what most of your favorite games use is 300 GSM Blue Core card stock.
Tuck boxes are made with 10pt. coated 1-sided card stock – the industry standard.
Custom Poker Cards
Poker style doesn’t mean you have to create a 52-card deck with suits, although we are experienced with that! The poker card size is perfect for playing card games or accompanying a board game. Here are some examples of poker style card games we’ve printed:


Playing Card Specialty Options
The best part about printing offset vs. POD is the amount of specialty options that are available. To the right is an example of a gold foil stamping. View our other options below:
Freshly updated customer reviews from TrustPilot
Tarot Style Playing Cards
Want to print tarot style playing cards? We can help!

Premium Tarot Cards Printed by PrintNinja
Do you want to help others unlock the answers to life’s most pressing questions? Or, are you designing a game that requires a specific card size? Whether you’d like to print a divinatory deck or you’re building a one-of-a-kind set, tarot cards are a fitting choice for many applications. It’s speculated that these mystical tools have been used to help people see into the future since the 15th century, but today they can be implemented in several different ways.
The standard size for our tarot style playing cards is 2.75” x 4.75,” which is an inch longer than regular poker cards. This custom length can be useful for distinguishing card purposes if you’re creating a game that requires multiple decks. For instance, tarot-sized cards might represent characters, while poker-sized cards might be used for a separate function of game play, like resources.
Tarot Card Packaging

Are you looking for a special way to take your tarot deck to the next level? If so, you can use customization options to design a custom tuck box to host your deck. Design elements like foil stamping are especially fitting for anyone using the cards to hone divine power, so don’t be afraid to get a little fancy with your packaging using the following options:
Ready to Get Started?
We’ve created a custom pricing calculator so that you can explore all the different printing choices, shipping methods, and get an instant price for your project. You can also customize just about anything, from size and paperweight to specialty options and so much more.
Get Your QuoteFreshly updated customer reviews from TrustPilot
Square Style Playing Cards

Our square style playing cards are 2.5″ x 2.5″. Creators typically use square cards in three ways: for games that utilize a “draw pile” function, for children’s games since this size can easily be picked up, or for games that require players to lay their cards down in a grid format.
Games that use square cards:
- I Spy Ready, Set, Silhouette
- Castle
Square Card Packaging
If your square cards are part of a board game, use a two-piece box to house the cards. If your game only requires cards to play, we can make a custom tuck box, or you can shrink-wrap your deck without a box.

Square Card Material and Alternatives
If you’re using our square style playing cards for a grid, or to act as the playing board, our tiles option may be a better fit for your game. Tiles can be customized to any size, and they are made of high density paper board, providing increased durability and easy handling.
If you’re interested in reading more about creating card games, be sure to check out our custom card game hub. This part of our site contains all the information you need to know about creating a card game – beyond just the standards listed here, this hub also contains detailed information on all the types of materials and packaging types we offer for your game. We’ve also analyzed popular card games to figure out what makes them work – and how you can apply these principals to your custom card game. There’s lots more to explore, like interviews with card game creators who have printed with PrintNinja, and special features you can add-on to your card game to make it stand out. Check it out!
Freshly updated customer reviews from TrustPilot
Mini Style Playing Cards
Want mini style playing cards for your custom board or card game? We can help.

Our mini-sized card die is 1.65″ x 2.5″ – the width of a standard poker card.
Mini-sized cards can be beneficial to your game in a variety of ways:
- The smaller size is easier for kids to handle.
- They are extremely portable – ideal for traveling.
- Brands can give away mini decks as an easy gift to build customer loyalty.
- They are great to sell for fundraisers, give away as party favors or other special event mementos.
- Some board games may need a variety of card sizes to distinguish between game features, like Monopoly’s Chance cards.
We’re sure there are many more ways to use mini cards – we can’t wait to see what you come up with!
If you’re interested in reading more about creating card games, be sure to check out our custom card game hub. This part of our site contains all the information you need to know about creating a card game – beyond just the standards listed here, this hub also contains detailed information on all the types of materials and packaging types we offer for your game. We’ve also analyzed popular card games to figure out what makes them work – and how you can apply these principals to your custom card game. There’s lots more to explore, like interviews with card game creators who have printed with PrintNinja, and special features you can add-on to your card game to make it stand out. Check it out!
Freshly updated customer reviews from TrustPilot
Non-Standard Sized Playing Cards
Non-standard sized playing cards arre any square or rectangular-shaped card that requires a width and length not associated with a commonly used card, such as poker or tarot.
Cost-Efficient Card Dies
Non-standard sized playing cards are cut to size using a die. Dies are metal blades that cut through paper by applying heavy pressure. We have many pre-made custom die sizes in stock, as listed below. If you don’t see the die size you are looking for, never fear, we can create a brand new die to your specs. However, creating a new die will add a significant cost to your project, approximately $500. If you would like to keep costs low, we recommend choosing from our selection.
Cost-Efficient Card Counts
You can also cut costs by choosing the right card count. We discuss this in our card count section, but it’s worth repeating.
The offset method prints all of your cards onto one large parent sheet. Cost is directly correlated to the number of parent sheets needed for your project. In the “Custom Die Sizes in Stock” section below, the parentheses show how many cards fit onto one parent sheet based on die size. You will be able to cut costs by making your card game equal to or less than the number of cards that can fit on one sheet.
For example, if you use a 2.45″ x 3.45″ die – which can fit 55 cards on one sheet – you may want to limit your game to 55 cards or less.
If you don’t see what you’re looking for we can create a custom sized playing card.
Custom Die Sizes in Stock
- 3.95″ x 1″ (104/sheet)
- 2.45″ x 3.45″ (55/sheet)
- 2.25″ x 3.45″ (55/sheet)
- 2.15″ x 3.15″ (55/sheet)
- 2″ x 3.25″ (55/sheet)
- 2.4″ x 4.5″ (44/sheet)
- 2.45″ x 3.9″ (44/sheet)
- 3.85″ x 2.9″ (36/sheet)
- 2.95″ x 4.1″ (36/sheet)
- 2.8″ x 4.4″ (36/sheet)
- 5.1″ x 3.35″ (24/sheet)
- 5″ x 3.5″ (24/sheet)
- 4.75″ x 3.5″ (24/sheet)
- 5.5″ x 3.75″ (21/sheet)
- 4″ x 6″ (21/sheet)
- 4″ x 5″ (21/sheet)
- 4.3″ x 6.3″ (12/sheet)
Freshly updated customer reviews from TrustPilot
Custom Shape & Size Playing Cards

Your design possibilities are endless with custom shaped cards. They can be as simple as a circle, or more complex like the outline of your heroic character or protagonist.
Custom shaped cards are not the same as non-standard sized cards, an unusual sized square or rectangle. We have 17 stocked non-traditional card sizes for you to choose from. If you’re so unique that we don’t have your size in stock you may use the Custom Shape and Size section on our card form to request a quote for your dimensions.
Creating Custom Cards
Cards are shaped with the die cutting method. The die, a set of steel blades, is formed into the desired shape and pressed into your printed card stock. The heavy weight cuts out the custom shape. This process does not allow for a lot of small intricate cuts, like a detailed snowflake. Always ask! Your account rep will be able to tell you if we can accurately produce your custom shape.
Watch a video of die cutting in action.
Cost
All custom shapes and sizes require us to create a new die, which is more expensive than using in stock card sizes – we already have these dies made. Depending on your design, creating a new die will likely come with an additional cost of $500.
Freshly updated customer reviews from TrustPilot
Playing Card Material
Which playing card material is right for you? It really depends on your game – and luckily, we offer a wide selection of options for you to choose from for your custom card game. Select an option below to learn more about our available card stocks and finishes, and find the perfect playing card material for you!
Playing Card Material Options


If you’re interested in reading more about creating card games, be sure to check out our custom card game hub. This part of our site contains all the information you need to know about creating a card game – beyond just the standards listed here, this hub also contains detailed information on all the types of materials and packaging types we offer for your game. We’ve also analyzed popular card games to figure out what makes them work – and how you can apply these principals to your custom card game. There’s lots more to explore, like interviews with card game creators who have printed with PrintNinja, and special features you can add-on to your card game to make it stand out. Check it out!
Freshly updated customer reviews from TrustPilot
Playing Card Stock
PrintNinja offers many high-quality weights and core types of playing card stock for custom card and board games. Fully understanding these terms and knowing what card type suits your needs is the first step in creating your game.

52 Sweat Up uses 280gsm cardstock, out most popular option
Cardstock Weight
Cardstock weight is measured in GSM (grams per square meter). This is the universal measure for playing card paper weight. The higher the number (300gsm, 330gsm, 350gsm), the thicker and heavier the stock and card will be. Generally speaking, heavier cardstock gives your cards a higher quality feel. We also offer plastic playing cards made of a durable PVC. These durable, waterproof cards are a great option for party games and children’s games.
Card stock with blue core (top) and black core (bottom)
Card Cores
Card stock is also categorized by its core: blue, black or coreless. You can tell what core cards use by ripping them in half as seen in the photo to the right. This shows blue core on top and black core on the bottom. The core prevents the card from being transparent when held up to a bright light.
Blue core is the standard and is used in most of the games found at your favorite game shop.
Black core is the highest quality card core. This is favored by casinos because the dark core doesn’t allow players to see through cards.
PrintNinja Tip
PrintNinja’s Cardstocks
- 280gsm Blue Core
- 310gsm Black Core (Linen)
- 330gsm Black Core
- 300gsm Coreless
- 350gsm Coreless
- 300gsm Foil Stock
- 0.3mm White PVC
Ready to get started?
We’ve created a custom card game pricing calculator for you to explore all our different printing choices, shipping methods, and get an instant price for your project. You can also customize just about anything, from size and packaging, to specialty options like metallic ink, foil stamping, and so much more.
Get Your PriceFreshly updated customer reviews from TrustPilot
Playing Card Finish Types & Styles
Finishes are applied on top of your printed project for the purpose of adding protection and artistic style. When choosing a finish, you will need to decide between either varnish or lamination.
Playing Card Finish Types
The finish type (varnish or lamination) protects the ink and prevents scratches.
Varnish is the most common finish type used for playing cards. This liquid gloss finish is applied by the offset printing press to seal in and protect the ink. Lamination is the most protective finish and makes your cards water resistant. Lamination is a thin polypropylene film that is applied after the printing process is complete. Lamination is available in gloss and as an anti-scratch matte lamination (discussed below).
Matte (Anti-Scratch)
Anti-scratch matte lamination is highly recommended if you prefer a matte style and your card artwork has a large coverage area of a dark color. Regular matte is more prone to showing scratches on dark ink, which is why we offer anti-scratch matte-lamination via the custom quote option.
If you’re interested in reading more about creating card games, be sure to check out our custom card game hub. This part of our site contains all the information you need to know about creating a card game – beyond just the standards listed here, this hub also contains detailed information on all the types of materials and packaging types we offer for your game. We’ve also analyzed popular card games to figure out what makes them work – and how you can apply these principals to your custom card game. There’s lots more to explore, like interviews with card game creators who have printed with PrintNinja, and special features you can add-on to your card game to make it stand out. Check it out!
Freshly updated customer reviews from TrustPilot
Card Count
If you’re trying to print a cost-effective game then card count should be your biggest concern. Offset printing uses large parent sheets, as seen below. The more parent sheets you need for your project the higher your cost. A parent sheet can only hold a certain amount of cards, based on your card style/dimensions and the size of the parent sheet determined by your card stock.
Cut down on cost by creating a game that only requires the number of cards that can fit on one parent sheet. Of course, you shouldn’t lower your card count if it sacrifices playability. Below you’ll find the list of magic numbers to help you choose the optimal card count for your game.
Common and Uncommon Card Backs
In some cases your card backs can increase price significantly, although this is an uncommon method, games that require each card back to have a different image affect price. Cards that have different backs are called unique or uncommon backs. Cards that use the same back image, like traditional poker cards, are referred to as common backs.
This doesn’t affect price until your card count starts to rise over 110 cards. For example, a sheet of 55 poker cards that have common and unique backs will need 2 printing plates (the front and back). A 110-card count job with unique backs need 4 sets of plates (2 for the front and 2 for the back) while common backs will only need 3 plates (2 for the front and 1 for the back). Every time you add more cards to your unique back deck you need another parent sheet and another plate.
Optimal card count per parent sheet based on your card dimensions and stock choice:
280 gsm Blue Core
- Poker fits 54 cards/sheet
- Tarot fits 29 cards/sheet
- Square fits 65 cards/sheet
- Mini fits 95 cards/sheet
300 and 350 gsm Coreless
- Poker fits 54 cards/sheet
- Tarot fits 29 cards/sheet
- Square fits 65 cards/sheet
- Mini fits 95 cards/sheet
310 and 330 gsm Black Core
- Poker fits 55 cards/sheet
- Tarot fits 34 cards/sheet
- Square fits 71 cards/sheet
- Mini fits 107 cards/sheet
300 gsm Foil Stock
- Poker fits 54 cards/sheet
- Tarot fits 29 cards/sheet
- Square fits 65 cards/sheet
- Mini fits 95 cards/sheet
Plastic PVC
- Poker fits 54 cards/sheet
- Tarot fits 29 cards/sheet
- Square fits 65 cards/sheet
- Mini fits 95 cards/sheet
Freshly updated customer reviews from TrustPilot
Packaging Box Types
Browse our options below to choose the best packaging based on your game’s needs.
Game Packaging Options


If you’re interested in reading more about creating card games and understanding your game packaging optinos, be sure to check out our custom card game hub. This part of our site contains all the information you need to know about creating a card game – beyond just the standards listed here, this hub also contains detailed information on all the types of materials and packaging types we offer for your game. We’ve also analyzed popular card games to figure out what makes them work – and how you can apply these principals to your custom card game. There’s lots more to explore, like interviews with card game creators who have printed with PrintNinja, and special features you can add-on to your card game to make it stand out. Check it out!
Freshly updated customer reviews from TrustPilot
Booster Packs
If you have a need to supply your game players with a special, small deck of extra cards, booster packs are an excellent solution. Commonly seen in many trading card games, booster packs are wrapped with silver foil to give your cards a pristine, professional look.

Booster packs are small, wrapped packages containing approximately 1-20 cards. For projects requiring more than 20 cards, simply request a custom quote with your specifications!
Booster packs are sealed with silver foil wrapping to keep all of the cards neatly in place. Printing on foil packaging requires very high order minimums due to setup costs, so for most orders we are unable to print directly on booster packs. With that said, labels are effective alternatives many game designers use to denote their booster pack contents.
A Note on Card Randomization for Booster Pack Packaging
Our facility fills and seals your booster packs by hand, which means we cannot offer a randomized distribution of cards in each pack like the filling found in CCG games. We can only fill booster packs with a fixed distribution, creating consistency among each. If game play requires randomization of cards, be sure to indicate shuffling is needed in your instruction packet.
Ready to get started?
We’ve created a custom card game pricing calculator for you to explore all our different printing choices, shipping methods, and get an instant price for your project. You can also customize just about anything, from size and packaging, to specialty options like metallic ink, foil stamping, and so much more.
Get Your PriceFreshly updated customer reviews from TrustPilot
Tuck Box Packaging

Tuck Box Card Game Packaging
A tuck box is the traditional card game packaging option, made by folding thick paper stock into a box with a flap top. Our tuck boxes can hold up to 110 cards in a single deck or 220 cards in two decks side by side, and can be fitted with an instruction booklet or sheet. If your game requires more cards we suggest using a two-piece box for better durability.
The minimum card requirement for tuck box packaging is 36 cards. However – if your game has less than 36 cards and you would like them packaged in a tuck-box we can work with that, but a cardboard insert will need to be included with the cards inside the tuck box. Please see below for an image example:

Tuck Box Light vs. Heavyweight
We offer two tuck box options: light and heavyweight. The industry standard is a lightweight box produced with 10pt stock. The heavyweight box is made of 12pt stock. If the heavyweight option is not durable enough, and you do not want a two-piece box, we suggest asking about our plastic deck box option.
Tuck boxes can hold more than cards, making games more travel-efficient. If your game has several small components, such as dice and tokens, you can include them in the tuck box packaging.
Retail Packaging Suggestion
If you plan on selling your game to retailers, we suggest adding a hangtag to your tuck box that allows retailers to hang your game on a peg wall. Specialty options will also help your packaging stand out from the conformity of retail displays.
Freshly updated customer reviews from TrustPilot
Two-Piece Box
Learn about our two-piece box for card games.

Two-piece boxes are the most durable packaging option, and can be used for a variety of game types. They are a great option for card games that require more than 110 cards to play, such as Cards Against Humanity or Twilight, both of which utilize two-piece boxes.
Two-Piece Box – Light vs. Heavyweight
We offer two material options: lightweight and heavyweight. Our lightweight box is made from 1.5mm high density paperboard – the industry standard material. Our heavyweight box uses 2mm high-density paperboard. Your design is printed in full color, or black and white, on paper stock, then wrapped and glued around the paperboard box.
Organizing Insert
If your game has multiple components that need to be contained in a large box, we suggest adding an organizing insert so the players can easily locate pieces. Please inform us how many compartments you would like to have in your organizer and the intent of each. Below you will see the two organizing insert options we offer: vacuum-form and cardboard.


If you’re interested in reading more about creating card games, be sure to check out our custom card game hub. This part of our site contains all the information you need to know about creating a card game – beyond just the standards listed here, this hub also contains detailed information on all the types of materials and packaging types we offer for your game. We’ve also analyzed popular card games to figure out what makes them work – and how you can apply these principals to your custom card game. There’s lots more to explore, like interviews with card game creators who have printed with PrintNinja, and special features you can add-on to your card game to make it stand out. Check it out!
Freshly updated customer reviews from TrustPilot
Magnetic Close Box
Learn more about our magnetic game box option.

Magnetic Closure Two Piece Game Box
Our magnetic closure box is made from 1.5mm high density paperboard – the same material as our two piece boxes. The box’s design has a book flap that snaps in place with hidden magnets. Your design will be printed on glossy paper and wrapped around the box covering the magnets.
This feature works well for long flat boxes used for games that house many card decks side by side or place this feature on your deck box, a box that’s wider than a tuck box.
If you’re interested in reading more about creating board games, be sure to check out our custom board game hub. This part of our site contains all the information you need to know about creating a board game – beyond just the standards listed here, this hub also contains detailed information on all the types of materials and packaging types we offer for your game. We’ve also analyzed some of your favorite board games to figure out what makes them work – and how you can apply these principals to your custom card game. There’s lots more to explore, like special features you can add-on to your card game to make it stand out. Check it out!
Freshly updated customer reviews from TrustPilot
Shrink Wrap Only (no box)
Learn more about our shrink wrap only option and find out if it’s right for your board game.

Shrinkwrap No Box
Card games are a popular item to shrink wrap since each deck holds a predetermined number of cards. If you have more than 110 cards, your cards will be wrapped into multiple decks.
Shrink wrap only (no box) is a great cost-effective option in lieu of a tuck box. Shrink wrap only is also a common option for add-on packs.
If you are looking to print add-on packs, consider using booster packs. They are the industry standard for expansion decks, and hold up to about 20 cards.
If you’re interested in reading more about creating card games, be sure to check out our custom card game hub. This part of our site contains all the information you need to know about creating a card game – beyond just the standards listed here, this hub also contains detailed information on all the types of materials and packaging types we offer for your game. We’ve also analyzed popular card games to figure out what makes them work – and how you can apply these principals to your custom card game. There’s lots more to explore, like interviews with card game creators who have printed with PrintNinja, and special features you can add-on to your card game to make it stand out. Check it out!
Freshly updated customer reviews from TrustPilot
Packaging Finishes & Thickness
This article will introduce you to our game packaging finishes and thickness options.
Finishes are applied on top of your printed packaging for added protection and aesthetic appeal. Choosing a tuck box finish is two-fold: you will need to pick a type (e.g. varnish or lamination) and a style (e.g. gloss or matte). For two-piece boxes, lamination is the default option due to the thick material. You only need to choose a style for your two-piece box.

Packaging Finish Types
The finish type (varnish or lamination) plays a protective role for the ink and prevents scratches.
Varnish is the most common finish type used for playing cards and tuck boxes. This liquid finish is applied by the offset printing press and is available in gloss and matte styles. Lamination is the most protective finish, and makes your packaging water resistant. Lamination is available in gloss, matte and as an anti-scratch matte lamination (discussed below).
Please Note
Water resistant is not water proof.
Packaging Finish Styles
The finish style (gloss or matte) adds an artistic appeal to your project.
Gloss adds a reflective shine to your box, while matte adds a duller shine and smoother touch.
Matte (Anti-Scratch)
Anti-scratch matte lamination is highly recommended if you’ve selected a matte style, and your artwork has a substantial area covered by a dark color. Matte is more prone to showing scratches on dark ink, so we recommend adding anti-scratch matte-lamination or choosing gloss.
Box Thickness
Our boxes are made out of high density paperboard, the industry standard. The thicker your box the more durable, but besides that choosing a thickness is your creative choice. Most games you see on the shelf of your game shop use 2mm thickness.
Freshly updated customer reviews from TrustPilot
Packaging Add Ons
Learn more about the packaging add ons for custom board games that we offer.
Not all specialty options can be applied to every packaging type. Click on a feature below to learn more.


Freshly updated customer reviews from TrustPilot
Shrink Wrapped Box
This article will teach you more about our shrink wrapped box option.

Shrink Wrapped Game Boxes Shrink- Wrapping
Our shrink wrapping machine allows us to shrink wrap two piece game boxes, tuck boxes, our magnetic close box, and even cards placed within your box.
We’ll assemble your game components inside your box before shrink wrapping your product. If you are planning to use a warehousing and fulfillment service we recommend adding shrink wrapping to protect your game from dirt and dust.
Freshly updated customer reviews from TrustPilot
Shrink Wrapped Cards

Shrink Wrapped Cards Inside Game Box
For a professional appearance, you can select to have your cards inside your packaging shrink wrapped. This is especially helpful to separate multiple functioning decks of cards within your game.
Shrink wrapping cards inside your box gives customers that valuable perception of a fresh brand-new game. You know, like that feeling you get from a new car smell.
This feature cannot be used with booster pack packaging.
If you’re interested in reading more about creating card games, be sure to check out our custom card game hub. This part of our site contains all the information you need to know about creating a card game – beyond just the standards listed here, this hub also contains detailed information on all the types of materials and packaging types we offer for your game. We’ve also analyzed popular card games to figure out what makes them work – and how you can apply these principals to your custom card game. There’s lots more to explore, like interviews with card game creators who have printed with PrintNinja, and special features you can add-on to your card game to make it stand out. Check it out!
Freshly updated customer reviews from TrustPilot
Retail Hook
Learn more about our retail hook add on option.

Plastic Retail Hook on Game Box
If you plan to sell your game to retailers, help your cause by including a hang tab on your box. Our retail hook is made from clear PVC plastic.
Unlike hang tabs that protrude out of your game boxes, these plastic hooks are applied to the back of your deck. This allows you to shrinkwrap your deck to prevent tampering. Be confident your game will be delivered to your customers with all pieces and in mint condition.
If you’re interested in reading more about creating card games, be sure to check out our custom card game hub. This part of our site contains all the information you need to know about creating a card game – beyond just the standards listed here, this hub also contains detailed information on all the types of materials and packaging types we offer for your game. We’ve also analyzed popular card games to figure out what makes them work – and how you can apply these principals to your custom card game. There’s lots more to explore, like interviews with card game creators who have printed with PrintNinja, and special features you can add-on to your card game to make it stand out. Check it out!
Freshly updated customer reviews from TrustPilot
Thumb Cut
Learn more about our thumb cut option for game boxes.

Thumb Cut Game Box Lid
Thumb cuts are an eclipse the size of a finger tip cut into the box lids for easy removal. No more struggling to pull the lid off your board game!
Adding thumb holes is a small detail, but one that shows your customers you care about the functionality of your packaging as much as your game’s mechanics. It’s a practical option that will make a big impact on your project.
If you’re interested in reading more about creating board games, be sure to check out our custom board game hub. This part of our site contains all the information you need to know about creating a board game – beyond just the standards listed here, this hub also contains detailed information on all the types of materials and packaging types we offer for your game. We’ve also analyzed some of your favorite board games to figure out what makes them work – and how you can apply these principals to your custom card game. There’s lots more to explore, like special features you can add-on to your card game to make it stand out. Check it out!
Freshly updated customer reviews from TrustPilot
Printed Inner Liner
This article will teach you more about the inner game box printing options that PrintNinja offers.

Print Inside your Card or Board Game Box Inner Liner
The fun is just beginning once your box is popped opened, so continue the thrill with a printed box interior. We can print a pattern, solid color, or any other design you see fit. The photo to the right shows an inner liner printed with game instructions.
This feature can only be executed with a two-piece box.
Freshly updated customer reviews from TrustPilot
Component Packaging
This article will introduce you to PrintNinja’s component packaging for board game options.

Game Board Component Pieces Packaging Bag
Show some love for your board game by keeping your pieces organized and your box clean. Providing players with component bags makes them less likely to loose pieces (open your Mouse Trap board game for proof) and provides protection.
Of course, bags work even better when paired with organizing inserts.
Choose from three bag materials: plastic bag, faux velvet, or linen. No matter what the aesthetic of your game is, we bet one of our material options will work for you.
If you’re interested in reading more about creating board games, be sure to check out our custom board game hub. This part of our site contains all the information you need to know about creating a board game – beyond just the standards listed here, this hub also contains detailed information on all the types of materials and packaging types we offer for your game. We’ve also analyzed some of your favorite board games to figure out what makes them work – and how you can apply these principals to your custom card game. There’s lots more to explore, like special features you can add-on to your card game to make it stand out. Check it out!
Freshly updated customer reviews from TrustPilot
Organizing Inserts
This article will introduce you to the custom board game organizers that PrintNinja offers.
Board Game Organizing Inserts Vacuum Formed Plastic
Organizing inserts are made to fit inside your two-piece box for the best board game storage solution. This add-on is simple but has a big impact on helping players clean up easily and keep track of all their game pieces, so their favorite game will always be fully stocked and ready to play.
Plastic Organizers
If your game has many pieces, our vacuumed formed plastic trays are perfect since they can be molded to cradle your individual pieces such as dice, sand timers, and most odd shapes. Our plastic comes in black, white or clear, but no matter which color you select the plastic organizer has a professional anesthetic.
Cardstock Dividers
We also offer 20pt. coated 1-side gloss cardstock and 20pt. uncoated cardstock that works great for dividing your box into prefigured compartments. While cardstock doesn’t look as polished as our plastic option, the material can be printed on. The default cardstock color is white, but you can choose to have it printed in a solid color or have some fun and add a pattern.

Board Game Organizing Inserts Cardstock Compartments
Organizing Box Insert Layout
You have full control of how many compartments you need and in what design you’d like them configured, as long as it will fit inside your box size. Remember, cardboard dividers are only capable of being shaped as squares or rectangles while our plastic can be formed to each piece.
If you’re unable to decide the best layout just leave it up to our professional team. We’ll design the best option to easily fit all your components.
Freshly updated customer reviews from TrustPilot
Specialty Game Options
Select one of our specialty game options below to learn more about how these features can enhance your playing cards, game box, and components.
Specialty Game Options


Once you’ve read about our specialty game options, if you’re interested in reading more about creating board games, be sure to check out our custom board game hub. This part of our site contains all the information you need to know about creating a board game – beyond just the standards listed here, this hub also contains detailed information on all the types of materials and packaging types we offer for your game. We’ve also analyzed some of your favorite board games to figure out what makes them work – and how you can apply these principals to your custom card game. There’s lots more to explore – check it out!
Freshly updated customer reviews from TrustPilot
Water-Resistant Cards
Learn more about the water-resistant cards option that we offer.

“Water-resistant” is a fancy way of saying laminated. Lamination is a finish that is typically applied to thicker materials. This requires a roll of film to be glued onto your printed parent sheet as seen in the lamination machine video below.
Applying a gloss lamination finish to a your cards will produce a highly reflective shine, as seen in the photo to the right. Matte lamination has a more subtle shine. If your cards have a lot of text then a matte lamination is probably best for readability.
This specialty option is available with:
- Cards
- Game Box
Please Note:
Now that you’ve read about water-resistant cards, why not learn more? If you’re interested in reading more about creating board games, be sure to check out our custom board game hub. This part of our site contains all the information you need to know about creating a board game – beyond just the standards listed here, this hub also contains detailed information on all the types of materials and packaging types we offer for your game. We’ve also analyzed some of your favorite board games to figure out what makes them work – and how you can apply these principals to your custom card game. There’s lots more to explore, like special features you can add-on to your card game to make it stand out. Check it out!
Did we answer all of your questions?
Contact usFreshly updated customer reviews from TrustPilot
Foil Stamped Cards and Packaging
Hot foil stamping is the easiest way to add value to your deck. This process greatly adds to the cards’ aesthetic appeal, as metallic foil is transferred onto your printed sheets producing a reflective shine.
Different designs can be applied to multiple cards, but this requires a custom quote as the number of foil stamp designs will impact the cost. “Basic Foil Stamping” as indicated in our calculator is priced for an area less than 4″ x 4″ with the same design on 1 side of the component.
This specialty option is available with:
- Cards
- Game Box
- Game Board
- Tokens
- Tiles
- Screens
- Note Pads
- Instruction Booklets
Foil Stamping Color Options
Most creators will foil stamp their logo or title, but you can also use foil as an accent to compliment your logo, as seen in the image above. Be traditional with gold and silver foil, or be wild and choose one of our 12 other foil colors.
If you would prefer a duller shine, our metallic ink should do the trick.
Freshly updated customer reviews from TrustPilot
Spot Gloss/UV Cards
This article will teach you more about our spot gloss option for cards and board games.

If you want your project to shine in the light, add a spot gloss to your design and watch the reflection catch the eyes of your potential buyers.
Spot gloss works best to emphasize logos, text, or a specific design.
For optimal results, apply a spot gloss to components with a matte finish.
This specialty option is available with:
- Game Box
- Game Board
- Tokens
- Tiles
- Screens
- Note Pads
- Instruction Booklets
Now that you’ve read about spot gloss for cards and games, if you’re interested in reading more about creating board games, be sure to check out our custom board game hub. This part of our site contains all the information you need to know about creating a board game – beyond just the standards listed here, this hub also contains detailed information on all the types of materials and packaging types we offer for your game. We’ve also analyzed some of your favorite board games to figure out what makes them work – and how you can apply these principals to your custom card game. There’s lots more to explore, like special features you can add-on to your card game to make it stand out. Check it out!
Freshly updated customer reviews from TrustPilot
Metallic Ink Printing
Learn more about metallic ink printing and see if it’s right for your project.
Looking to really accentuate your project or go beyond the CMYK color spectrum? Then metallic ink is perfect for you. This option creates a strong visual impact and draws the eye directly to a part of your project.

What Is Metallic Ink?
Metallic ink is created by adding metallic particles to ink, these particles reflect the light and give your project a unique, metallic look. Metallic ink is a spot color, which means it’s a pre-mixed ink that uses a single printing plate instead of the four used for traditional CMYK colors. Spot colors, sometimes also referred to as the Pantone Matching System (PMS), make it possible to print colors outside of the standard CMYK spectrum. Most notably, this is achieved with highlighter or metallic covers.
You can use metallic ink to make any of the following projects come to life:
- Cards
- Game Box
- Game Board
- Tokens
- Tiles
- Screens
- Note Pads
- Instruction Booklets
Metallic Ink vs. Foil Stamping
While metallic ink is an uniquely mixed ink that is rolled onto your project similar to CMYK inks, foil stamping applies metallic foil onto your printed paper stock with heat and pressure. Both methods achieve a unique aesthetic appeal, but different projects are better suited for one approach over the other.
Metallic Ink and Foil Stamping Pros and Cons
- Metallic ink achieves a subtler effect than foil stamping because it’s applied to your project early in the printing process, then covered with a finish (lamination or varnish). Foil stamping, on the other hand, achieves more of a vivid impact and a highly realistic metallic shine because it is applied to your project after printing has already been completed.
- Small, intricate designs are best suited for metallic ink, because it is applied with the printing press. When foil stamping is performed, the design is cut out of foil stock. If your design is small and thin, metallic ink is likely the better fit.
- If your card or board game has an intricate, predominantly metallic design, consider using metallic ink instead of foil for a softer shine. Some designers feel that using too much foil can create a gaudy appearance and opt for metallic ink for these applications instead.
- There are vast color options available with metallic ink because it is made by mixing the ink color of your choice with gold or silver metal particles. However, if you prefer a metallic other than gold or silver, you may want to consider the 12 foil stamping options besides these two choices. We even have holographic foil options for a truly wow-worthy effect!
- If you intend to incorporate other specialty printing options like embossing or debossing into your project, foil stamping works best. Because metallic ink encompasses real bits of metal, embossing or debossing could cause the ink to crack.
- Foil stamping tends to outperform metallic ink in terms of longevity. The ink’s metal flecks may cause cracking as the product ages.
- Metallic ink is typically the more economical option when compared to foil stamping.

Freshly updated customer reviews from TrustPilot
Spot Color
Learn more about spot color for games and find out if it’s the right option for your project.

The only way to guarantee 100% accuracy for a specific color in offset printing is to use spot color. The ink color is mixed separately by hand and applied to the finished document via the offset press using a separate printing plate. The most common way to specify a spot color for use is the Pantone Matching System, which identifies colors through a number, such as ‘PMS 165’, which is a burnt orange color.
Spot colors can also be used to apply specialty inks like metallic colors, neon colors, or glow-in-the-dark ink.
This specialty option is available with:
- Cards
- Game Box
- Game Board
- Tokens
- Tiles
- Screens
- Instruction Booklets
Now that you’ve read about spot color for games, if you’re interested in reading more about creating board games, be sure to check out our custom board game hub. This part of our site contains all the information you need to know about creating a board game – beyond just the standards listed here, this hub also contains detailed information on all the types of materials and packaging types we offer for your game. We’ve also analyzed some of your favorite board games to figure out what makes them work – and how you can apply these principals to your custom card game. There’s lots more to explore, like special features you can add-on to your card game to make it stand out. Check it out!
Freshly updated customer reviews from TrustPilot
Emboss/Deboss Packaging
Learn more about embossing and debossing your packaging, and figure out if it’s the right option for your project.

Emphasize your design with embossing (raised edges) or debossing (sunken edges) … or both! This feature is only available for your game’s packaging. If you want to offer a tactile experience through your cards, try our linen texture finish.
Embossing/Debossing with Foil Stamping
Embossing or debossing pairs well with specialty features such as spot UV or foil stamping. The photo on the rights displays a debossed gold foil line stretching vertically at the edge of the deck box. You can also spot an embossed “White” text with gold foil stamped on top. Both options are beautiful and work well in unison.
Blind Embossing/Debossing on Cards and Boxes
Blind embossing or debossing occurs when the effect is applied to a blank spot on the paper, meaning no ink or specialty option is present to make the feature more visible. In the photo, the indented ray lines that extend from the card’s center illustrate the appeal of a blind deboss. It’s a spectacular way to enhance your design, or to subtly add a secret message, depending on how you want to use it.
Freshly updated customer reviews from TrustPilot
Linen Textured Cards and Packaging

Our textured playing cards have a luxurious linen texture added to them. You’re probably familiar with this texture if you’ve played with Bicycle cards. This finish can be used with any of our available card stocks. Besides the obvious tactile addition, the texture adds ridges that reduce surface contact between cards, making them easier to shuffle, deal and handle.
To be clear, the linen texture is different than embossing or debossing. You cannot emboss or deboss your cards however, you can apply this feature to your packaging.
Creating Linen Textured Cards & Boxes
Your card or box artwork will be printed on parent sheets (large sheets of paper). These sheets are pushed through a textured metal roller (as seen to the right). The roller applies heavy pressure that imprints the linen marks onto the paper. Your cards will be cut to size and the box artwork will be trimmed and wrapped around the paperboard box.

Textured Game Boxes
Boxes are made with a thicker material than cards, dulling the feeling of the texture. However, these ridges are still very much visible and help catch the eyes of consumers, begging them to pick up your product.
Freshly updated customer reviews from TrustPilot
Artwork Recommendations
Here are our recommendations for creating your custom game artwork.

Offset games can be printed in full color (CMYK) or greyscale/black and white. Full-color printing is created by blending four colors of ink: cyan, magenta, yellow and black – also known as key for K.
Black and white or greyscale uses just one color of ink, black, lending itself to be more cost-effective. When designing your custom game artwork, keep in mind games printed with just black will not be as deep as rich black, which is the outcome of using all four colors of CMYK.
If your game contains pre-made components (pawns, meeples, card stands) we have an inventory of stocked colors. However, for an additional fee, you can request specific colors.
Cards and Packaging Artwork
Whether you choose full color or black and white is your creative choice. However, we cannot print on foil booster packs. The most noteworthy tip for your cards and packaging artwork is to keep in mind that bleed applies. To avoid white lines showing around your edges follow this bleed guideline.
Punch Tokens Artwork
We offer CMYK and black and white one-sided or two-sided printing. The cheaper option, one-sided tokens, will have a grey board back visible. Two-sided tokens will have printing and finishes on both sides of the token. This is a great option for reversible tokens that need different images on each side or if your game calls for a more polished look.
Instructions Artwork
Most instructions are printed in black and white since they are heavy in text. If you choose to print your instructions in full color, we recommend submitting your files with your text profile set in greyscale to avoid ghosting. The rest of your file can be submitted as CMYK.
Booklets are often printed with full color covers and black and white interiors. If this is what you prefer please choose the black & white option on our card quote form. Then write a brief explanation in the additional notes box.
File Design Considerations
Read through our Printing Color Guide to avoid the most common pitfalls when printing in offset.
Freshly updated customer reviews from TrustPilot
Available Game Pieces
Learn about ordering game pieces with PrintNinja and why printing your project with us has so many advantages.
One of the best ways to customize and expand your board game project is the inclusion of game pieces. They can range in complexity from simple plastic pawns to detailed wooden dragons, and PrintNinja is happy to help you find or create any number of them.
A major hurdle to buying or customizing game pieces is the minimum order quantity (MOQ) required for each order. Much like PrintNinja has an MOQ of 500 copies of any game you produce with us, game piece vendors often have MOQs in the thousands. By producing your game with PrintNinja you have access to our library of stock game pieces, allowing you to bypass those quantity restrictions. Below are some common game pieces we currently have available. If you don’t see what you’re looking for feel free to let us know through our board game quote request form and we’ll let you know if we have it in stock.
We can also create custom pieces specific to your game, though these are subject to the vendor’s MOQ and will have to be researched and designed. We have detailed information about custom miniatures custom miniatures and what we call the “non-printed piece problem in other pages inside our board game section. .
Please note
Due to the way they are manufactured, all wooden game pieces will experience a slight cutting variance between components. This may result in some pieces being a little smaller or having a slightly different shape than others.
Select an option below to learn more:


Freshly updated customer reviews from TrustPilot
Wooden Components
Please note: Due to the way our wooden components for board games are manufactured, all pieces will experience a slight cutting variance between components. This may result in some pieces being a little smaller or having a slightly different shape than others.

Standard Meeple
Meeples are perfect with any game that requires you to play as a human (or humanoid) character, such as an adventure game. We have five stock colors (white, red, yellow, green, and blue) and are roughly 16mm tall.
Examples from existing games: Agricola, Terror in Meeple City

Tall Meeple
Just like the variety of characters in your game there’s a variety of meeples to choose from. This is our ‘tall’ meeple that’s roughly 23mm tall.
Examples from existing games: Carcassonne, Cartagena

Standard Pawn
Pawns are one of the most flexible pieces to include in your game. They are simple enough that they will fit with almost any aesthetic. The standard pawns is our exclusive PrintNinja designed pawn, made to look similar to the plastic Sorry pawn. This piece is available in a variety of colors and measures about 25mm tall.
Examples from existing games: Sorry

Halma Pawn
This pawn style was made famous when the Halma board game was introduced in the 80’s, hence the name Halma pawn. This piece is available in a variety of colors and measures about 25mm tall.
Examples from existing games: Halma

Small Cubes
Wooden cubes are a great way to keep track of in-game currency or resources, since they are small and don’t take up a lot of room as the players start accumulating more of them. We have five stock colors (white, red, yellow, green, and blue) and the cubes measure about 8mm.
Examples from existing games: El Grande or Kingsburg

Large Cube
Sometimes a game needs to use a large size for the pieces to convey an importance factor, that’s where our large wooden cube comes into play. This piece is great for keeping track of in-game currency or resources, comes in five stock colors (white, red, yellow, green, and blue) and measures about 16mm.

Small Disc
Like wooden cubes, wooden discs are perfect for acting as counters, resources, or currency. The choice is purely a creative decision on your end. Our small disc measures 16mm in diameter and comes in five stock colors (white, red, yellow, green, and blue), but available in a variety upon request.
Examples from existing games: Crokinole

Large Disc
The biggest difference between the small disc and large (besides size) is the ability to print a sticker in the appropriate size that can be placed on your 20mm large disc in order to give it more purpose or character.

Thin Cylinder
Our thin cylinder is 20mm high and 10mm in diameter, for a lengthy token. These pieces can be used for a variety of game mechanics, one popular option is seen in the board game Trouble, that has hollow cylinder holes for the player to set their marker in as they advance through the game.
Examples from existing games: KeeKee The Rocking Monkey

Thick Cylinder
Our thick cylinder is 10mm high and 15mm in diameter, for a hefty token.
Examples from existing games: KeeKee The Rocking Monkey

Octagon
This 8-sided wooden token flat smooth sides for easier dexterity and won’t roll too far when dropped. This token is 10mm high and 10mm in diameter.

Cone
These wooden cones are solid (not hollow) works of art, and are versatile in that they can represent characters or act as resource tokens. They are large 10mm in diameter and height, so they really stand out on a game board.

Tile
Thin wooden tiles, 4mm tall and 20mm in diameter, are great for laying out on your board or to make your board. You can print stickers to be set on the tile for a mechanic that allows users to flip over tiles to uncover information.
Examples from existing games: Scrabble, Sudoku

Our sticks are 25mm long and 5mm tall. Sticks are typically used to connect a long path or used as counters.
Examples from existing games: Settler’s of Catan

House
We have traditional wooden house components in stock, sized at 12mm tall and 15mm long these pieces are perfect for a game that needs to house their players, meeples, or keep track of property.

City
Sometimes a wooden house doesn’t quite convey the purpose you need it to, so try using our 20mm tall and 20mm long city to represent a larger piece of property or importance.
Examples from existing games: Settlers of Catan
Now that you’ve read about our wooden components for board games, if you’re interested in reading more about creating board games, be sure to check out our custom board game hub. This part of our site contains all the information you need to know about creating a board game – beyond just the standards listed here, this hub also contains detailed information on all the types of materials and packaging types we offer for your game. We’ve also analyzed some of your favorite board games to figure out what makes them work – and how you can apply these principals to your custom card game. There’s lots more to explore, like special features you can add-on to your card game to make it stand out. Check it out!
Freshly updated customer reviews from TrustPilot
Plastic Components
This is a list of the plastic components that we offer for board games.

Standard Pawn
This is the most common shaped plastic pawn on the market. The wide 14mm base provides stability for these hallow 25mm tall pieces.
Examples from existing games: Pandemic

Halma Pawn
The Halma style pawn get’s it’s name from the Halma board game introduced in the 80’s. This fun piece is available in a variety of colors and measures about 23mm tall.

Ball Pawn
Ball Pawns, also know as people pawns, are a fun shape that work well for children’s games as you don’t need to have fine motor skills to grab the large 30mm tall 14mm wide plastic pawn.

Poker Chip
This plastic chip is designed to look like a casino chip with all the traditional indentations and is available in the standard red, white, and black colors as well as untraditional colors.
Examples from existing games: Black Jack

Chip
Plastic translucent chip in a variety of colors and sizes. This piece is a prime way to track in-game currency or resources, since they are small and don’t take up a lot of room as the players start accumulating more of them.
Examples from existing games: Tiddlywinks

Pyramid Card Stand
If you want to get very customized with your game’s player characters, a common method is to print cards or boards and use simple plastic stands to hold them up. This way, your characters are as detailed as you draw them to be. This stand’s design makes it the most stable when it comes to keeping your cards upright and in place.
Examples from existing games: Dungeon Twister or Return of the Heroes

Square Card Stand
The square stand is a good fit for traditional card sized (square/rectangle) characters, although it can hold customized character cards the square shaped design is geared towards cards.
Examples from existing games: Dungeon Twister or Return of the Heroes

Round Card Stand
You can use stands for traditional card sizes as well as customized characters. The round card stand comes in white or clear options, keeping the focus on the card.
Examples from existing games: Dungeon Twister or Return of the Heroes
If you’re interested in reading more about creating board games, be sure to check out our custom board game hub. This part of our site contains all the information you need to know about creating a board game – beyond just the standards listed here, this hub also contains detailed information on all the types of materials and packaging types we offer for your game. We’ve also analyzed some of your favorite board games to figure out what makes them work – and how you can apply these principals to your custom card game. There’s lots more to explore, like special features you can add-on to your card game to make it stand out. Check it out!
Freshly updated customer reviews from TrustPilot
Glass Components
This is a list of the glass components we have available for board games.

Marble
Our glass marbles are about 16mm in diameter, and come in a variety of translucent colors. Depending on the project, marbles may be used in place of figurines or meeples, or they may serve a more functional purpose.
Examples from existing games: Aggravation, Marble Run

Stone or Gem
These glass stones are used most often in games as counters. Our stones come in a variety of translucent colors.
Examples from existing games: Mancala
Now that you’ve learned about our glass components for board games, if you’re interested in reading more about creating board games, be sure to check out our custom board game hub. This part of our site contains all the information you need to know about creating a board game – beyond just the standards listed here, this hub also contains detailed information on all the types of materials and packaging types we offer for your game. We’ve also analyzed some of your favorite board games to figure out what makes them work – and how you can apply these principals to your custom card game. There’s lots more to explore, like special features you can add-on to your card game to make it stand out. Check it out!
Freshly updated customer reviews from TrustPilot
Accessories
Here’s a list of the accessories for board games that we offer.

Arrow Spinner
Spinners are a good substitute for dice or perfect for games that don’t rely on numbers to move players through the board. Our stocked spinners have an arrowhead to provide a definitive answer no player can argue with.

Point Spinner
This spinner is easier to rotate since it’s shape has more mass than the classic arrow design. This spinner is about 80mm long and has a 20mm diameter stand allowing the spinner to be used without a game board, but can be inserted into a die cut hole on your board.
Examples from existing games: Twister

Sand Timer
Our sand timer can be requested in :30, 1:00, 2:00, 3:00 time increments to fit your games playability. This sand timer is your traditional plastic timer found in many games.
Examples from existing games: Boggle, Pictionary, Hedbanz

Dry Erase Marker
Our dry erase markers come with eraser head tops for ultimate functionality and can be easily wiped clean from a dry erase board.
Examples from existing games: Likewise!, Jeopardy, Hangman
Now that you’ve learned about our accessories for board games, if you’re interested in reading more about creating board games, be sure to check out our custom board game hub. This part of our site contains all the information you need to know about creating a board game – beyond just the standards listed here, this hub also contains detailed information on all the types of materials and packaging types we offer for your game. We’ve also analyzed some of your favorite board games to figure out what makes them work – and how you can apply these principals to your custom card game. There’s lots more to explore, like special features you can add-on to your card game to make it stand out. Check it out!
Freshly updated customer reviews from TrustPilot
Punch Out Tiles and Tokens
PrintNinja has the printing and manufacturing experience to help create the highest quality tokens for your game. Learn more about some of our token options below.

Premium PrintNinja punch out tokens
Punch Out Tokens
Does the game you’re designing involve tokens? If so, punch-out options could be an ideal addition to your project. Instead of receiving a series of tokens upon opening your game, your players get to experience punching them out of a pre-cut sheet when they open your game. This ensures all of the pieces are in one convenient location and allows your players to take an active role in game prep. Plus, the tokens will be in mint condition upon first opening the game instead of jostling about in the box.
Size
PrintNinja creates punch tokens by die-cutting large, high-density greyboard sheets. We therefore only need to know the size of the sheet to formulate a quote for your project. To determine the right sheet size for your needs, calculate how many tokens you’ll need, then make sure they can all fit on the requested size. Don’t forget to account for the size of your two-piece box: the sheet must be small enough to fit inside. After you’ve submitted this information and requested a quote, we’ll get in touch to discuss the specifics, including token sizes and quantity.
PrintNinja Tip
Some game designers like to include an empty bag in their game boxes so players have a safe place to store tokens after they’ve been punched out.
Material and Printing
The words “token” and “tile” are often used interchangeably, but these game pieces actually have two different functions. While tokens are usually a resource (a game piece used to collect winnings, for instance), tiles actually assemble the playing surface, also referred to as the game board. They are also made from different materials: while tokens comprise high-density greyboard, tiles are made from high-density paperboard.
To produce your tokens, our operators will wrap a sheet of high-density greyboard in printed paper. You can choose to have just one side of the sheet wrapped, leaving the backside of the tokens exposed, or cover both sides so players can use either side of the token. After being covered by the printed paper, the greyboard is die cut with all of your requested shapes so players can pop out your tokens with ease!
Specialty Token Options

Premium PrintNinja tokens
If you’d prefer to limit the assembly steps needed to set up your game, consider selecting our special pre-punched token option. With this option, players will open their games and find a series of pre-punched tokens inside, ready for use. We recommend including a bag or organizing insert to prevent tokens from floating around inside the game box.
Another specialty option to consider is interlocking token pieces. Our die-cutting machine is able to create interlocking pieces, like those you’d find in a puzzle, allowing players to link pieces together.
Multiple Variants
Do you have different pieces of artwork you’d like to incorporate onto your tokens? No problem! Just let us know how many varieties of artwork you’re thinking of so we can plan accordingly. The greater the number of variants, the more printing plates we may need to create (this is also based on sheet size). We’re happy to produce many different types of tokens so your players can engage in game play the exactly as you’ve envisioned it!
Freshly updated customer reviews from TrustPilot
Screens
Learn about the custom player screens that we offer for your board game project.

Screens can offer an area for players to hide valuable information or reference information that other players shouldn’t see.
Production and Material
Our screens are made using a similar process as the cover for a casebound book. Sheets of cardboard are cut to size and wrapped with a printed and finished parent sheet. Through a gluing and folding process, that produces a hinge, you end up with a screen.
Panel Options
Our screens can be made with two panels or three panels. A two-panel screen has one fold (hinge) and can best be visualized as opening a hardcover book. Three-panel screens are produced as a long rectangle with the two outer panels folding into the center panel.
Two-panel screens are a common option and work very well, but if you have a larger area you need to cover or a lot of players surrounding you, then a three-panel screen may be a better choice.
Screen Size
Your screen size must be smaller than the size or your game box. If you choose a three-panel option then you can have a larger screen while still fitting inside your box. For quoting, please provide the full size of the screen as it measures in its unfolded state.
Multiple Variants
Typically, games will require each player has their own screen. You can decide to have each screen printed with the same artwork or provide different art for each piece. For example, if you’d like to have 5 screens per game each with different artwork then we’ll need to know you need 5 variants.
Now that you’ve read about custom player screens, if you’re interested in reading more about creating board games, be sure to check out our custom board game hub. This part of our site contains all the information you need to know about creating a board game – beyond just the standards listed here, this hub also contains detailed information on all the types of materials and packaging types we offer for your game. We’ve also analyzed some of your favorite board games to figure out what makes them work – and how you can apply these principals to your custom card game. There’s lots more to explore, like special features you can add-on to your card game to make it stand out. Check it out!
Freshly updated customer reviews from TrustPilot
Note Pads
This article provides information on the custom note pads we offer.

Note pads can be produced in a variety of sizes, but to make your game design journey easier we provide 3 commonly used options that work well for board games. Just don’t forget to include pens and pencils!
Size Options: 4″ x 5″, 5.5″ x 8.5″, 8.5″ x 11″
Note Pad Binding
Paper is cut to your final size, stacked on top of each other and then glued along one edge, this is the binding side. The pad is then glued to a cardboard backing for extra durability. You’ll select your preferred binding side: left or right like a flip book or on the top like an office note pad.
Sheet Count Options: 20, 40, 60, 80
Please Note: Page counts for note pads are indicating the number of sheets. Each sheet has 2 sides thus a 20 sheet notepad has 40 pages.
If you’d prefer your pages to have a cleaner tear we can add perforated edges to each sheet.
Material and Printing
Our default notepad is made with uncoated 70 lb text paper. You have the option to choose white paper, thin printer paper, or off-white paper, which is a cream color.
Once material is selected it’s time to choose your printing option based on the need of your notepad, full color, black and white, or blank.
Full color printing is great for adding color, especially if you want your branding to be present. Black and white is the most common choice for game pads, since the designs usually just contain lines, boxes, and logos like Scattergories. Blank is the most cost-effective option and used for a lot of drawing games, like Pictionary.
Freshly updated customer reviews from TrustPilot
Custom Dice Options
While PrintNinja offers many standard dice options for board games and card games, we also can offer a full suite of custom dice options. This article and these links will give you more information about MOQs, dice sizes, dice style, custom-printing patterns and other options. If you’re considering custom dice, you should check out the pages linked below to learn about all your available options. Ultimately, a conversation will be in order – reach us through our custom dice quote with more information about your request and we’ll set the conversation in motion.
If you’re interested in reading more about creating board games, be sure to check out our custom board game hub. This part of our site contains all the information you need to know about creating a board game – beyond just the standards listed here, this hub also contains detailed information on all the types of materials and packaging types we offer for your game. We’ve also analyzed board card games to figure out what makes them work – and how you can apply these principals to your custom card game. There’s lots more to explore, like special features you can add-on to your card game to make it stand out. Check it out!


Freshly updated customer reviews from TrustPilot
Dice Side & Face Types
Interested in what types of dice side and face type options? Read on to find out how to create the dice of your dreams.

Number of Sides
Traditionally dice are cube shaped, but depending on how many sides you would like your die to have it may form a specialized triangle or sphere. The dice is referred to by the number of sides it shows, i.e. a dice with 6 sides is called a 6-sided die or d6. We have 6 available dice side options:
- d4
- d6
- d8
- d10
- d12
- d20
If you need a different sided die please request that on our board game request form’s additional notes box, but please note there will likely be a high minimum order quantity.

Dice Face Types
- Standard pips (6-sided Die only)
- Standard number faces
- Spindown (20-sided only)
- Custom Engraved
- Custom silkscreen
Dice with Pip Faces
The standard face type is know as pips, the pattern of round dots that make up a number. However, pips can only be used on 6-sided die. For the simple reason, if your die’s number is larger then six, there won’t be enough room for the pips to fit.
Your dice don’t have to be black and white. With pips you can choose the face color as well as the pip color.
Dice with Standard Number Faces
The next options is a standard number of faces, sides that have the number appear as a digit i.e. “4” or “10”. This options works for any sided die.
Spindown Dice Face
A spindown face is only available with 20-sided dice. This is not the same has having a 20-sided standard face dice. The difference?
Numbers on a standard die will be laid out so opposite sides will always add up to equal the highest die number plus 1. For example, any two d6 opposite sides equal 7 and any two d20 opposite sides equal 21.
This rule does not apply to spindowns. Spindowns are laid out so the numbers are in sequence order and thus the die “spins” down from 20 to 1. This is most popularly seen with Magic: The Gathering life counter dice.
Custom Dice Sides
If the purpose of your dice has nothing to do with generating a random number then custom faces are for you. We can engrave or silkscreen your designs onto the face of your dice. Of course, images that have a simple design are much easier to read and make a better impact.
Note that custom engraved dice and silkscreened dice have special requirements and minimum order quantities. For example, we are only able to engrave or silkscreen on 6 sided dice and the image must be vector based. Custom engraved dice require a 1,000 unit MOQ and silkscreened dice require a 5,000 unit Minimum Order Quantity.
Corners
If your game works best with D6 (6-sided dice) then you can specialize your dice further by selecting rounded or squared corners. These style options don’t affect roll variability, this is strictly a design decision. However, if you have messy kids, rounded corners hurt less to step on!
Freshly updated customer reviews from TrustPilot
Dice Material Options
Interested in our dice material options? Read on to find out about what we offer.

We have four available dice materials.
- Wood
- Opaque Resin
- Transparent Resin
- Transparent Glitter Resin
Wooden Dice
Our wooden dice can have square corners or be rounded off for a longer roll. You can keep them in the natural wood appearance or you can choose to color the wooden face.
Opaque Resin
Resin is the standard material dice are made out of. This is the most popular material for dice and is found in most of your favorite games.
Opaque resin is a solid color without any transparency. You may choose from a number of face colors as well as pip colors.
Transparent Resin
Transparent resin gives your dice colors a neon glow effect. Typically the face values will be white for any color unless your die is clear then black is the suggested pip, number or symbol color.
Transparent Glitter Resin
The glitter takes away some of the transparency, but the bright color remains.
With all these dice material options, you’ll be able to create the dice of your dreams.
If you’re interested in reading more about creating board games, be sure to check out our custom board game hub. This part of our site contains all the information you need to know about creating a board game – beyond just the standards listed here, this hub also contains detailed information on all the types of materials and packaging types we offer for your game. We’ve also analyzed board card games to figure out what makes them work – and how you can apply these principals to your custom card game. There’s lots more to explore, like special features you can add-on to your card game to make it stand out. Check it out!
Freshly updated customer reviews from TrustPilot
Dice Size
Interested in what dice size options we offer? Read on to find out about our offerings.

Our available dice size options:
- Micro .4″ (10mm)
- Tiny .47″ (12mm)
- Small .55″ (14mm)
- Standard .63″ (16mm)
- Large .80″ (20mm)
Choosing a dice size is all about your game play. If your game requires a player to roll 6 dice at the same time (Yahtzee) then a smaller size would be easier for a player to roll all the dice at once. Or your game may require one large master dice.
Freshly updated customer reviews from TrustPilot
Dice Color Options

Interested in what dice color options we offer? Read on for more information.
Dice have two areas that can be colored, the face and the pips/numbers. Our most popularly requested face colors are white, black, red, blue and yellow.
Traditionally pips are black or white, but this is your custom game so feel free to ignore the trend and add some more color to your dice.
Dice can be spot colored, also called Pantone Match System. The color range of Pantone inks is far wider than the standard CMYK gamut, and it can include specialty inks such as metallic or fluorescent colors. With this breadth of dice color options, you can create the dice of your dreams.
If you’re interested in reading more about creating board games, be sure to check out our custom board game hub. This part of our site contains all the information you need to know about creating a board game – beyond just the standards listed here, this hub also contains detailed information on all the types of materials and packaging types we offer for your game. We’ve also analyzed board card games to figure out what makes them work – and how you can apply these principals to your custom card game. There’s lots more to explore, like special features you can add-on to your card game to make it stand out. Check it out!
Freshly updated customer reviews from TrustPilot
Instruction Styles
Want to learn more about how to design instructions for your card game? You’ve come to the right place.
Instructions are the unsung hero of any game, and necessary to keep in mind when creating your product.
Card Game Instruction Styles
Select an option below to learn more about how to design instructions for your card game.


If you’re interested in reading more about creating card games, be sure to check out our custom card game hub. This part of our site contains all the information you need to know about creating a card game – beyond just the standards listed here, this hub also contains detailed information on all the types of materials and packaging types we offer for your game. We’ve also analyzed popular card games to figure out what makes them work – and how you can apply these principals to your custom card game. There’s lots more to explore, like interviews with card game creators who have printed with PrintNinja, and special features you can add-on to your card game to make it stand out. Check it out!
Freshly updated customer reviews from TrustPilot
Printed on Card or Box

Print Instructions on a Playing Card or Your Game Box
Rulebooks or instruction sheets aren’t the only way to convey rules to your players. Get creative and think outside the box…or on it! For a cost-effective option, print your rules on the game box or on a single card.
Keep in mind that card count affects cost, so if you add an instruction card, make sure it doesn’t surpass the optimal card number per parent sheet.
If you’re interested in reading more about creating card games, be sure to check out our custom card game hub. This part of our site contains all the information you need to know about creating a card game – beyond just the standards listed here, this hub also contains detailed information on all the types of materials and packaging types we offer for your game. We’ve also analyzed popular card games to figure out what makes them work – and how you can apply these principals to your custom card game. There’s lots more to explore, like interviews with card game creators who have printed with PrintNinja, and special features you can add-on to your card game to make it stand out. Check it out!
Freshly updated customer reviews from TrustPilot
Instruction Booklets
Learn more about printing your own custom instruction booklet.

The first thing every gamer reaches for after opening a new game is the instruction booklet – the backbone of board games. With tabletop games there are typically a variety of components and mechanics that need to be explained, requiring a multi-page booklet. Booklets also work well for complex card games.
Instruction Booklet Binding
Saddle-stitched binding, binding held together with staples, is the default rule booklet option. It’s cost efficient and its ability to lay flat makes it easy to store in a tuck box.
However, we’ve printed perfect bound instruction books – typically for more complex board games – providing a heavier and more durable manual. If your instructions need to be continually referenced throughout game play, then perfect binding is your best option.

Instruction Booklet Paper Weight Options
Our default paper weight for a saddle-stitched rule books is 70lb text gloss for the interior and cover pages. If you’d like to request a different paper weight, please alert us to the new weight in our additional information box on our card form.
Rule Booklet Page Count
Whether you choose saddle-stitched or perfect bound books, your interior page count must be a multiple of 4.
What Should I Include In My Rulebook?
Writing a rulebook is a lot like writing a book. If you’re struggling in your epic quest to print a top-notch rulebook, check out this guide we found on what to include in your instruction book.
Freshly updated customer reviews from TrustPilot
Accordion Style Rules

Accordion style rules is simply a sheet of paper folded in a way that mimics an accordion, in which you can display artwork and instructions on the front and back. The accordion style makes it very easy to insert your rules into a tuck box.
Limitations of Accordion Style Rules
Our machinery can only produce 4 folds on one sheet. If you need more folds – like the 7 folded instruction sheet to the right – you can request them to be folded manually for an extra fee or to have us glue two sheets of four folded instructions together.
Accordion Booklet Material
Our default accordion rule booklet paper is 70lb text gloss.
You may choose to request another paper option through our card game quote form’s additional information box.
If you’re interested in reading more about creating card games, be sure to check out our custom card game hub. This part of our site contains all the information you need to know about creating a card game – beyond just the standards listed here, this hub also contains detailed information on all the types of materials and packaging types we offer for your game. We’ve also analyzed popular card games to figure out what makes them work – and how you can apply these principals to your custom card game. There’s lots more to explore, like interviews with card game creators who have printed with PrintNinja, and special features you can add-on to your card game to make it stand out. Check it out!
Freshly updated customer reviews from TrustPilot
Folded Game Instructions
Learn more about folded game instructions and find out if they’re right choice for your game.

The simplest instruction style is a folded sheet of paper. We use an 70lb text gloss sheet of paper for this option, but you may request a thicker or thinner paper weight.
On our card quote request form you’ll be directed to select the size of the paper in inches (width x height) in it’s unfolded form. We’ll then calculate the optimal way to fold your sheet so it’s final size matches your playing card dimension.
If you’re interested in reading more about creating card games, be sure to check out our custom card game hub. This part of our site contains all the information you need to know about creating a card game – beyond just the standards listed here, this hub also contains detailed information on all the types of materials and packaging types we offer for your game. We’ve also analyzed popular card games to figure out what makes them work – and how you can apply these principals to your custom card game. There’s lots more to explore, like interviews with card game creators who have printed with PrintNinja, and special features you can add-on to your card game to make it stand out. Check it out!
Freshly updated customer reviews from TrustPilot
No Instructions
The No Instructions option is perfect for those designing a traditional 52 card poker deck made for playing multiple games.
If your deck is meant to play a specific game, there are many alternatives to the traditional paper instructions.
The most common alternatives are printing your rules on your game box or on an extra playing card. If your instructions are too long for that option we’ve had creators find success printing their website instruction page URL and/or a QR code on the box, card or small sheet of paper.
Freshly updated customer reviews from TrustPilot
Sample Game Pricing
This article will give you information on board game pricing to help you estimate how much your project will cost.
There’s a seemingly endless list of possibilities when it comes to crafting your own board game, but how much will it actually cost? Narrowing down all of your dream options in order to gather some pricing info can seem a bit daunting at first. Fortunately, PrintNinja is here to help you get started on the right foot. On this page are several common game configurations along with the approximate production cost for each one; you can use these as a base to estimate how much all the bells and whistles will affect your game’s price.
Visit our card quote form to request a price and play around with available options for card games.
Sample Card Deck
![]()

– 54 cards, 280 GSM gloss blue core cardstock
– Tuckbox, 10pt coated 1-side
– Shrink wrapped
– 500 copies: $2.34 per game
– 1,000 copies: $1.67 per game
Sample Card Deck
![]()

– 300 cards, 280 GSM gloss blue core cardstock
– Instructions, 4-page accordion
– 2-Piece box
– Shrink wrapped
– 500 copies: $10.47 per game
– 1,000 copies: $7.38 per game
Sample Board Game

– 55 cards, 280 GSM gloss blue core cardstock
– Instructions, 20-page booklet, 70lb gloss paper
– Game board, 18 in by 18 in, full color, quad-fold, gloss lamination
– 2 Punch-out token sheets, 8 in by 8 in, 2-sided full-color gloss varnish
– 5 Standard plastic pawns
– 2 Standard resin 6-sided dice, 0.63 in, white with black pips
– 2-Piece Box with 2 compartment cardboard dividers, shrink wrapped
– 500 copies: $14.28 per game
– 1,000 copies: $10.60 per game
Now that you’ve learned about our board game pricing, why not check out our budgetary board game calculator? You can get a ballpark estimate of how much your game will cost when you print with PrintNinja.
Freshly updated customer reviews from TrustPilot
Game Proofing Options
A prototype is the first step you take when making a game. Physical proofs are a closer representation of the final result than a prototype. The cost of adding a physical proof to your custom game order depends heavily on the components involved. The games will arrive fully assembled to give you a great idea of how the final product will look, though due to the complexities of the game production process not every component will be printed on our offset presses. Any component that is digitally printed will NOT be color accurate. Please read the following information carefully to find out what each part of the physical proof represents.

Card Game Physical Proof
- Playing cards, offset printed, packed in a tuck box = $350 per parent sheet*
- Upgrade to two-piece box, digitally printed** = $150
- Instructions, digitally printed** = $50
- Shipping = $100
- Turnaround time = 2 weeks
Board Game Physical Proof
Choose as many options as you’d like to include in your game proof.
- Playing cards, offset printed, packed in a tuck box = $350 per parent sheet*
- All tokens, tiles, and instruction sheets/booklets, digitally printed** = $150
- Game board, digitally printed** = $150
- Dice = Free if standard 0.63 inch six-sided dice, $150 if custom
- Wood or plastic game pieces = Free if our stock pieces, $150 if custom design
- Vacuum formed plastic box divider = $200
- 2-piece box, digitally printed** = $150
- Shipping = $100 flat fee
- Turnaround time = 3-4 weeks
Add-ons, such as foil stamping and spot UV, differ from that of our book proofs.
- Foil Stamping= $300 per side. 1 unique design
- Foil Stamping on box= $100
- Spot UV on Cards= $150
- Spot UV on Box= $100
- Debossing/Embossing on Box= $50
- Anti-Scratch Lamination on Box= $150
- Linen Texture on Cards or Box= $50
- Metallic Ink on Box= $100
- Metallic Ink on Cards= $100 per side
*If you don’t wish to include your cards, we can substitute placeholder cards that are the same size and material as your cards for free, $350 for blue core and coreless stocks. $600 for Black Core stocks, and $900 for Foil, and PVC.
**Digitally printed prototypes are NOT color accurate
Freshly updated customer reviews from TrustPilot
How to Instantly Quote your Custom Poker Deck
This article will teach you how to instantly quote your custom poker deck.
PrintNinja makes affordable, high quality, custom card games. Because we’re capable of so many custom options, our instant price calculator has many options to navigate. If you’re simply looking to print your custom artwork on a standard deck of playing cards, here are some helpful tips to complete your quote.
Deck Size and Card Count
The first two options you’ll need to select when you start to quote your playing cards are deck size and card count. Deck size refers to the dimensions of each card. Standard poker cards are 2.5” wide and 3.5” long.
Card count refers to the total number of cards in each deck. A standard poker deck has 54 cards, including jokers, so you’ll want to enter 54 into this field.

PrintNinja Tip
A typical parent sheet can fit 55 poker cards. If you want to add one more card to your 54-card deck, it won’t add very much to your total cost.
Card Stock and Card Backs
The card stock you choose will have a significant impact on your unit costs. We have plenty of options to fit a variety of budgets. If you’re on a budget, Blue Core Standard 280gsm is a great choice. It’s affordable, but still looks and feels very professional. On the other end of the spectrum are our Black Core card stocks, which are thicker and have a dark black core so you can’t see through them even when they’re held up to a light.
“Card Backs” refers to the number of unique designs on the back of a playing card. Poker decks almost always have just one back, so you’ll want to enter 1 into this box.

Finish Style and Specialty Options
For poker cards, we recommend gloss varnish for your finish type. For a bit of an upgrade, you may also want to add a linen finish. Most mass-produced playing cards use a linen finish to make the cards easier to shuffle.

Packaging and Instructions
Most poker decks are packaged in a tuck box or with shrink wrap. Tuck boxes are useful because your customers will be able to store their cards in them. However, shrink wrap is a less expensive option, and you won’t have to worry about designing a tuck box. For the Instructions section of our calculator, simply choose “none”.

Quantity and Proofing
For the field called Game Quantity, simply enter the number of decks you’d like to purchase. Our minimum order quantity is 500. If you’d like to order a quantity not available on this form, you can fill out a custom quote request.
Next, choose your proofing option. The quickest and most cost efficient option is electronic proofing. However, if you’d like a hard copy proof, we can do that too.

Almost done!
After you enter your zip code and click Calculate, you’ll be able to see your total cost including shipping and all applicable taxes. From here, you can decide if you’d like to expedite all or part of your order, and you can even save your quote for 90 days. We highly recommend saving a quote so you can lock in your price. If you’re not sure about some of your selections, you can always go back and save another quote with different options.
Need card face artwork? We’ve got you covered.
PrintNinja offers two different poker face styles. If you’d like to choose one of these options, you just need to let your account manager know after you place your order. We also have an option that lets you place a photo on each card, so you can put up to 54 different photos into one deck.

Classic Poker Deck

Modern Poker Deck
Ready to Get Started?
Head on over to our card game calculator and instantly price your poker deck. We recommend opening the calculator in a separate tab so you can reference this guide as you go.
Get Your PriceFreshly updated customer reviews from TrustPilot
Poker Card Face Options
Not sure what poker card face to choose for your custom deck? We provide two great options.
If you’re tasked with ordering a poker deck for your business, charity, school, church, camp, or other organization, we have tools to help make this process as easy as possible. While many of our customers use fully custom artwork for their poker decks, PrintNinja also has two sets of card face artwork you can use for your project. We offer both a classic option and a modern option.
Classic Poker Card Face
This deck is illustrated with regal face cards, including classic motifs like flowers, swords, and axes. If you’d like to use this option, after placing your poker deck order let your account manager know you’d like to use Classic Poker Deck artwork.
Modern Poker Card Face
If you’re looking for something more clean and minimalist, our Modern Poker Deck uses creative typography to make your deck stand out. We also have a version of this artwork that allows you to put a 1.25” square photo in the center of each card. This allows you to put 54 unique photos into a single deck! After you place your order, let your account manager know if you’d like to select either of these options.
Like what you see?
Get started by pricing your card game instantly. You can save your quote for up to 90 days, or order now and get started right away.
Get StartedFreshly updated customer reviews from TrustPilot
Popular Printing Add-Ons
Learn more about our specialty printing options and see if any of them are right for your project.
These are the most commonly used specialty options because they are some of the easiest and most cost-effective ways to enhance your project. All of the features below are available for book and game printing. Select one of the options below to learn more.
Specialty Printing Options


Not sure if any of these specialty printing options are right for you? Feel free to contact us and one of our friendly customer service ninjas can help you determine the right path for your project.
Freshly updated customer reviews from TrustPilot
Foil Stamping
Foil stamping is an easy way to catch the eyes of consumers. With hundreds of custom printing options to choose from, we’re here to make sure your project comes out exactly how you envisioned.
Do you want to make sure your cover gets noticed amongst other books on the shelf? If so, this is an excellent option for creating some eye-catching visual appeal. As its name suggests, the process employs the use of foil to achieve a metallic finish, usually in gold or silver.

How It Works
Our expert operators use a heated die to transfer the foil onto a printed or unprinted sheet. Check out the process in action here.
Our basic foil stamping services include areas up to 4” x 4” in gold or silver. As with all of our services, however, there are plenty of custom options available. To cover larger areas try using metallic ink with small flakes of metal, or make your entire cover from foil using foil stock. You can also use multiple foil colors to wow your readers with vivid metallic hues, or add sequential foil numbering to make each piece in your run unique. No matter what you have in mind, there are plenty of ways to make your project shine.
Pricing
To get an estimate for this add-on service, simply check the appropriate box using our quoting calculator. If you have a specialty option in mind beyond a 4″ x 4″ area in silver or gold foil, simply request a custom quote.


Basic vs. Complex
How much area, and how complex your foil stamp design is will dictate the cost associated. “Basic” foil stamping must be contained within a 4″ x 4″ area, while a complex option can cover large portions of your covers. To get pricing for “Complex” foil stamping please request a custom quote. Please also note that complex foil stamping is still restricted to a minimum thickness, so for designs with fine detail consider metallic ink.
PrintNinja Tip
Things to Consider
Shifts in Placement
The stamping process can cause the placement of the foil to vary slightly from one project to the next by 0-2mm. To prevent an overlapped appearance with the ink, avoid duplicating any printed shapes or texts with foil. Instead, remove the printed version of the text or shape from your file and simply use the foil itself.
Fragility
The material used for foil stamping can be delicate – it’s much thinner than aluminum foil. Due to its fragile nature, this option is best-suited for thicker, larger fonts. Text or line-work less than 1mm thick (2.83 Adobe points) is not suited for hot foil stamping and could flake off over time. For this reason, we strongly recommend reserving foil stamping for areas that have a minimum thickness of 1mm. Additionally, large areas of foil stamping can scuff over time, so consider placing your foil stamp beneath a gloss, matte, or anti-scratch matte lamination if you intend for your foil design to cover large areas.
Gradients and Textures
The material used for foil stamping is solid, meaning there cannot be any gradients or textures present in your files. If you’re seeking a gradated or textured metallic effect, however, we’ll be happy to make it happen. Simply request a custom quote and with metallic inks, which works great for gradients.
Embossing
If you’re foil stamping an area that’s also being embossed, we will automatically add a lamination of your choice (gloss, matte or anti-scratch matte) on top of your cover(s) in order to protect them from scratches and scuffs. If you choose to use a matte lamination on top, your foil stamp may look less shiny than usual, but will remain unscathed by the elements. All foil stamped or embossed areas in your mask files must be at least 1mm (2.83 Adobe points) thick.
Debossing
Debossing can also be coupled with foil stamping to create a stand out cover. In fact, the process is actually simpler, and because the debossed area is sunken in versus protruding, there are fewer design limitations. We do not require a protective layer of lamination atop a debossed foil stamp. To ensure quality, the only limitation we recommend is ensuring your stamped areas are at least 1mm (2.83 Adobe points) in thickness.
PrintNinja Tip
Ready to Get Started?
We’ve created a custom pricing calculator so that you can explore all the different printing choices, shipping methods, and get an instant price for your project. You can also customize just about anything, from size and paperweight to specialty options and so much more.
Get Your PriceFreshly updated customer reviews from TrustPilot
Spot Gloss and Spot UV

If you want areas of your book cover or game to really pop, you can include a Spot Gloss, also known as a Spot Varnish or Spot UV.
Is there an area on your cover that you want to really stand out? Captivate your customers by drawing the eye directly to your most compelling graphic or text using a Spot Gloss, also known as a Spot Varnish or Spot UV.
This unique high-gloss shine is typically applied either atop a matte varnish or matte lamination. As a result, the area with the Spot UV will be shiny and accentuated, standing out against the rest of your smooth matte design. If you’re curious about how to make areas of your project pop using this feature, take a look at our setup guide below.
PrintNinja Tip

What is Spot UV?
Spot UV is a clear varnish that can be applied to your printing project in specific areas. Similar to how ink is added to your project, the varnish is a liquid that is applied via a cylinder during the printing process. Afterwards, the varnish is cured using a UV light, hence, Spot UV. This option adds not only a reflective property to your project but also a textural component, drawing attention to a particular part of your project.

Glow in the Dark!
A variation on a standard Spot UV is Glow in the Dark. Although this option looks almost exactly like the standard option in normal light, when exposed to bright light, that area will glow in dark conditions. To add Glow in the Dark Spot UV to your order request a custom quote.
Pricing
You can request pricing for this add-on by checking the appropriate box on our quoting calculator. If you have additional specialty options in mind for your project, these can also be requested when locking in your quote.
Ready to Get Started?
We’ve created a custom card game pricing calculator for you to explore all our different printing choices, shipping methods, and get an instant price for your project. You can also customize just about anything, from size and packaging, to specialty options like Spot UV and so much more.
Get Your PriceFreshly updated customer reviews from TrustPilot
Embossing vs. Debossing
Confused about what it means to emboss vs. deboss an element of your project? We can help clarify.
PrintNinja is the premier offset printer for independent creators and small businesses. With hundreds of custom printing options to choose from, we’re here to make sure your project comes out exactly how you envisioned.
Embossing and debossing create unique visual and textural impacts on your project’s cover. These options are ideal for designers seeking ways to make elements of their cover art pop off the page. With both approaches, covers take on more of a three-dimensional appearance compared to traditional paperbacks and hardcovers.

Embossing
Embossing raises certain parts of the paper, bringing them forward so the eye is directed towards these areas first. You may have seen paperbacks with embossed covers, with the title and author’s name embossed for a striking appearance, for example.
How is embossing done?
The process of embossing involves the use of a special custom die. The die is carved to align seamlessly with the image (or text) to be embossed. Then, the sheet of paper or cover is inserted into the die machine with the die facing the back of the sheet. The raised area of the die then pushes the paper or cover away, creating the raised effect. If you’re curious about how it works, take a moment to watch the process in action here.

Debossing
Debossing, on the other hand, lowers certain parts of a sheet to achieve a “sunken in” look. This also attracts the eye by recessing a specific area. While not as popular as embossing, debossing can be used to support a particular aesthetic or theme.
How is debossing done?
The process of debossing is very similar to embossing and again involves the use of a custom die. However, when the sheet of paper or cover is inserted into the die machine, the front of the sheet faces the die. The debossed area of the die then pushes the paper or cover away, creating the sunken effect.
You can emboss or deboss an area of your project up to a 4″ x 4″ square. If you have a more complex embossing or debossing project in mind, feel free to reach out to our experts. With large, multi-level, beveled, and sculptural embossing options available, we can accomplish just about anything you’re envisioning! Our team will be happy to provide you with a custom quote for any options you have in mind.
PrintNinja Tip
For hardcover books, instead of raising the embossed area, we actually deboss the entire cover except for the area you want embossed. The final result is the same, but your emboss file should be set up as though you were debossing everything else.
Pricing
If you think embossing or debossing would be a good fit for your project, find out more about pricing using our quoting calculator. Simply check the appropriate box for this add-on, or request specialty options for customized embossing or debossing features while requesting a custom quote.
Ready to get started?
We’ve created a custom pricing calculator so that you can explore all the different printing choices, shipping methods, and get an instant price for your project. You can also customize just about anything, from size and paperweight to specialty options like embossing/debossing and so much more.
Get Your PriceFreshly updated customer reviews from TrustPilot
Specialty UV Varnish

Coatings play a main role in your design and quality as they are dually protective and enhance your book cover, album sleeve or packaging. Our Specialty UV varnish options will increase the number of consumer eyes on your project as well as encourage them to touch and examine your project.
Pricing for Specialty UV Varnish
Request pricing for this add-on while locking in your price on our quoting calculator. We’ll reach out to you with a custom quote (or questions) within 1 business day of receiving your request.

UV Pearl
UV Pearl creates a shimmering effect with high-quality apperance and texture. You can choose to place the UV Pearl all over or in specific spots.

Glow-In-The-Dark
Glow-in-the-dark is a varnish that makes specific areas glow after being exposed to certain light. This adds an extra quality to your book or board game, plus, never lose your project again!
Not sure if any of these options are right for you? Feel free to contact us, and one of our friendly customer service ninjas can help you decide which of our specialty UV varnish options is right for your project.
Freshly updated customer reviews from TrustPilot
Sequential Foil Numbering

Unlike traditional foil stamping, sequential foil numbering is done with a special press that gives each individual piece of your run a unique number.
Sequential foil numbering is a great addition to Kickstarter / crowdfunded projects, and it can also be done on a small part of the run (say just 100 copies out of 500) to make those copies extra special.
Sequential numbering has certain restrictions: because it is done with a special machine, the size and font of the numbering cannot be changed, and there will always be 6 numbers.

Sequential Foil Numbering File Placement:
Sequential foil numbering must be placed within 10cm (3.93 inches) of the outside edge. Please see the guide above for a visual example of where you can place your numbers, anywhere in the blue space. Note: we cannot print the numbers within 0.2 inches of the outside edge.
The size of PrintNinja’s foil numbering is approximately 3/16 inch in height and 1 inch in width.
Pricing
Request pricing for this add-on while locking in your price on our quoting calculator. We’ll reach out to you with a custom quote (or questions) within 1 business day of receiving your request.
Freshly updated customer reviews from TrustPilot
Foil Stock

Foil stock, not to be confused with foil stamping, is a paper option that allows your entire cover to be made of foil. Foil stock comes in silver base, and UV inks are used in the print process to create shiny metallic colors of near-infinite variety.
The album cover to the right is made from gold foil stock with red and black ink printed over the foil. Instead of highlighting one element with foil stamping, such as the title of their album, Edoheart wanted to emphasize the entire cover with a bright and reflective foil stock. This is a great option if you want your whole cover to be highlighted.
Pricing
Request pricing for this add-on while locking in your price on our quoting calculator. We’ll reach out to you with a custom quote (or questions) within 1 business day of receiving your request.
Not sure if foil stock is the right option for you? Stuck between this option, foil stamping, and metallic ink? Feel free to contact us and we can help you make a decision. Our friendly customer service ninjas can help you determine which of these options is right for your project. Give us a call and we’ll help you out!
Freshly updated customer reviews from TrustPilot
Anti-Scratch Matte Lamination
Learn more about our anti-scratch printing option and figure out if it’s right for your project.

While many creators prefer the subtle look of a matte finish, one downside is that it tends to show marks more easily than a gloss finish does – especially on large areas of solid color. To avoid this, you can use an anti-scratch matte lamination in place of our standard matte lamination, keeping scratches and scuffs from affecting the aesthetic of your covers or the pages of your board book.
Please see the below image comparison of “Anti-Scratch Matte” lamination vs. basic “Matte” lamination:

Anti-scratch matte lamination is also a great choice for custom games, especially for game boards, since they tend to see more action than a typical book does.
Pricing for Anti-Scratch Printing Option
Please Note: The costs below are for standard book projects. Board Books and Custom Games may require custom pricing.
$.30 per unit for orders over 700 units.
$200 standard cost for orders under 700 units.
List this item in our add-on box while locking in your price on our calculator. We will get back to you with a quote within 1 business day of receiving your request.
Not sure if this option is right for you? Feel free to contact us – one of our friendly customer service ninjas can help you determine if our anti-scratch printing option is the right choice for your project.
Freshly updated customer reviews from TrustPilot
File Setup Checklist
Use PrintNinja’s checklist to correctly setup and make sure that your files are ready for submission. Having correctly prepared files will help to ensure the prepress process goes as smoothly as possible.


Once you’ve double-checked our file setup checklist, head to your quote to find your file upload link.Your quote contains a file upload link. See our artwork upload tips if you’re having trouble. For larger files or other errors with uploading your file, you may use an outside service like Dropbox and email the download link to customerservice@stage.printninja.com or your account rep.
Check out our other resources on:
Freshly updated customer reviews from TrustPilot
What We Can and Can’t Print In China
What We Can and Can’t Print In China
We print in China. That occasionally causes a problem with creators that are working with nudity, religious or ideologically-sensitive content.
Obviously, the list of things that can be printed is much longer than the list of things that can’t be printed. (Pictures of puppy dogs? Sure. Skyscrapers? Sure.). But no one ever asks whether they can print puppy dogs or skyscrapers! So we’ll use this page to address the things that we get questions about. You can always contact us if you have any questions regarding your content.
The first thing to know: Hey, edgy content doesn’t bother us
Our US team is very open-minded and quite hard to shock. We’ll be happy to look at your artwork and tell you if it’s in-bounds or out of bounds. Don’t be shy – send us your questions and we’ll clarify. There are a few firm rules and lots of guidelines that are subject to interpretation. When we get questionable artwork, we’ll send it to our team in China and they’ll have a look at it.
Why we don’t print questionable material in China:
The laws on acceptable content in China force compliance on the printing company. That is, you as a creator aren’t going to get in trouble if you print pornographic material in China, but the printer could be fined or even lose their business license if they print inappropriate material. Printers aren’t going to risk it.
What can’t be printed in China?
Here are some broad categories for your consideration. They’re not exact, and there may be exceptions up or down. Give us a shout if you think that you’re in a grey area.
Content that can be printed:
- Books with religious themes or messages as long as the content isn’t written in a language common in China / tries to prostletize Chinese readers. (So far, English-language Bible stories haven’t been a problem.)
- Vulgar language
- Representations of famous naked artworks (think pictures of Michelangelo’s David.)
Content that we’d need to review
We’ll have to look at the content before telling you that we can print it. In some cases, we actually pass the work to the printing company and they run it by their local printing bureau that maintains the most up-to-date interpretations.)
- More-specific religious references. (We had a client that printed a religious history of a Western Asian religion; the printer that did the work went to the local government and got permission to print the history.)
- Hyper-Violence/Ultra-Violence & Gore
- Definitions of what constitutes the terms above may vary. If the content could be considered “extreme” it’s probably a good idea to check with us first.
- Realistic nudity
- Realistic nudity is a “general” no rather than a “hard” no
- Our general rule of thumb is if it would be covered by a swimsuit, it needs to be covered in your artwork.
- Think of it like this: if it’s NSFW, it’s NSFPNCP (not safe for PrintNinja’s Chinese Printers)
- Non-realistic Cartoon nudity
- A naked human, drawn manga-style, without any gratuitous shading is probably fine
- We did a book where the creator drew a series of dogs that were shaped like penises; this was deemed acceptable to print in China
- Naked zombies may be OK in a couple of panels but not OK in a whole book about naked zombies. (It would depend on the zombies!)
- We generally haven’t had trouble with representations of female nudity above the waist.
- Art nudity (naked model in a photograph, turned away) may have a slightly wider berth if it’s artistically presented
Things that can’t be printed:
- Hardcode pornography (of any persuasion – photographic, illustrated, vector,etc.)
- Bibles (as in the King James version)
- References to Taiwan, Tibet, or other areas that are politically sensitive to China
- Documents that would appear to be anti-Chinese government (hard to pin this kind of content down, but it’s not common)
The final word
See how there are lots of grey areas? If you have questions, send us your artwork and we’ll have a look.
Did we answer all of your questions?
Contact usFreshly updated customer reviews from TrustPilot
Book Printing File Setup Guide
If you’ve never printed a book before, this book printing file setup guide will give you all the information that you need to successfully format and submit files.
The easiest way to understand book printing file setup is to think of your cover as one file and your interior pages as another file. (Dust jackets are a third file.) . Breaking these files down through the correct setup allows all of us to understand and manage the printing process for each piece of your book project, making the overall process easier on everyone involved.
Some examples: a hardcover book with a dust jacket would have three files – a dust jacket, the hard cover itself, and the interior pages. A perfect-bound book with a spot UV on the front cover would have a cover file, a cover spot UV file, and an interior pages file.
Select a book printing file setup guide below to get started creating your document in your page layout software. When your document is nearing completion, you should view our file format suggestions for information about the best file formats for printing. We’re happy to answer any questions you may have.


Freshly updated customer reviews from TrustPilot
Creating Your Interior Pages
Read on for information about creating your interior pages with various Adobe software.
One of the most intimidating steps during the printing process is properly setting up files for the press. However, this process is actually a lot easier that it appears. Over the years we’ve been printing books, games, and more, we have seen projects of all layouts and formats – and now we want to share our insight with you!
There are many different types of programs out there that you can use in creating your interior pages, but the most common and easiest to use are Adobe InDesign, Photoshop, and Illustrator. They can be a bit daunting to learn at first, but if you follow the steps outlined in the book template tutorials below, you’ll be an expert in no time.
Create a Book Template Customized to your Specifications
Please note: these guides are for creating a template of the interior pages of your project. For help in designing your cover please consult the appropriate guide.
These are not the only acceptable programs, however. If you’re more comfortable using something else like Manga Studio while creating your interior pages, then feel free to use that as well. As long as the files are submitted in an proper format and you follow our printing setup guides, then you’ll be able to move forward with prepress.


Creating a Book Template in Adobe InDesign
Read on for instructions on creating a book template in Adobe InDesign.
For years, PrintNinja has been the premier offset printer for independent creators, self-publishers, and small businesses. We specialize in high-quality printing services at prices that only offset printing can bring you.
One of the most intimidating steps during the printing process is properly setting up files for the press. However, this process is easier that it appears. Over the years we’ve been printing books, games, and more, we have seen projects of all layouts and formats. We’ve created the instructions below to make sure your files are setup to print exactly how you envision them.
How to Create a Template In Adobe InDesign
- In InDesign, select File > New > Document
- Choose Print as your Intent.
- Make sure Facing Pages is selected, this creates a spread
- For the number of pages, enter your interior page count plus your inside front and back cover pages (as well as end sheets if your project requires them). Your cover spread will be created separately.
- Your Start Page # will be 2.
- Enter your page size (this is the final trim size of your book).
- The margins will be used to show the safe area. For most projects we recommend keeping all important text and images at least 0.125” away from the trim line, but if you would like your pages to have an even border around them (for example, around the panels on a comic page) then we recommend increasing this to 0.25”.
- Enter 0.125” for the bleed on all sides.
- If you aren’t don’t use InDesign often, your set your unit of measurement may default to picas. To change this, go to InDesign > Preferences > Units & Increments and choose Inches for Horizontal and Vertical.
- Click OK to create your project document. Your inside front cover will be the first page on the left and will proceed in reading order.

Exporting Your Book Template as a PDF in InDesign
- When your pages are all designed and you are ready to export your pages as a print-ready PDF, go to File > Export
- Choose Adobe PDF (Print) as your format.
- At the top, select High Quality Print as your preset, though we will be making some changes.
- In the General tab make sure to export all pages as spreads.

- In the Compression tab, turn off all compression settings to avoid unnecessary quality loss. The only time to select these options is if your images have a very high resolution. 300 pixels/dots per inch is ideal for print, but we will accept up to 400 ppi/dpi. Anything above that cannot be accurately reproduced by offset printing presses, so choose Bicubic Sampling To 300 ppi for images above 400ppi if you find yourself in this position.

- Turn off all printer’s marks in the Marks and Bleeds tab, and make sure to select Use Document Bleed Settings.

- In the Output tab, if your images are in CMYK choose No Color Conversion. If your images are in RGB, choose Convert to Destination (Preserve Numbers) and select Japan Color 2001 Coated (if you will be printing on coated paper) or Japan Color 2001 Uncoated (if you will be printing on uncoated paper) as your profile. In both cases make sure to choose Don’t Include Profiles.
- Click Export to save your print-ready PDF.
- You now have an interior page template to design your project around.

Get an instant quote
Now that you have print-ready files, check out our instant price calculator to experiment with specialty options and get your price!
Get Your QuoteFreshly updated customer reviews from TrustPilot
Creating a Book Template in Adobe Photoshop
Read on for information on creating a book template in Adobe Photoshop.
For years, PrintNinja has been the premier offset printer for independent creators, self-publishers, and small businesses. We specialize in high-quality printing services at prices that only offset printing can bring you.
One of the most intimidating steps during the printing process is properly setting up files for the press. However, this process is easier that it appears. Over the years we’ve been printing books, games, and more, we have seen projects of all layouts and formats. We’ve created the instructions below to make sure your files are setup to print exactly how you envision them.
How to Create a Template In Adobe Photoshop
- In Photoshop, select File > New.
- Make sure to include the page number in the file name as you will need to create a different file for each page.
- For the page size enter your final trim size plus 0.125” bleed on all four sides, or 0.25” to the total page size. For example, if you are printing a 6.625” x 10.25” comic, you would enter 6.875” x 10.5”. You may also choose to design your pages as two page spreads, in which case you would first double your page width before adding .125” bleed on all four sides (so 13.5” x 10.5” for the 6.625” x 10.25” comic size).
- Ensure that the image resolution is 300 pixels per inch.
- Choose CMYK as your color mode.
- In the Advanced section select Don’t Color Manage This Document and Square Pixels.
- Click OK to create your page, then repeat the process as many times as you need to cover all of your pages.
Exporting Your Book Template as a PDF in Photoshop
- When your pages are all designed and you are ready to export your pages as a print-ready PDF, select File > Automate > PDF Presentation
- If you have all of your book pages open, select Add Open Files. Otherwise, click Browse to add them to your PDF.
- Save the file as a Multi-Page Document and unselect everything in the Include section.
- Click Save to continue.
- At the top choose High Quality Print as your preset, though we will be making some changes.
- In the Compression tab turn off all compression settings to avoid unnecessary quality loss. The only time to select these options is if your images have a very high resolution. 300 pixels/dots per inch is ideal for print, but we will accept up to 400 ppi/dpi. Anything above that cannot be accurately reproduced by offset printing presses, so choose Bicubic Sampling To 300 ppi for images above 400ppi if you find yourself in this position.
- In the Output tab choose No Color Conversion and Don’t Include Profile.
- Click Save PDF to save your print-ready PDF.
Get An Instant Quote
Now that you have print-ready files, check out our instant price calculator to experiment with specialty options and get your price!
Get Your QuoteFreshly updated customer reviews from TrustPilot
Creating Your Book Template in Adobe Illustrator
Read on for instructions on creating your book template in Adobe Illustrator.
When you’re creating a book in Adobe Illustrator, it’s important to start with the right settings so your project prints exactly the way you expect. With PrintNinja, you’ll have a prepress expert to help make sure your files are print-ready, but the best way to make sure this process goes smoothly is to start with the correct file setup. Follow our step-by-step instructions for creating your book template.
Getting Started
- In Illustrator, go to File -> New
- The Number of Artboards will be your interior page count plus your inside front and back cover pages (as well as end sheets if your project requires them). Your cover spread will be created separately.
- Make sure the first button to the right of the Number of Artboards is selected.
- Enter 0 for the spacing and any number you want for the columns (this will be the number of pages per row).
- Enter your page size (this is the final trim size of your book) and .125” bleed to all four sides.
- You may also decide to set your pages up as two page spreads. If so, divide the number of artboards by two (each artboard would consist of two pages), enter 1 for the columns, and double your page width. You should keep the amount of bleed the same.
- In the Advanced section choose CMYK as your color mode and 300 ppi as your resolution under Raster Effects.
- Click OK to create your project document. Your inside front cover will be the first page in the top left and will proceed in reading order.
- NOTE: Keep in mind that Illustrator has a limited canvas size, which means the total width of each row of pages and total height of each column of pages cannot exceed 227.5” (including bleed). If you are working on a long book then you may need to split your project up into multiple files.

Exporting your Book Template as a PDF in Illustrator
- When your pages are all designed and you are ready to export your pages as a print-ready PDF, go to File -> Save As
- Choose Adobe PDF as your file format.

- At the top choose High Quality Print as your preset, though we will be making some changes.

- In the Compression tab turn off all compression settings to avoid unnecessary quality loss. The only time to select these options is if your images have a very high resolution. 300 pixels/dots per inch is ideal for print, but we will accept up to 400 ppi/dpi. Anything above that cannot be accurately reproduced by offset printing presses, so choose Bicubic Sampling To 300 ppi for images above 400ppi if you find yourself in this position.

- Turn off all printer’s marks in the Marks and Bleeds tab, and make sure to select Use Document Bleed Settings.

- In the Output tab choose No Color Conversion and Don’t Include Profile.
- Click Save PDF to save your print-ready PDF.
- You now have an interior page template to design your project around.

Cover File Setup Guides

If you’re printing a cover with PrintNinja, you’ll want to read this file setup guide. The better you understand the process of setting up your files, the easier your printing process will be – and the less corrections you need to make to your file, the faster you’ll get your final product! Assembling your cover file for print is a slightly different process than setting up your inside pages, and varies greatly depending on your selected binding – saddle-stitched, wire-bound, and spiral-bound have different requirements than perfect bound, case bound, or dust jackets. Here are some specifications for different types of binding:
Saddle-stitched books: please include the front and back cover pages in your interior page file.
Wire-bound books: please include the front and back cover pages in your interior page file.
Spiral-bound books: please include the front and back cover pages in your interior page file.
All other book formats: please see the links below for more specific cover file setup guides relating to your binding type.
- Softcover / Perfect Bound Cover Template
- Hardcover / Case Bound Cover Template
- Dust Jacket Template
- Board Book Cover Template
- Hinge Template
Did we answer all of your questions?
Contact usFreshly updated customer reviews from TrustPilot
Softcover Perfect Bound Cover Setup Guide
Because a single sheet of paper is wrapped around the rest of your pages to create your cover, perfect bound / softcover book covers should be created as a single spread.
Design a Softcover Children’s Book
Perfect Bound Cover Template
- The “Page Height” and “Page Width” measurements in the guide below should be the same as the inside pages of your book.
- Next, you’ll have to accommodate for your book’s spine. To calculate the width of your spine, see our online spine calculator.
- Finally, as with your inside pages, you should include 0.125 inches of bleed around the edge of your design that will be trimmed off. Also make sure to keep all important text and graphics 0.125 inches away from the trim line since softcovers, like all offset printing, exhibit minute variance in their production.
Important Design Consideration

Perfect Bound Inside Cover and Front Cover Score
Because the book block is glued into the cover, perfect bound books have 10 millimeters of area on their inside covers that will be glued to the first and last inside page. This means that all artwork on the inside covers, the first inside page, and the last inside page should be kept at least 10 millimeters away from the spine.
Additionally, we score the front and back cover to allow them to open without a rough crease.

Hardcover & Casebound Cover File Setup Guide
Here’s a quick and easy casebound cover file setup guide to help you set up your hardcover book cover files.
Hardcover book covers are printed on a single sheet of paper that gets wrapped around the outside of your book.
Hardcover & Casebound Cover File Template

Calculate your total cover height and total cover width:
Total Cover Height:
- Begin with the height of your interior pages.
- Add 0.27 inches to the page height.
- Add 0.8 inches to both the top and bottom (1.6 inches total) of the new page height for the foldover. This area is printed, folded over, and glued to the inside of the greyboard case to hold everything together. You can learn more about this process on our Hardcover and Casebound Binding We recommend extending your artwork to the edge of the foldover area, even though most of it will not be visible.
- You have now calculated your total cover page height (including the foldovers).
Total Cover Width:
- Begin with the width of your interior pages.
- Subtract 0.16 inches from the page width.
- Add 0.8 inches to the new page width for the foldover (see above).
- Add 0.4 inches to the new page width for the hinge. The hinge is the area on each side of the spine that allows the book to open without causing damage to the cover or spine.
- Multiply the new page width by 2.
- Calculate the spine width of your cover using our Spine Width Calculator and add the spine width to the new page width.
- You have now calculated your total cover page width (including the spine, hinges, and foldovers).
Hardbound Cover Template Example
Let’s use an 8.5” x 11” book with a 0.314” spine width as an example. To find the total cover height you would add 0.27” to 11” giving you 11.27”. You would then add 1.6” for both the top and bottom foldover areas (0.8 * 2). This would give you a total cover height of 12.87”.
To find the total cover width you would subtract 0.16” from 8.5” giving you 8.34”. You would then add 0.8” for the foldover and 0.4” for the hinge giving you 9.54”. You would then multiply this number by 2 and then add 0.314” for the spine. This would give you a total cover width of 19.394”.
Cover Design Considerations
- When creating artwork for a hardcover project, you can choose to center the front and back cover artwork from the “spine” area or the “hinge” area. This is a design-based decision on your end, but we have provided a visual guide to illustrate below:
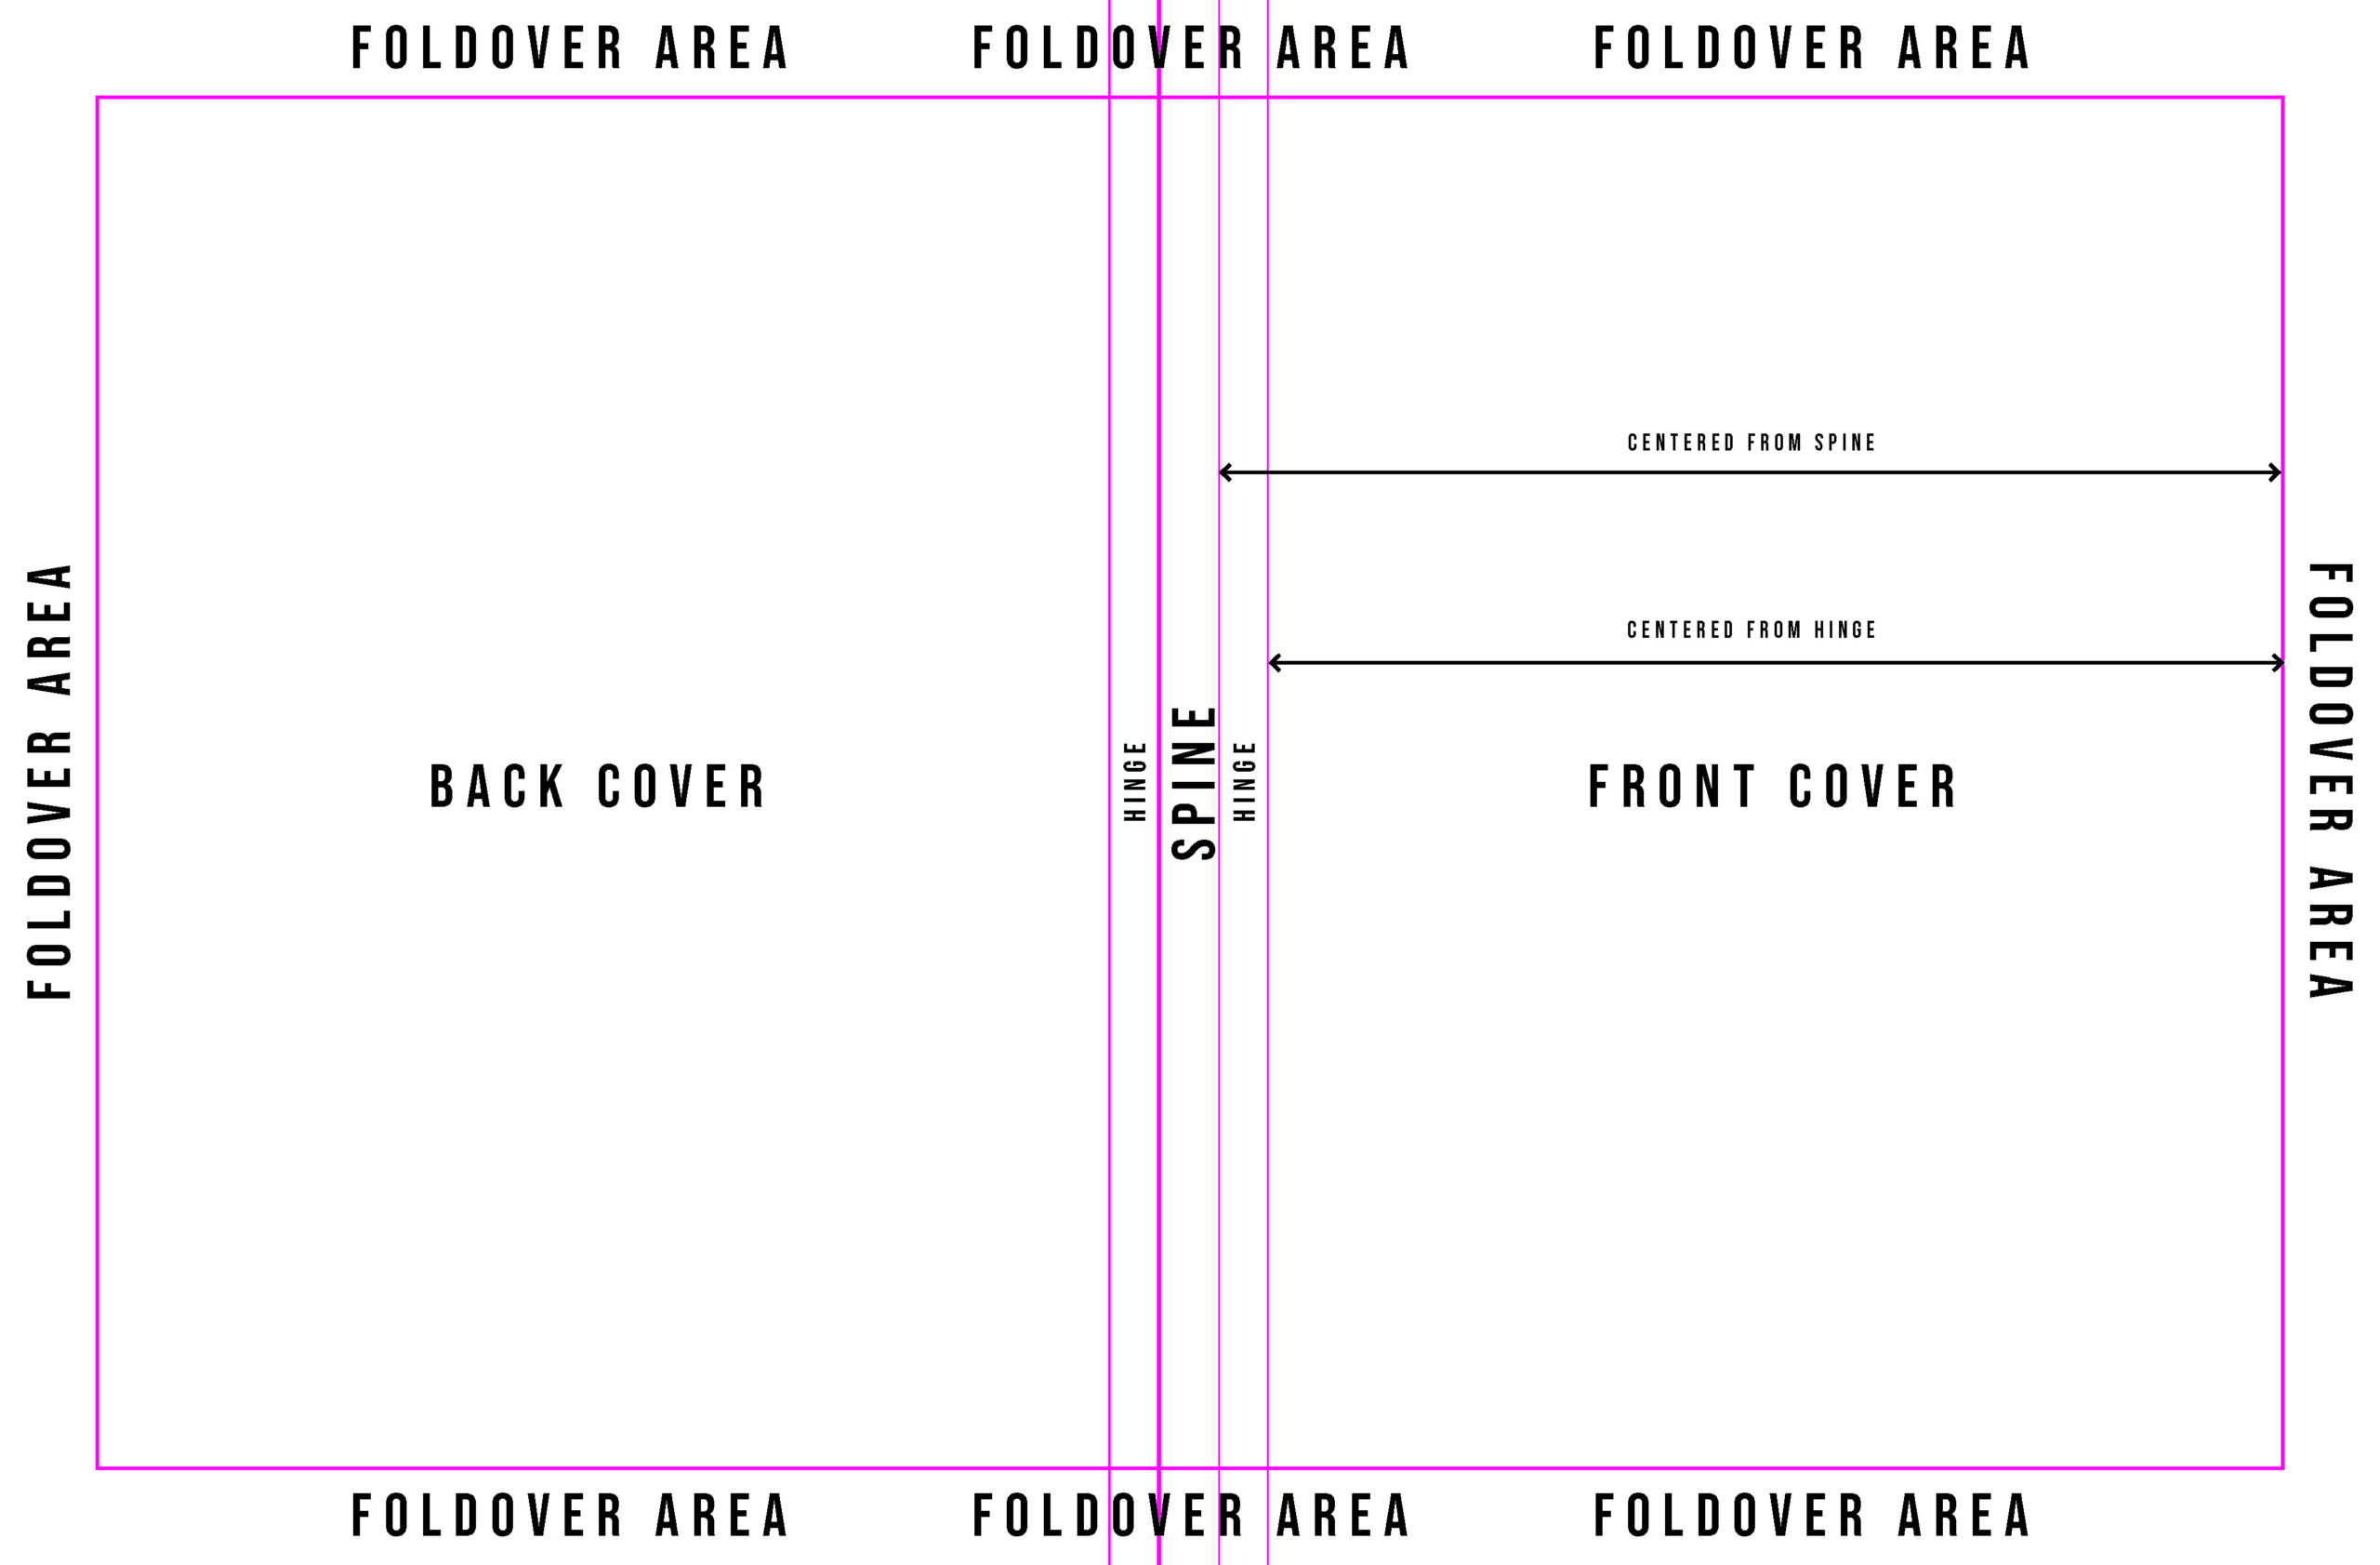
- Furthermore, please be sure to reference our hinge considerations and setup guide here: https://stage.printninja.com/printing-resource-center/printninja-file-setup-checklist/book-printing-file-setup-guides/cover-setup-guides/hardcover-book-hinge-setup-guide
How to Create a Template in Adobe Indesign
- Create a new InDesign document.
- Enter your total cover width and height as the dimensions.
- Select 2 columns and enter your spine width as the column gutter.
- Enter 0.8 inches as a margin on all four sides.
- Do not enter any bleed or slug values.
- Click create. You have now created your cover template!
Indesign Cover Template Example (8.5″ x 11″ Book)

Exporting Your Cover Template as a PDF in Indesign
Please refer to the export instructions toward the bottom of our Interior Page Setup Guide.
Watch the hardcover binding process in action.
Did we answer all of your questions?
Contact usFreshly updated customer reviews from TrustPilot
Dust Jacket File Setup Guide
Dust jackets are printed on a single sheet of paper that gets wrapped around the outside of your hardcover book. Your dust jacket artwork should be created as a “double-page” or single spread.
Dust jackets are slightly larger than the book itself. Be sure to double-check the numbers in this guide as you set up your files.
Creating a Dust Jacket File Template
- Begin by calculating the page height and page width from your book.
- The “Page Height” and “Page Width” measurements in the image below are the same as the inside pages of your book:
- Add 0.27 inches added to the page height
- Add 0.3 inches added to the page width
- The “Page Height” and “Page Width” measurements in the image below are the same as the inside pages of your book:
- Then, calculate the spine width of your dust jacket using our spine width calculator.
- Add 0.04 inches to the calculated width of your spine to account for the extra thickness of the dust jacket paper.
- Set up your dust jacket flaps:
- Your dust jacket flaps must be at least 2.83”. Most creators design flaps that are ⅓ the width of the book’s cover.
- Double-check that your dust jacket file includes 0.125 inches of bleed around the perimeter.
- Double-check that all important text and graphics are at least 0.125” away from the bleed area.
- If you have specialty options on your dust jacket (spot UV, embossing/debossing, etc.) you will need to submit multiple files. We have multiple pages dedicated to setting up files for specialty options to assist. (Any artwork submissions to us are checked and double-checked, as well, during our prepress process.)
- Double-check that all important text and graphics are at least 0.125” away from the bleed area.

Dust Jacket Flap Design Considerations
We suggest extending your front and back cover artwork on your dust jacket at least 0.125″ past the foldover guide to ensure that the artwork will wrap around the edges of the hardcover preventing the flap artwork from appearing in the cover area. See below for an image example:

Did we answer all of your questions?
Contact usFreshly updated customer reviews from TrustPilot
Board Book Cover Setup Guide
PrintNinja’s Board Book Cover Setup Guide will help you set up your printing files for your board book printing project. PrintNinja helps many creators and self-publishers print their board books every year; if you are interested in getting an instant quote on a project you can check out our board book page for pricing information.
Board book covers are similar to other covers; they are made by taking a single sheet of paper and wrapping it around paperboard to create your cover. This manufacturing process means that board book covers should be created as a single spread.
Making your Board Book Cover File Template
- For your back cover and front cover: the “Page Height” and “Page Width” of your board book covers are the same as the corresponding dimensions of the inside pages of your board book. See the illustration below.
- Add the thickness of your book’s spine in your cover file. To calculate the width of your spine, use our spine width calculator.
- Your cover file should include 0.125 inches of bleed around the edge of your cover artwork. Note that this bleed area will be trimmed off during production. As such, make sure to keep all important text and graphics 0.125 inches away from the bleed area. (Here’s our refresher course on created as a bleeds; they’re easier than they sound.) All of our printing processes at PritnNinja assume and include “full-bleed” printing.
Did we answer all of your questions?
Contact usFreshly updated customer reviews from TrustPilot
Hardcover Book Hinge Area Setup Guide

Learn how to setup your files properly with our hardcover book hinge setup guide.
When hardcover books are produced, there’s a small indentation on the front and back cover. This helps the book open and close without causing damage to the covers or the spine. This area is called the “hinge.”
In order to accommodate for the hinge, allow for 0.4 inches additional space on both the front and back cover, as you can see in our hardcover artwork setup guide.
You do not need to draw any permanent lines for the hinge on your files – but it may be useful to draw layout lines in your layout software so that you do not inadvertently cross over into this space.
How do designers treat the hinge area?
In general, most designers keep important graphical elements out of the hinge, since the hinge will shrink and contract in the hardcover binding process. All-over art or background art is generally considered to be just fine.
We especially recommend that you keep text elements such as your title out of the hinge, since elements that run into the hinge may change proportion somewhat due to its concave shape. You’re better off centering these objects starting from the edge of the hinge instead.
Finally, we suggest that you avoid spot UV or foil stamping in the hinge area. These special treatments are durable on flat surfaces, but are not designed to handle the flexing activity that the cover hinge endures.
Following the instructions in this hardcover book hinge setup guide will allow you to get a great looking final product.
Freshly updated customer reviews from TrustPilot
Spine Width Calculator
The thickness of your book project’s spine is determined by a combination of your project’s page count, paper stock and cover choice. The spine width plays heavily into how you should set up things like your hardcover design, softcover design, or dust jacket. Use this spine width calculator to get an approximate measurement of the width of your spine for your book printing project – this measurement is crucial in making sure you setup your hardcover, softcover, or dust jacket files correctly.
Spine Width Calculator
The thickness of your spine is determined by a combination of your project’s page count, paper stock and cover choice and plays heavily into how you should set up things like your hardcover design, softcover design, or dust jacket. Use this calculator to get an approximate measurement for the width of your spine.
Did we answer all of your questions?
Contact usFreshly updated customer reviews from TrustPilot
Double Page Spread In InDesign
Read on to learn how to create a double page spread in InDesign.

A double-page spread (also known as a crossover) is when an image goes across more than one page, like the art book pictured to the right.
PrintNinja specializes in being able to hit spread placement within a millimeter or two so that the final product looks like one continuous image. In order to facilitate this, we request that projects with crossover artwork be submitted as spreads instead of single pages. This will help us get your project looking exactly the way it should look.
Creating a Double-Page Spread in InDesign
The easiest way to create double page spread in InDesign is to make sure the “facing pages” option is checked when you’re exporting from your graphics program, as in the screenshot below.
If you’re setting up the spreads yourself in a different graphics program than InDesign, it’s important to note that we do not need any bleed in the center, just the standard 1/8″ bleed on all outside edges. Similar to the way you would setup a cover file, you’ll want to include this bleed. While you can use a different program, InDesign is probably the easiest program for this process.

Freshly updated customer reviews from TrustPilot
Custom Game File Setup
Below you will find custom game guidelines to help you appropriately set up your artwork files – whether it be for a card game only or a complex, multiple component board game.aigns.
Custom Game File Setup Guidelines
Have you already placed your custom game order? Great!
The next step is to upload your files for our prepress experts to review. The following custom game guidelines will help you accurately set up your various game components. As a general rule, the margins, recommended image resolution, and color requirements for each printed component (instructions, cards, tokens, etc) are the same. They experience the same production variances and can be up to 1/8” off-center on some copies. For information on this, please reference our offset printing guidelines.
Playing Cards
One Common Back
Ideally, a whole deck is submitted as one multi-page PDF with each face of each card on its own page. If the cards share a common back, then you can include just one copy of that artwork. Please see the below link for an example of how a deck should be submitted with one common back for a 20-card deck.
Multiple Backs
You can go about this one of two ways:
1. Submit one multi-page PDF with each common back placed before its unique card faces. This is the best way to submit artwork as this will indicate to us how you would like the cards ordered in the deck for the final print run. Please see the below link for an example of how a deck should be submitted with three common backs for a 20-card deck.
2. Submit multiple multi-page PDFs with each common back as the first page of each PDF and the unique card faces associated with that common back following. If you do this, you will need to communicate to your prepress manager the order of the cards in the deck for the final print run.
For example, say you are printing a 20-card deck with three common backs. You can submit a total of three PDFs for the card artwork: PDF #1 should be titled “Card Back 1”, PDF #2 should be titled “Card Back 2”, and PDF #3 should be titled “Card Back 3”.
Suggested File Types for Playing Cards
While we generally print using PDFs, if individual image files such as JPEGs or TIFs are all that is available, we can accept those as well.
Poker-Sized Card Template
See the below link for “poker-sized” card template. Be sure to pay close attention to the instructions on the template.
If you require a custom card size, please follow the noted instructions in the below “Gobawk” graphic. For example, if you are looking to print a 3” x 5” card, your document size should be 3” x 5” including the 0.125” bleed area on all four sides. Be sure to keep all crucial text and graphics at least 0.125” inside the trim line of the document to ensure nothing crucial will be trimmed off during production. Additionally, be sure to extend any artwork that touches the trim line to the edge of the bleed area.

Tuck-Box Templates
Please see below for all available tuck-box templates for blue core, poker-sized decks. If you find your project utilizes a different card size or playing card stock, or if you have multiple components to be included in the tuck-box, you will need to place an order to receive your custom template.
- https://stage.printninja.com/standard-poker-card-tuck-box-templates
Note that boxes increase in size for every 5 cards.

Custom Dice
If your dice will be custom engraved, please see below for the file set up requirements:
- We will need each face as a separate vector file (Illustrator file). The engraved artwork should be 100% black on a white background.
- Size the artwork to the size of the ordered die face. For example, the artboard should be .63” if you are ordering a standard .63” die.
- Engraved lines/strokes should have a minimum width of .3mm and should be at least 2mm away from the edge of the dice.
Please see the below image for an example of how custom engraved artwork should look when uploaded to us:
If your dice will be custom silk screened, please see below for the file set up requirements:
- Silk screening can only be done on D6 or D12 die.
- Artwork is required to be in vector format (Illustrator file).
- Spot color required for artwork.
- The printable area is only to 3mm away from the edge of the die. For example: For a 20mm die, the maximum printable area is 17mm x 17mm.
Please see the below image for an example of how custom silk screened artwork should look when uploaded to us:

Punch-Outs and Tiles
For circular or rectangular/squared shapes, you can send files for punch-out tokens or tiles either as one page of art for the whole punch-out board/tile or as individual files for each separate token/tile (similar to sending files for playing cards). PDF format is recommended.
For both methods, please include two versions if you have selected one-sided printing:
- One version with just the art for printing (including bleed).
- One replicated version with a visible stroke indicating the intended trim around each token or tile – “magenta” is recommended for the stroke color. Our vendors will use this second file as reference to ensure accuracy during production.
Please include four versions if you have selected double-sided printing:
- One version with just the art for printing (including bleed) for the FRONT OF THE TOKEN/SHEET/TILE.
- One replicated version with a visible stroke indicating the intended trim around each token or tile for the FRONT OF THE TOKEN/SHEET/TILE. Our vendors will use this second file as reference to ensure accuracy during production.
- One version with just the art for printing (including bleed) for the BACK OF THE TOKEN/SHEET/TILE.
- One replicated version with a visible stroke indicating the intended trim around each token or tile for the BACK OF THE TOKEN/SHEET/TILE. Our vendors will use this second file as reference to ensure accuracy during production.
Please see below for additional print-ready requirements:
- Punch-outs that have an extremely small diameter will require using a different material than the standard greyboard (thick card or cover stock), so they will be less durable. The smallest punch-out tokens we can use on grayboard are 15mm, though we recommend 20mm to be safe.
- Punch-outs need to be spaced 5 mm apart from one another when printing on a sheet.
- 1/8″ bleed is recommended for punch outs/tiles = 3.175mm. Bleed between punch-outs can overlap.
- For custom punch-out or tile shapes, please be sure to send along your artwork to your account manager , as they will need to confirm the shape can be manufactured as-is.
Please see the below image for an example of print-ready punch-out sheet artwork with one-sided printing:

Please see the below image for an example of print-ready artwork for one tile with one-sided printing:

Game Boards
As noted in our board game quote form, there are several “folding” options for the game board component: single, double, triple, quad, and triple-double. Be sure to keep what folding selection you have ordered in mind when designing your artwork. Please note: The wrapped edge will overlap the image on the board 1/8 of an inch – so be sure to compensate.
If you are ok with the folding options as noted in the board game quote form, you will only need to submit one PDF of the board game artwork.
If you have a custom preference on how your game board will fold, please include two versions of the art file:
- One with only the art for printing (including bleed)
- One with cut/fold lines/strokes on top of the image for reference. Folding lines should be solid and cutting lines (for boards that fold more than once) should be dotted. PrintNinja will use this second file as a reference to make sure the boards are properly assembled.
The document size for your artwork should match the ordered board size, but should also include the necessary bleed – .125” on all four sides. So, for example, if you are printing a 15” x 15” game board the artwork should be 15.25” x 15.25” when uploaded to us as these dimensions include the bleed.
Please see the below image for an example of print-ready board game artwork for a basic quad-fold:


Two-Piece Boxes
We will provide a custom template for your two-piece box within 2-3 business days AFTER you place your order – we cannot provide custom templates ahead of time due to their custom nature and the amount of labor involved.
Once you receive your template, two-piece box artwork should be submitted in two versions:
- One version should have the artwork correctly sized for the printed box (including bleed).
- One replicated version with the guidelines overlaid on top of the art. PrintNinja will use the first file for printing and the second file as a reference to make sure the box art lines up correctly.
Screens
As noted in our board game quote form, there are several “folding” options for the screen component: double, triple, and quad. Be sure to keep what folding selection you have ordered in mind when designing your artwork.
The document size for your artwork should match the ordered screen size, but should also include the necessary bleed – 0.125” on all four sides. So, for example, if you are printing a 17” x 11” screen the artwork should be 17.25” x 11.25” when uploaded to us as these dimensions include the bleed.
Upon request, we are able to provide a custom template for your screen. Alternatively, you can create your own template following the information included in this section. The screen artwork should be submitted in two versions:
- One version should have the artwork correctly sized for the printed screen (including bleed).
- One replicated version with guidelines indicating the trim and fold lines overlaid on top of the art. PrintNinja will use the first file for printing and the second file as a reference to make sure the screen art lines up correctly.
You can reference this PDF file as an example of a custom template for a 17” x 11” double-fold screen.
Notepads
As noted in our board game quote form, there are several “printing” options for the note pad component: full-color, black and white, or blank. Be sure to keep what option you have ordered in mind when designing your artwork.
If you have selected to print in full-color or black and white, the document size for your artwork should match the ordered pad size, but should also include the necessary bleed – 0.125” on all four sides. If no bleed is required in the artwork, the file can be prepared to the trim size.
So, for example, if you are printing a 4” x 5” notepad and have artwork that should extend to the trim, the artwork should be 4.25” x 5.25” when uploaded to us as these dimensions include the bleed.
You should only upload a one-page PDF for the notepad artwork regardless of the number of pages in the pad, as only one design can be printed per pad.
Please see the below image for a print-ready example of full-color notepad artwork:

Playmats
The document size for your artwork should match the ordered playmat size, but should also include the necessary bleed – 0.125” on all four sides. So, for example, if you are printing a 8” x 12” playmat the artwork should be 8.25” x 12.25” when uploaded to us as these dimensions include the bleed.
Please see the below image for a print-ready example of playmat artwork:
Instructions
Folded Sheet
If you select folded sheet instructions you will receive one individual sheet, printed single or double sided, that is folded down to fit inside your packaging. Our production team will determine the best way to fold your sheet to fit in your packaging unless you provide specific instructions for how you would like your sheet to be folded.
The document size for your artwork should match the ordered sheet size, but should also include the necessary bleed – 0.125” on all four sides. So, for example, if you are printing a 8.5” x 11” sheet the artwork should be 8.75” x 11.25” when uploaded to us as these dimensions include the bleed.
If you have selected single sided printing for your sheet, you should only upload a one-page PDF. If you have selected double sided printing for your sheet, you should upload a two-page PDF.
You can reference this PDF file as an example of a custom template for a 5” x 7” instruction sheet that will fold down to fit inside a poker-size tuck box (2.5” x 3.5”):
Booklet
The default binding option for instruction booklets is saddle stitching. We are also able to print perfect bound instruction books, but this section will discuss file setup for saddle stitched instruction booklets.
The document size for your artwork should match the ordered booklet size, but should also include the necessary bleed – 0.125” on all four sides. So, for example, if you are printing a 2.5” x 3.5” booklet the artwork should be 2.75” x 3.75” when uploaded to us as these dimensions include the bleed. Alternatively, you can submit your artwork as two-page spreads which would require 5.25” x 3.75” artwork including the bleed on all four sides of the spreads.
Your page count (beginning with the front cover and ending with the back cover) must be a multiple of four.
You can reference this PDF file as an example of a custom template for a 2.5” x 3.5” 8-page instruction booklet.
Accordion
If you select accordion instructions you will receive one long sheet with equal size panels folded down to the ordered size.
You have two options when setting up your artwork file:
- Submit each panel individually: The document size for your artwork should match the ordered accordion size, but should also include the necessary bleed – 0.125” on all four sides. So, for example. If you are printing a 2.5” x 3.5” accordion the artwork should be 2.75” x 3.75” when uploaded to us as these dimensions include the bleed.
- Submit each side of the complete sheet: The document size of your artwork should match the full spread width of your accordion, but should also include the necessary bleed – 0.125” on all four sides of the complete spread. So, for example, if you are printing a 2.5” x 3.5” 8-page accordion the artwork should be 10.25” x 3.75” when uploaded to us as these dimensions account for a 4-panel spread and include the bleed on all four sides of the spread.
You can reference this PDF file as an example of a custom template for a 2.5” x 3.5” 8-page accordion.

Example File Setup
As mentioned above, some components (like boxes or punch-out tokens) should be submitted both with and without fold lines. Here is an example of a hexagon punch-out token. The file on the left is just the artwork that will be used for printing; the file on the right is the reference file with trim and bleed lines.
Freshly updated customer reviews from TrustPilot
Game Box Setup Guides
Read on for our reccommending packaging setup for your game box printing project.
Select your box type below for a step by step guide to setting up your print-ready files. For additional box types, please contact us.
Freshly updated customer reviews from TrustPilot
Custom Game Design Guidelines
PrintNinja recommends you keep the following custom game design guidelines in mind while proceeding with your project.
For the most part, designing your files for board games and card games is similar to designing files for books. Bleed and safe area measurements are the same, we use the same color printing process with the same recommended proofing options, etc. However, there are a few areas of game printing that have specific details and pitfalls that book printing does not – read on for our custom game design guidelines for each of these components.
Color
Color is probably the trickiest part of offset printing, and it goes double for game printing. The main issue that is more prevelant here is color variance. Because the CMYK printing process blends four colors of ink on an offset press, colors will always exhibit very slight variances between runs and even smaller variances within different copies of the same run. These variances are much smaller with offset printing than with digital printing, but there will always be minute differences due to the nature of the four-color process. This means that cards or tokens that are printed on different press sheets will look slightly different, even if they are designed with the same colors. Cards printed in separate orders (for example, an expansion pack of cards for a game you printed with us previously) will have even more color variation.
Using a Spot Color
The only way to guarantee 100% accuracy for a specific color is to use what is known as a ‘spot color’. In this case, the ink color is mixed separately and applied to the finished document via the offset press using a separate printing plate. The most common way to specify a spot color for use is the Pantone Matching System, which identifies colors through a number, such as ‘PMS 165’, which is a burnt orange color. They are always done via custom quote since their pricing varies based on the type of ink specified and the coverage area.
If you don’t wish to add a spot color to your order, or if your colors are too complex (for example, if they use gradients) for a simple spot color, but you still wish to try and coordinate colors within a print run or between multiple orders, then please reach out to your account manager before you place your order. Sometimes our vendors may be able to specifically try to match these colors for you if they know what to look for. However, remember that this still won’t result in 100% color matching since CMYK printing is too inexact. It will just result in smaller variances than the normal process produces.
Our card game calculator offers Spot Color as a specialty option which includes up to 2 spot colors. If your card game requires more than 2 spot colors, you will need to get a custom quote.
Variance in Sourced Components

While we do all of our printing with our partner vendors there are some game components that we need to source from an outside company. Pieces like meeples are bought pre-made so the size and color are dependent on the vendor’s stock at the time. This means that, while we try to keep things consistent, components can vary slightly between orders, and sometimes even within the same order. If you need four different color meeples per game, for example, the colors that the vendor have on hand might all be slightly different sizes. If you’re placing a reorder of a previous game, a color you used might no longer be available.
We can have custom pieces made to achieve greater consistancy, but this costs more money than using our existing pieces.
Freshly updated customer reviews from TrustPilot
Specialty Options Setup Guides
Follow along with our easy specialty options setup guides to prepare your print-ready PDF files.
For most of these specialty options, you will be required to submit two files. The first (with slight variations for each specialty option) is a full color file containing all the images that will be printed. The second file is specific to each of the speciality options – you’ll want to create a file that shows only the area of your printed project that the specialty option will be applied to. Please select one of our setup guides below to read more detailed instructions on each of these options. You can use a computer program like Adobe PhotoShop or InDesign to accomplish setting up these files. Carefully following these specialty options setup guides will insure that your printing process is as smooth as possible, and that your final project looks the way it should.
Since specialty options are premium upgrades to your project, we want to make sure you get as much value as possible – and following these guides will set you up for success for getting the most bang for your buck. Closely follow the instructions in the guides below.
Specialty Options Setup Guides

Freshly updated customer reviews from TrustPilot
Metallic Ink and Spot Color Setup Guide
Follow along with our metallic ink and spot color setup guide to learn how to correctly prepare your files for printing with PrintNinja.
PrintNinja can print a wide variety of Pantone colors in the Pantone Matching System (PMS). This includes metallics and other specialty inks upon request. Our standard metallic gold is PMS 871 C and our standard metallic silver is PMS Silver 10077 C. You are welcome to utilize unique applications such as tints, halftones, and overprints.
In order to print your book using spot colors, you will need to submit your artwork files with the spot colors already assigned within your document. Be sure to keep the spot colors labeled by their PMS number instead of renaming them within your document. You can refer to the information below for adding a spot color to a document in Adobe InDesign, Illustrator, and Photoshop.
How to Add a Spot Color in Adobe InDesign
- Open your Indesign document and from the top navigation bar select [Window > Color > Swatches] to open the swatches panel if it is not already visible.
- Click on the fly-out menu at the top-right corner of the swatches panel and select “New Color Swatch”.
- Set “Color Type” to “Spot” and “Color Mode” to “PANTONE+ Solid Coated” or your preferred Pantone Color Library. Note that you should only select uncoated if you will be printing on an uncoated paper stock.
- Use the text box to search or scroll through the list and select your preferred spot color, then click “Add” to add it to your swatches panel.
- Click “Done” when you’ve finished selecting and adding colors. Note that if you open the “New Color Swatch” dialogue box but don’t add a color to your Swatches panel, the button reads “OK” instead of “Done.”
- You can now select your spot color as a fill or stroke from the swatches panel for the text and graphics you would like to print in spot color. Be sure to follow our recommended export settings to ensure your spot colors are exported correctly.


How to Add a Spot Color in Adobe Illustrator
- Open your Illustrator document and from the top navigation bar select [Window > Swatches] to open the swatches panel if it is not already visible.
- Click on the fly-out menu at the top-right corner of the swatches panel and select [Open Swatch Library > Color Books > PANTONE+ Solid Coated] or your preferred Pantone Color Library. Note that you should only select uncoated if you will be printing on an uncoated paper stock.
- Use the text box to search or scroll through the list and select your preferred spot color, Hovering over a swatch will display the PMS number and clicking a swatch will add it to your swatches panel.
- You can now select your spot color as a fill or stroke from the swatches panel for the text and graphics you would like to print in spot color. Be sure to follow our recommended export settings to ensure your spot colors are exported correctly.


How to Add a Spot Color in Adobe Photoshop
There are several methods for adding spot colors to documents in Photoshop, many of which can be found through a simple internet search. However, oftentimes it can be difficult for inexperienced users to decipher the optimal solution for their files and ensure the spot color is set up and exported properly. For this reason, our best recommendation for adding spot color to raster-based artwork such as Photoshop files is to use the following instructions which are similar to our other specialty options setup guides.
To print a spot color using Photoshop or other raster-based artwork files you will need to submit two versions of your artwork:
- A full-color (or grayscale) file containing all artwork that will be printed in CMYK.
- A single-color file containing only the spot color element as a solid-black image or text. For multiple spot colors, you will need to submit separate files for each spot color. You will also need to let your account manager or prepress ninja know what spot color you would like printed.
Please see the image below for an example of how your files should be submitted.

Foil Stamping Setup Guide

Follow along with our foil stamping setup guide to learn how to correctly prepare your files for printing with PrintNinja.
The image to the right shows how your final cover will look with the foil stamp applied. The “Foil Stamp Guide” text will be foil stamped, while the black background and the PrintNinja logo will be printed.
PrintNinja can foil stamp solid shapes and lines. Soft edges or gradients cannot be foil stamped. It is generally recommended that foil stamp artwork have a minimum stroke width of at least .25mm and at least .25mm spacing between foil stamp elements to avoid plugging. That being said, please always reach out to your account manager or prepress manager to confirm your artwork will apply correctly without any necessary adjustments. Please see below for an image example to help clarify:

If you have specific questions, please contact your account manager.
Foil Stamp File Submission Guidelines
To add foil stamped details to your cover, you will need to submit two unique versions of your cover artwork file. Both should be sized correctly according to our cover guides.
Cover File #1: A full-color file that contains all content (images and text) on your cover that will be printed, not foil stamped. The foil stamping process is applied after your cover is printed. Any printed elements under the foil stamped area will not be visible.

Cover File #2: A single-color file that contains only the foil stamped area in solid black.
In the image below, note that only the foil stamped area is included in this file. For accurate results, the printed area must align perfectly with the foil stamped area.

Freshly updated customer reviews from TrustPilot
Emboss and Deboss File Setup Guide
Follow along with our emboss and deboss file setup guide to correctly prepare your files for printing.
Embossing or debossing your project is a great way to add a special touch to your work and help it stand out. Properly setting up your embossed/debossed files is the first step in adding this memorable feature.
To add emboss or deboss to your project you will need to submit two versions of your cover:
- 1. A full color file that contains all images that will be on your cover.
- 2. A single-color file containing only the emboss/deboss element as a solid-black image or text
Example of an Embossed or Debossed File
Below are the two cover files you need to submit. Both should be sized correctly according to our cover guides.
The first file, which is in full color, contains all of the elements of the cover including the embossed/debossed title. Since the process simply raises or lowers part of the cover the entire cover will need to be printed before the emboss/deboss is applied.
The second file, which is submitted as solid black only, contains only the parts of the cover that will be embossed or debossed. Note that only the text is included on this file. The text needs to line up perfectly with the full color file for accurate results. “Blind” embossing or debossing is also possible, where instead of affecting a specific printed element (such as the title) you can emboss/deboss a shape or text in an otherwise solid area of the cover.


To the right is how your final cover will look with the emboss/deboss applied. The “Emboss/Deboss Guide” text will be raised or lowered, while the background and the PrintNinja logo will not be affected.
Ready to get started?
We’ve created a custom card game pricing calculator for you to explore all our different printing choices, shipping methods, and get an instant price for your project. You can also customize just about anything, from size and packaging, to specialty options like embossing/debossing and so much more.
Get Your PriceFreshly updated customer reviews from TrustPilot
Spot Gloss / Spot UV Setup Guide
Follow along with our spot UV setup guide to learn how to properly prepare your files for printing with PrintNinja.

Spot Gloss UV Setup Guide
To apply a spot UV to your project you will need to submit two versions of your cover.
- A full color file containing all images that will be on your cover.
- A single-color file containing only the spot-UV element as a solid-black image or text.
Example of Setting up a Spot UV File
To the right is how your final cover will look with a spot UV applied (the UV is represented by the glowing edges). The “Spot UV Guide” text will have the UV applied to it, while the background and the PrintNinja logo will not have the same high-gloss look.
Below are the two cover files you need to submit. Both should be sized correctly according to our cover guides.
The first file, which is in full color, contains all of the elements of the cover including the title. Since the spot UV is only a varnish you can see the title underneath, so the entire cover will need to be printed before the varnish is applied.
The second file, which is submitted as solid black only, contains only the parts of the cover that will have the UV applied. Note that only the text is included on this file. The text needs to line up perfectly with the full color file for accurate results.


Offset Printing Guidelines
Read on for more information on our offset printing guidelines.
Learn About Our Offset Printing Guidelines
Learning how to get your file ready for offset printing can be overwhelming, especially if you’re new to the process. However, we’re ready to help. We’ve been working with offset printing for several years, and we know how to make the process as easy as possible. On this page, you’ll find links to important information about bleeds, file resolution and dpi, CMYK color requirements, file formats, country of origin, and more. Still have questions? Don’t worry you have a team of experts to guide you.
Below you may select a must-know option to learn more. If you are still craving knowledge on the offset printing process, our Printing Academy should satisfy you.


Freshly updated customer reviews from TrustPilot
Perfect Bound Glue Area Design Considerations
When perfect bound books are assembled, there’s a small area between the inside cover pages and the first and last interior pages that will be glued together, so everything on those four pages should be kept at least 10mm away from the trim line on the binding side on those pages.
To aid in further explaining, we have provided a visual comparison of a production file spread PDF vs the actual manufactured print.
See below for the production file PDF example:

See below for the actual printed project:

There’s more info about this on the bottom of our softcover setup guide page.
Be mindful that due to the nature of perfect bound books, content that is very close to the binding area may be obscured. Please keep any important text and artwork 10mm (0.39 inches) away from the bound edge (the center of the page for two-page spreads) to be fully visible.
To aid in further explaining, we have provided a visual comparison of a production file spread PDF vs the actual manufactured print.
See below for the production file PDF example:

The magenta boxes highlight the 10mm “danger” area on either side of the binding.
See below for the actual printed project:

Traditional Endsheet Setup Considerations
PLEASE NOTE: Endsheets only apply to HARDCOVER (Casebound) projects and are automatically included in hardcover projects with 60 or more pages. Additionally, they are only printed on 105 lb. uncoated stock.
Below is a video example showing endsheets in a printed book:
If needed, we recommend reading more about them here and here.
When setting up your interior page artwork, traditional endsheet artwork should be the first three pages of your document and the last three pages of your document. It’s important to note that the endsheets do not count toward your interior page count. So, for example, let’s say you have a project that is 64 pages. Your interior page document should include 70 pages. Pages 1-3 are the front endsheets and pages 68-70 are the back endsheets. This leaves 64 additional pages, hence, the page count of 64!
Please click on the following link to download a PDF representation of this setup consideration:
Smyth-Sewn Binding Considerations
Due to the nature of casebound books and smyth-sewn binding, content that is very close to the binding area may be obscured. Please keep any important text and artwork 0.125″ away from the bound edge (the center of the page for two-page spreads) to be fully visible. Please see below for an image example noting the safe area as well as an image of the final printed project.


Note that all crucial text is at least .125” away from the center of the spread.
File Setup for Full Bleed Printing
Read on to learn more about file setup for full bleed printing.
Before any project gets printed, it must be formatted into a print-ready file. Understanding bleed, same zones, and borders is an essential step to printing your project and a must-know for any creator.
In most types of projects, printing goes all the way to the edge of a page. Pick up virtually any book from a shelf and in most cases you’ll see that the artwork extends all the way to the very edge. To ensure there are no blank areas at the edge of your page, an extra 0.125 inches of artwork is required beyond the trim line to accommodate for what is known as “bleed.”
Full Bleed Printing
The bleed area (depicted in red below) will be cut off in the final product, but printing it helps to ensure that your design will fully extend to the end of the page. This is because there is a standard cutting variance of up to 1mm inherent in professional printing processes. By incorporating an extra 0.125” of artwork into your design, you’ll create a buffer to accommodate for this variance.
Likewise, when setting up your file for full bleed printing, it’s also a good idea to keep any critical text or important graphics at least 0.125” away from the edge of the page and in what is referred to as the “safe zone,” depicted in white below. The areas depicted in gray are not within the safe zone, and therefore could be at risk of getting cut off in the trimming process. This is because the 1mm variance applies to either direction, inwards or outwards.

Here’s what you need to know:
Bleed Area
Everything within this red space will be trimmed off. However, you should still extend your design to the edge of this area. This will prevent the very edge of your project from having an irregular white border as a result of the variance in the trimming process.
Trim Line
This dotted line is the edge of your page. We will trim your book to size along this line, but you’ll have to extend your design 0.125 past this line to account for a cutting margin of error. Additionally, because the trim variance could extend up to 1mm inwards as well, it’s a good idea to leave any critical components of your design out of this area.
Safe Zone
Anything within these lines is safe, so keep all of your important text and visual content within this white box.
Why?
PrintNinja uses sheet-fed, offset printers. This means several pages of your book will be printed on the same sheet of paper. Then, a large machine will trim each paper down to size. Bleed allows for the tiny variances inherent in mechanical printing to ensure your design will run all the way to the edge of each page.
Project Visual Example
To aid in further explaining why bleed is an important and necessary part of production, we have provided a visual comparison of a production file spread PDF vs the actual manufactured print.
See below for the production file PDF example:

You will see that the TRIM and BLEED area have been pointed out. The artist has made sure to extend the artwork to the full bleed area.
See below for the actual printed project:

You can see the bleed area was trimmed off, but because the artwork included bleed and was not left white there is not an unsightly white edge along the page.
Adding Bleed to Your File
We have outlined steps here in our resources to help you set up files with bleed room using the program of your choice, including Adobe InDesign, Photoshop, and Illustrator.
An Important Note About Borders: Due to the variance of up to 1mm in cutting, we recommend that any borders you would like to include on the perimeter of your page extend a full 0.25 inches inside of the trim line, which is twice as far as the safe zone. This way, your borders will appear even, regardless of the standard cutting variance.
Ready to get started?
We’ve created a custom pricing calculator for you to explore all our different printing choices, shipping methods, and get an instant price for your project. You can also customize just about anything, from size and paperweight, to specialty options like metallic ink, foil stamping, and so much more.
Get Your PriceFreshly updated customer reviews from TrustPilot
Recommended Resolution
This article explains the recommended resolution for printing projects.
Resolution is measured in ppi (pixels per inch) when talking about images on a screen, or dpi (dots per inch) when talking about printed images. The images below have been zoomed in to simulate how they will look when printed.

High Resolution Images (Recommended Resolution for Printing)
For printing, the recommended resolution for all images and art files is 300 dpi. The offset press cannot accurately reproduce resolutions above 300, so it is the industry standard.
Please note: submitting files at a resolution higher than 300dpi does not improve print quality, and beyond a certain point it makes the files too large to process easily. For this reason, PrintNinja sets a maximum resolution of 400dpi for submitted files.
The image of Billy the dog to the right is 300 dpi

Medium Resolution Images
Sometimes, the only images or art files available are under 300 dpi. If your images or artwork are in the 200 dpi-300 dpi range, they will still look pretty good, although not quite as sharp as images at a full 300 dpi.
The image of Billy the dog to the right is 200 dpi
Low Resolution Images
Images with less than 200 dpi resolution are considered low resolution, and they will exhibit notable pixelation / blurring in the final printed product.
The image of Billy the dog to the right is 72 dpi
Images used on the internet are typically 72 dpi. This is a suitable resolution for websites since it enables a small file size and does not look visibly pixelated on most computer screens.
However, images at 72 dpi will ALWAYS look pixelated and low-resolution when printed.
WARNING: Don’t Upsample
It may seem like a good idea to open up your artwork in Photoshop and just change the resolution setting from 72 dpi to 300 dpi. However, this doesn’t actually increase the resolution in your artwork, it just makes the pixels in the pixelated image larger. This is called upsampling, and while these images will technically read as 300 dpi once you expand them, they will still look just as pixelated / blurry on the printed page.
PrintNinja Tip
How to Rasterize Complex Vector Graphics in Adobe Illustrator
Sometimes artwork composed of many complex vector graphics cannot be processed properly for proofing. If this applies to your artwork, your prepress ninja will request that you resubmit your artwork with the complex vector graphics rasterized. The following guide will walk you through how to make that adjustments in Adobe Illustrator:
Without making a copy, you can select the vector artwork and choose [Effects > Rasterize] from the top navigation bar. You should select “Color Model: CMYK” (or “RGB”/”Grayscale” depending on the working color space of the document) and “Resolution: High (300 ppi)”. You can leave the other settings as default or make adjustments if you’d like, then click “OK”.

Now, because the rasterization has been applied as an effect, you can turn it on or off, change the settings, or delete it in the Appearance panel [Window > Appearance] at any time.
Freshly updated customer reviews from TrustPilot
Offset Color Requirements
Read on to learn more about offset color requirements.
Color is one of the most commonly misunderstood and error prone topics in all of printing. For years, PrintNinja has been the #1 source for offset printing and printing information. We’ve compiled a few guides based on our experience to help you understand various aspects of how printed color works and why it might be different from what you’d expect, so that you can make sure your colors come out exactly the way you intend.
The Difference Between RGB and CMYK

The most common mistake we see during the printing process is creators who submit RGB files for printing.
The RGB color profile combines red, green, and blue light to create colors. It is used by computer monitors, televisions, phones, LCDs, and any device that emits light to create color. It is important to note that because RGB uses light and not ink, it is physically impossible to reproduce RGB files in print without first converting them to CMYK, which is based on blending cyan, magenta, yellow, and black ink instead of light.
For a more in-depth look at the differences between the RGB and CMYK color models, visit our advanced color explanation.
Converting RGB to CMYK
There is no direct conversion between RGB and CMYK, and certain colors that can be created in RGB are physically impossible to recreate in CMYK, so be weary if a printing company tells you they can print in RGB.
If your files are currently in RGB, don’t fret! Our RGB to CMYK Conversion Guide will walk you through converting your files step-by-step. Converting files to CMYK before submitting your artwork gives you total control over your colors and allows you to manually adjust some of the trickier colors to your liking. We can also convert your colors to CMYK for you, but gives you less control over your final colors. Regardless of how you choose to convert your files, be sure to request a proof of your project to know exactly how your project will look when complete.
Another way to create your colors is to use these suggested CMYK values that can reliably produce bright, vivid colors on the printed page.
Standard Black vs. Rich Black

In the offset printing industry, there are primary two ways to produce the color black, standard black and rich black. Rich black uses a combination of cyan, magenta, yellow, and black (CMYK) to create black, while standard back uses only black (K).
The most important functional difference between CMYK and K-only is that the standard black (bottom of photo) produced using only black ink will not be as deep as the rich black (top of photo) which is produced using all four colors of CMYK. If you’re converting your files from RGB or grayscale to CMYK, the conversion will often automatically make your blacks rich black.
However, the one time you do NOT want to use rich black, even in a full color CMYK project, is for very delicate lines such as small text. For example, speech balloons in comic books should use standard black because with very thin lines the microscopic variations in plate registration between the 4 colors can cause slight color shadows to appear around the text.
To learn more about these colors and when you should and shouldn’t use rich black, visit our in-depth Standard Black vs. Rich Black guide.
Color Matching and Spot Colors
Because CMYK blends four colors of ink on an offset press, colors will always exhibit a slight variances between runs and even smaller variances within different copies of the same run. These variances are much smaller with offset printing than with digital printing, but there will always be minute differences due to the nature of the four-color process. That’s why colors created by CMYK are sometimes called “process colors”.
The only way to guarantee 100% accuracy for a specific color is to use what is known as a ‘spot color’. In this case, the ink color is mixed separately and applied to the finished document via the offset press using a separate printing plate. The most common way to specify a spot color for use is the Pantone Matching System, which identifies colors through a number, such as ‘PMS 165’, which is a burnt orange color.
Spot colors can also be used to apply specialty inks like metallic colors, neon colors, or glow-in-the-dark ink. They are always done via custom quote since their pricing varies based on the type of ink specified and the coverage area.
Please note: it is not possible to match CMYK process colors exactly to a PMS spot color value. You can look up approximate CMYK values online, which will get quite close, but CMYK printing will always exhibit some degree of variation.
Something to note about offset printing is that very subtle gradients can often get lost, and especially at very high ink saturations, your project may come out darker than it looks on the computer screen.
For single-color saturations, extremely light ink coverage (under 10%) may not even print at all, and extremely heavy ink coverage (over 90%) may just appear to be a completely solid color.
Additionally, if your ink saturation values are too high overall, your project will look much darker than it does on screen. Deep blues and blacks can look wonderful on a backlit screen, but when your overall ink saturations start exceeding 300% total ink saturation your final product will appear much darker in print.
Here is a saturation scale for ink coverage and an explanation of how to avoid extreme values.
PrintNinja Tip
Freshly updated customer reviews from TrustPilot
CMYK Suggested Values and Color Guide
Read on for more information on CMYK suggested values in RGB color reproduction.
Formulas for getting the optimal results in RGB color reproduction
Since launching in 2009, PrintNinja has printed over 6 million comic books, tabletop games, children’s books, art books, photo books and graphic novels for thousands of independent creators, publishers, and businesses. As the premier offset printer, we’re here to help you through every step of the process.

Reading These Color Charts
This guide contains a series of colors that are known to be able to be reliably produced using CMYK offset printing. While no color matching can be guaranteed, including the colors shown here, without ordering a spot of Pantone color, the colors and color values shown here are good choices to ensure accurate color reproduction. Following these CMYK suggested values should get you good results in your printing project.
The color charts are organized starting with the dark “base” color on the top left and decreasing color values gradually while progressing around the color wheel. The other wheels on the page increase the values of secondary colors, such as magenta and yellow for example, while creating blues.
Please note that depending on your monitor settings, the colors may appear different on your screen than they print on an offset press. Colors will also vary if this guide is printed on an inkjet or laser printer. The best way to ensure your colors come out exactly as planned is with a proof of your project.


Freshly updated customer reviews from TrustPilot
How to Convert RGB to CMYK
This article will teach you how to convert RGB to CMYK.
Because there are no methods for printing in RGB, no matter where you print you must convert your project to a printable format (CMYK). This is a crucial step in the printing process and affects how well your colors are represented in the final product. If you’d prefer, you can also let us convert your colors for you.
At PrintNinja, we offer rich, full color CMYK printing on all products and work with you all throughout the printing process to make sure your project comes out exactly how you envisioned. Make sure to visit our instant quote calculator to see our full range of high quality, custom printing options like foil stamping and embossing. If you want to learn more about why printing files must be in CMYK, see our RGB and CMYK advanced color guide. Additionally, if you need more help setting your files up be sure to check out our full offset printing guidelines to learn how to make your print-ready files.
How To Convert Your Project From RGB To CMYK
Conversion of your RGB file to CMYK can easily be done in either Adobe InDesign or Photoshop. If you want the most possible control over your colors, we recommend you convert colors on your end.
NOTE: we do not recommend using Adobe Acrobat Pro to convert your colors, unless you have professional pre-press software like PitStop installed. Acrobat’s built-in color conversion engine provides sub-optimal results.
- 1. Start by selecting Edit > Convert To Profile
- 2. Under Destination Space, leave the RGB Profile as is but set the CMYK Profile to Japan Color 2001 Coated, this is the CMYK color setting that is used by most high-quality overseas offset printers.
- 3. In the Conversion Options section select Adobe (ACE) as your conversion Engine and choose Relative Colorimetric for your Intent. This option will preserve all RGB colors that can be reproduced accurately in CMYK, and it will replace any colors that cannot be reproduced accurately in CMYK (known as “out of gamut” colors) with their nearest CMYK match.
- 4. Click OK

Adjusting Your CMYK Values
Now that your file has been converted to CMYK, take a look at how your colors have shifted. If you had any very bright blues, reds, or greens, chances are they’ve been reined in to account for CMYK’s reduced color gamut. While it may be disappointing that some colors are dulled, the hard truth is that there is physically no way to reproduce many RGB colors on the printed page.
However, because you chose to convert colors yourself, you now have some options to play with your CMYK colors. In terms of global changes, if you’re working in Photoshop, you can try playing with levels, contrast, and saturation. However, the most thorough way to improve your colors is go to through and alter the CMYK values of the colors themselves. Use your color selection/eyedropper tool and take a look at how much of each color of ink you’re using.
Once you’ve made any tweaks and adjusted your colors to where you’d like them, you’re ready to export to PDF.
PrintNinja Tip
Exporting Your CMYK File to PDF
Generally, the “Press Quality” default settings in InDesign and Photoshop are great, however for submitting files to PrintNinja, we recommend that you do not do any further color conversion or embed any color profile information. In order to keep this from happening, you’ll want to use the following settings in the Output panel of the PDF export dialog.

If You Prefer, We Can Convert Colors For You
If you’d prefer not to modify colors yourself, you are more than welcome to submit your RGB files and let us convert them for you. We’ll show you the CMYK files in your Electronic Proof before going to press, so you’ll be able to see exactly how your colors have changed in the conversion process.
However, this method provides the least amount of control for you, since we won’t make any changes to your colors beyond the conversion. If you want to be able to tweak your colors after conversion, you should convert them on your end before uploading your artwork.
Did we answer all of your questions?
Contact UsInk Saturation and Density Guide
Read on to learn how to avoid ink density issues with our ink saturation guide.
For years, PrintNinja has been the foremost offset printer and source for printing knowledge. Over this time, one of the most common errors we see in file setup is that of improper ink saturation.
In any form of printing, ink saturation is less precise than color reproduction on a computer monitor, meaning your project may print differently than what you see on your screen. For this reason, it’s important to avoid using extreme saturation values whenever possible. Follow the suggestions below to reduce ink saturation extremes on your printed pages.
Saturation Extremes
All printing methods, including offset, become unreliable at extremely high or low ink saturations on a single color (under 10% or over 90%). The extremely low ink saturations may not print at all, and the extremely high ones may be indistinguishable from a solid color (100%). This problem most often arises in black-and-white printing, so we’ll use examples from the black, or Key plate.

At 8% Saturation, This Line is Unlikely to Print
Too Light
In the example on the right, you can clearly see the grey line. You can also see from the eyedropper tool that the black ink saturation level is 8%, which is below the 10% recommended minimum.
If this file were to go to press, it is very likely that the line would not print at all.

At 91% And 100% Saturation, These are Likely to Be Indistinguishable in Print
Too Heavy
In the example on the right, you can clearly see the cross set within a circle. The cross has black saturation values of 100%, which is as dark as the black offset plate can print. However, the circle has a black saturation values of 91%.
While it’s easy to see the difference between the two shapes on a computer screen, it will be almost impossible in the finished printed product; instead, both of these areas will look completely black.
Ink Saturation Scale
Most people that are new to printing often find that their final product comes out slightly darker than they anticipated. Unless they opted for a hard copy proof, which allows your to visualize your physical project in full color before the full run begins.
This is because even though your computer screen can show differences in colors with extremely high ink saturation, on the printed page most high-saturation colors end up looking very dark and muddied.
In the 4-color CMYK process, each pixel has an ink saturation level between 0% and 100% for each of the 4 colors – Cyan, Magenta, Yellow, Black – meaning the maximum saturation for a pixel is 400%. That’s all 4 printing plates distributing the highest possible amount of ink onto the paper.
In the swatches below, you can see how your monitor displays 4 different browns from 100% total saturation to 400% saturation. However, this can be deceptive.

Best Saturation Level to Use for Offset
Based on your monitor, it may seem that 300% saturation still retains much of its character, but as you approach the 300% total ink saturation level in print your colors will all appear very dark. The large amount of ink on the page reduces the reflected light that gives the color its character. Your computer monitor is not subject to this limitation since it generates its own light, so retains much of its character on-screen.
We recommend your color choices, even your darkest sections, stay within the 150%-250% range. This area will show a lot of color flexibility, while preventing the muddied look when colors approach 300% and above. This is especially important to keep in mind if you’re converting your own colors from RGB to CMYK, since the ink saturation values automatically generated in conversion may be higher than optimal.
PrintNinja Tip
Ready to get started?
We’ve created a custom pricing calculator for you to explore all our different printing choices, shipping methods, and get an instant price for your project. You can also customize just about anything, from size and paperweight, to specialty options like metallic ink, foil stamping, and so much more.
Get Your PriceFreshly updated customer reviews from TrustPilot
Standard Black vs. Rich Black
This article explains the difference in standard black vs. rich black in offset printing.

Since launching in 2009, PrintNinja has been the premier source for offset printing services. During this time, PrintNinja has printed over 6 million comic books, tabletop games, children’s books, art books, photo books and graphic novels for thousands of independent creators, publishers, and businesses. As the foremost offset printer, we’re here to help you through every step of the process.
Files Printed Rich Black (Top) and Standard Black (Bottom)
The black produced in black-and-white printing differs significantly from the black produced in full color CMYK printing. When creating your design, keep in mind that there are two types of black: standard black and rich black. Standard black uses only black ink (100% K), whereas rich black contains elements of other colors (Cyan, Magenta, Yellow). Because rich black uses more ink, the resulting color will be deeper and more saturated. If you are using rich black, then we highly recommend you visit our ink saturation guide.
The two might look the same on your screen, but they won’t on paper. In print, the difference will be something like what you see below. Be sure to check the values for each color in all your blacks for the sake of consistency.
Standard Black (K) vs. Rich Black (CMYK) Values

When Not to Use Rich Black
The one time you do not want to use rich black, even in a full color CMYK project, is for very delicate lines such as small text or line art. The microscopic variations in plate registration between the 4 colors can cause slight color shadows to appear around the text, called ghosting. This is prevalent in newspaper printing.

Ghosting as a Result of Using Rich Black with Fine Text
Ghosting Example
On the left you can see ghosting due to the thin text and black background being set up as CMYK profiles (rich black) instead of grayscale (standard black). Because rich black is made by four plates distributing ink on top of each other, there can be a slight variance with one of the plates being slightly off. In the photo, you can see the result when the magenta plate shows variance. The variance is especially obvious when the text is thin. If the black was set as standard black (grayscale), then only one plate would be needed and ghosting wouldn’t be possible.
Ready to Get Started?
We’ve created a custom pricing calculator so that you can explore all the different printing choices, shipping methods, and get an instant price for your project. You can also customize just about anything, from size and paperweight to specialty options and so much more.
Explore Your OptionsFreshly updated customer reviews from TrustPilot
How To Submit Your Files To PrintNinja
This article will explain the proper file formats for printing that you should use for submitting your files to PrintNinja.
- Board Books
- Hardcover & Casebound
- Perfect Bound & Softcover
- Saddle-Stitched
- Wire & Spiral Bound
- What if I cannot submit a multi-page PDF?
- Where do I submit my files?
Board Book File Formats
Set up your cover file using PrintNinja’s board book cover setup guide.
Submit two files:
- 1. One cover file.
- 2. One interior page file, submitted as a multi-page PDF, starting with the inside front cover as page 1 and ending with the inside back cover.
Hardcover & Casebound File Formats
Set up your cover file using PrintNinja’s hardcover setup guide.
If you have a dust jacket, set it up using PrintNinja’s dust jacket setup guide.
Submit three files:
- 1. One cover file.
- 2. One dust jacket file.
- 3. One interior page file, submitted as a multi-page PDF. This file should begin with your inside front cover (the first inside page attached to your hardcover) and it should end with your last page (attached to your hardcover).
Perfect Bound Softcover & Paperback File Formats
Set up your cover file using PrintNinja’s softcover setup guide.
Submit two files:
- 1. One cover file.
- 2. One interior page file, submitted as a multi-page PDF, starting with your inside front cover as page 1 and ending with your inside back cover.
Saddle-Stitched Softcover File Formats
Submit one file as a multi-page PDF in reading order starting with your front cover as page 1, your inside front cover as page 2, and proceed from there. Your back cover will be the last page.
Wire and Spiral Bound File Formats
Submit one file as a multi-page PDF in reading order starting with your front cover as page 1, your inside front cover as page 2, and proceed from there. Your back cover will be the last page.
What if I can’t submit a multi-page PDF?
If you can’t submit a multi-page PDF, we can also accept TIFF files, and JPEG files. PDF is our preferred format.
How do I submit my files?
We will accept and review your files as you place an order or save a quote. After you save a quote, a file upload link will be included on your quote PDF. If you’re having trouble locating the link or want to know what to expect during the file submission process, visit our art upload walkthrough.
Did we answer all of your questions?
Contact UsFreshly updated customer reviews from TrustPilot
Country of Origin Marking
Learn more about what a country of origin marking is and why you have to include one in your Chinese printed project.

Projects printed in China are required by both international and national laws to have the country they were printed in on them. Here at PrintNinja, while you’ll be communicating with our team in Evanston, Illinois, your project will actually be printed in China. Because of this, your project must have “Printed in PRC” or “Printed in China” on it somewhere (PRC is short for “People’s Republic of China”). This is standard for all printing projects in China, and it is mandatory to include.
If your project has a copyright or credits page or lists your organization’s address, this is a good location for this.
Laws also require the text be “conspicuous” so we recommend a type size of at least 8 points and a text color that has adequate contrast between it and the background. Don’t try to beat the system by hiding it!
By including the country of origin in your printing project, you will be following all required rules, thus setting yourself up for success and a smooth process.
Freshly updated customer reviews from TrustPilot
Creating Your Document
There are many programs out there that you can use to assemble your print-ready files, but the most common and easiest to use are Adobe InDesign, Photoshop, and Illustrator. They can be a bit daunting to learn at first, but if you follow the steps outlined in the book template tutorials below, you’ll be an expert in no time.
Create a Book Template Customized to your Specifications
Please note:
These guides are for creating a template of the interior pages of your project. For help in designing your cover please consult the appropriate guide.
Adobe InDesign book template tutorial
Adobe Photoshop book template tutorial
Adobe Illustrator book template tutorial
These are not the only acceptable programs, however. If you’re more comfortable using something else like Manga Studio then feel free to use that as well. As long as the files are submitted in an appropriate format and you follow our printing setup guides then you’ll be able to move forward with prepress.
Printing Industry Standards

If you want to be able to sell your book or game printing project in stores, you’ll want to learn about industry standards.
Maybe you rush to your local comic store every Wednesday to pick up the latest releases and wish you could print your own comic that wouldn’t look out of place next to a DC or Marvel one. Maybe you’ve been collecting every volume of One Piece since the beginning and now you want to make a series with that authentic manga feel. Or maybe you and your friends get together to play a game every Friday night and you’re eager to create a new addition to the rotation.
Whatever your passion, PrintNinja is here to help you choose the best printing options for your project. The links below and in our Resource Center’s “Industry Standards” section walk you through dimensions, paper weights, and binding types that are considered “common” or “standard.” They can give you a solid starting point in your research or they can act as a guideline for you to break away from as you see fit!
Printing Industry Standards by Genre
Select a genre to see the most commonly used size, material and binding.

Activity/Workbooks
If you’re printing a workbook or an activity book, you’ll want to know what the industry standards are.
Workbooks and activity books are interactive publications that allow kids or adults to write directly on the pages. While a workbook is used more for educational and therapeutic purposes and an activity book is full of entertainment, such as puzzles, games, and other types of interactive activities, they share common features. Both activity books and workbooks favor uncoated paper because this material is easier to write on – especially in a workbook that uses crayons, having uncoated paper on which color will show up on is important. They also use low weight interior paper to cut down on the cost since these books tend to have high page counts. The binding will vary for each type of style; some may be wire bound, where others will use perfect softcover binding or saddle stitching. The binding is determined in part by what functionality is needed for the workbook or activity book. The rest of the options are open to be customized by the creator, but below are the workbook standards for each style to help get you started.
Choose an option to see our recommended printing options for each style:
Design An Activity Book
PrintNinja recommends following these industry standards to design an activity book.

Design An Activity Book
The high-quality paper we use for activity books is a far cry from the flimsy pages of yesteryear, so the masterpieces produced with your book can make their way to the fridge or the frame. The white, uncoated paper provides the perfect surface for crayon and colored pencil artwork to truly pop, allowing their authentic colors to shine. In addition to our vivid pages, some of our most activity book options include the industry standards listed below. Read on to learn how to design your own custom activity book!
-
- Binding: Saddle-stitched
- Size: No standard size, photo shows 5.8 inches x 8.4 inches
- Cover Finish: Gloss
- Cover Weight: 70lb text
- Interior Paper Weight: 55lb text
- Interior Paper Coating: Uncoated
Uncoated paper is easier to write on, and thus will let crayon and colored pencil pop on the page.

Perfect Bound Activity Book
-
- Binding: Perfect (softcover)
- Size: No standard size, photo shows 5 inches x 7 inches
- Cover Finish: Gloss lamination
- Cover Weight: 10pt cover
- Interior Paper Weight: 70lb text
- Interior Paper Coating: Uncoated
Uncoated paper is easier to write on, and thus will let crayon and colored pencil pop on the page.
Did we answer all of your questions?
Contact UsDesign A Workbook
PrintNinja recommends following these industry standards to design a workbook with dry-erase pages.

How to design a workbook
Because the pages of a dry-erase workbook are so thick (due to the glossy, double-sided lamination on the thick 14pt cover-wight paper that gives them their dry-erase board effect), wire binding is the best choice – this will allow your reader to easily open your workbook so that it lays flat on a surface, making it easier to write in.
-
- Binding: Wire bound
- Size: 8.5 inches x 11 inches, photo shows 7 inches x 9.5 inches
- Cover Finish: Gloss lamination
- Cover Weight: 14pt cover
- Interior Paper Weight: 14pt cover
The interior paper has to be thick in order to apply a lamination finish to your interior paper. That’s why we recommend a 14pt weight – though this weight of paper is usually used for covers of books, here, this weight of paper supports the lamination. This finish allows you to use dry-erase markers, and makes each page re-usable – just erase when you’re done!
-
- Interior Paper Coating: Gloss, double-sided lamination
Double-Sided lamination adds a dry erase board effect for reuse.
Coloring Books

PrintNinja’s bright white, uncoated coloring book paper versus newsprint
Coloring books continue to stand the test of time as favorite children’s activities. In recent years, however, the industry has seen a surge in adult coloring books, too! It’s no surprise why they continue to be one of the best-loved mediums for self-expression. According to research, coloring can reduce stress, boost mindfulness, and may even aid in developing problem-solving and organizational skills!
Have you created intricate designs intended for experienced coloring enthusiasts? Or, do children love coloring your pictures so much that you’ve compiled a whole series of drawings? Turn your collection into a beautiful, bound book just waiting to be filled in with our coloring book printing services.
Our high-quality paper is a far cry from the flimsy pages of yesteryear, so the masterpieces produced with your book can make their way to the fridge or the frame. The white, uncoated paper provides the perfect surface for crayon and colored pencil artwork to truly pop, allowing their authentic colors to shine. In addition to our vivid pages, some of our most popular coloring book options include the industry standards listed below.
Coloring Book Industry Standards
- Binding: Perfect (softcover) or Saddle Stitched
- Size: 8.5 inches x 11 inches
- Cover Weight: 10pt cover
- Cover Finish: Gloss lamination
- Interior Paper Weight: 70lb text, perforated
- Interior Paper Coating: Uncoated
Are you looking for something extra-special for your coloring books? We can help you there, too! Our printing services give you the power to bring your project to life exactly as you’re envisioning it with dozens of creative options. Incorporate perforated edges for hassle-free tear-outs, or create a pocket-sized volume for coloring on-the-go. There are many more options to choose from, so feel free to start exploring them all now!
Making a coloring book?
Our pricing calculator defaults to the industry standards listed above. Keep in mind, if you’d like perforated edges, make a note in the additional info box while saving your quote.
Get StartedGames
PrintNinja recommends keeping the following guidelines in mind in order to design a tabletop game.
The board, card, and tabletop game industry has exploded in popularity in recent years, with independent game creators leading the charge. People can’t stop gaming! Thanks to the self-publishing revolution, we’re seeing a renaissance in games across every genre. Ready to create your board, card, dice or RPG game? Read on!
Tabletop Game Design
Visit the pages below to see our recommended printing options.
- Party Board Game
- Adventure Board Games
- Strategy Board Game
- Survival Board Game
- Instruction/Rule Booklet
Freshly updated customer reviews from TrustPilot
Tabletop Board Game Industry Standards
PrintNinja recommends keeping the following guidelines in order to design a board game.
Board games, also referred to as tabletop games, contain a board and components that move around the board based on a set of rules. While all board games share that definition, that is where the similarities end. Games have no standards for size, components, and materials because each game is designed and built around its playability. To give you a sense of measurements and material, below are specs that would recreate the board game Risk.
If you’re interested in reading more about creating board games, be sure to check out our custom board game hub. This part of our site contains all the information you need to know about creating a board game – beyond just the standards listed here, this hub also contains detailed information on all the types of materials and packaging types we offer for your game. We’ve also analyzed board card games to figure out what makes them work – and how you can apply these principals to your custom card game. There’s lots more to explore, like special features you can add-on to your card game to make it stand out. Check it out for more information on how to design a board game!
Do you already know your game specs?
Request a Game Quote
Make Your Own Board Game
Box
- 15.7 inches x 10.5 inches x 2.5 inches
- 1.5 mm high density paperboard
- Full CMYK
- Packaging: Shrinkwrap

Organizer
- 7 compartments
- Vacuum formed plastic
- Black

Game Board
- 20 inches x 30 inches, 1/4 fold
- Full CMYK on front and black gameboard backing
- 2mm high density paperboard
- Gloss

Playing Cards
- 43 cards, 2.2 inches x 3 inches
- 300 gsm blue core
- Gloss varnish
- Packaging: Shrinkwrap with easy pull tab

Miniatures
- 300 total pieces
- 60 Horseman: 12 blue, green, red, yellow, black
- 40 Cannons: 8 blue, green, red, yellow, black
- 200 Infantry soldiers: 40 blue, green, red, yellow, black
- Packaging: Plastic bags

Dice
- Three black 6 sided die with white pips
- Two red 6 sided die with white pips
- Packaging: Plastic bags

Instruction Book
- 6 inches x 9 inches
- 85lb gloss interior and cover paper weight
- 12 interior pages
- Saddle-stitched binding
- Full CMYK
Did we answer all of your questions?
Contact UsFreshly updated customer reviews from TrustPilot
Card Decks and Card Games
PrintNinja recommends you keep the following guidelines in mind when you design cards for a board game.
Card games are any game that uses playing cards as the main component. It is amazing how many games can be played with a traditional deck of 55 cards, but even more intriguing are the endless possibilities of new games appearing in the market. We all remember the big boom of Cards Against Humanity, now cards are taking many forms in quantities, sizes, materials and gameplay. Request your card game quote with our instant price calculator.
If you’re interested in reading more about creating board games, be sure to check out our custom board game hub. This part of our site contains all the information you need to know about creating a board game – beyond just the standards listed here, this hub also contains detailed information on all the types of materials and packaging types we offer for your game. We’ve also analyzed board card games to figure out what makes them work – and how you can apply these principals to your custom card game. There’s lots more to explore, like special features you can add-on to your card game to make it stand out. Check it out!

Design Card Decks and Card Games
Traditional Cards
- Card Size: 55 cards, 2.5 inches x 3.5 inches (poker size)
- Card Material: 300 gsm blue core
- Finish: Gloss linen
- Tuck Box Size: 2.5 inches x 3.5 inches x .81 inches
- Tuck Box Material: 10pt. coated 1-sided cardstock box
- Tuck Box Finish: Gloss varnish

Custom Card Game
- Card Size: 162 cards, 2.2 inches x 3.4 inches
- Card Material: 300 gsm blue core
- Finish: Gloss varnish
- Tuck Box Size: 5.9 inches x 8 inches x 0.9 inches
- Tuck Box Material: 10pt. coated 1-sided cardstock box
- Tuck Box Finish: Gloss varnish
- Organizing Box Insert: 3.6 inches x 7 inches
- Instructions: 3 inches x 4 inches folded 12 inches x 16 inches unfolded
Freshly updated customer reviews from TrustPilot
Party Board Game
PrintNinja recommends keeping the following guidelines in mind when you design a party game.
It’s hard to define a party game, but you know it when you play it. They’re games that are meant to be played in large social gatherings for entertainment – we know it sounds like most games! Some common characteristics are team-based play, easy for players to learn quickly, and a lot of player interaction with each other. Popular party games include Cranium, Taboo and Scattergories. Finishit, outlined below, shows common sizes, material and components found in party games.
If you’re interested in reading more about creating board games, be sure to check out our custom board game hub. This part of our site contains all the information you need to know about creating a board game – beyond just the standards listed here, this hub also contains detailed information on all the types of materials and packaging types we offer for your game. We’ve also analyzed board card games to figure out what makes them work – and how you can apply these principals to your custom card game. There’s lots more to explore, like special features you can add-on to your card game to make it stand out. Check it out for more information on designing a party game!

Party Card Game Design
Two-Piece Box
- 7 inches x 8 inches x 2 inches
- 2 mm high density paperboard
- Full CMYK
- Organizing Insert:
- 20pt coated 1-side gloss cardstock
- 3 compartments
- Black
- Packaging: Shrinkwrap

Playing Cards
- 360 poker cards, 2.5 inches x 3.5 inches
- Divided into 3 decks of 120
- 300 gsm Blue Core
- Gloss Varnish
- Full CMYK
- Packaging: Shrinkwrap

Dry Erase Boards & Markers
- 8 tiles, 2.75 inches x 4.750 inches
- 1.5mm high density paperboard
- Double lamination
- Gloss
- 8 black dry erase markers with eraser tips
- Packaging: Plastic bag

One Sheet Instructions
- 7 inches x 8 inches
- 10pt cover gloss varnish paper
- One flat sheet
- Full CMYK
Ready to Price Your Game?
Fill out our board game quoting tool and we’ll follow up with you within one business day to get any additional details we need to quote your game.
Get StartedFreshly updated customer reviews from TrustPilot
Adventure Board Game Industry Standards
PrintNinja recommends keeping the following guidelines in mind in order to design an adventure game.
If your game has a story that focuses on a quest, whether it be an exploration or to save a princess in a tall tower, you likely are creating an adventure game. Adventure games often have large grid game boards that provide a bird eyes view of the world your characters are living in and a variety of resource pieces. Forbidden Desert is a great example of this genre and all its components have been dissected below.
If you’re interested in reading more about creating board games, be sure to check out our custom board game hub. This part of our site contains all the information you need to know about creating a board game – beyond just the standards listed here, this hub also contains detailed information on all the types of materials and packaging types we offer for your game. We’ve also analyzed board card games to figure out what makes them work – and how you can apply these principals to your custom card game. There’s lots more to explore, like special features you can add-on to your card game to make it stand out. Check it out to find out more about how to design an adventure game!
Do you already know your game specs?
Request a Game Quote
Adventure Game Design
Two-Piece Box
- 8.5 inches x 8.5 inches x 3 inches
- Tin
- Full CMYK and embossed
- Organizing Insert:
- Vacuum form plastic tray
- 6 compartments
- Black
- Packaging: Shrinkwrap

Playing Cards
- 49 poker cards, 2.5 inches x 3.5 inches
- 300 gsm Coreless
- Gloss Varnish
- Linen Texture
- Full CMYK
- Packaging: Shrinkwrap

Small Tiles
- 24 tiles, 2.5 inches x 2.5 inches
- 2mm high density paperboard
- Matte Varnish
- Linen Texture
- Full CMYK on front and back
- Packaging: Shrinkwrap

Tokens
- 48 ‘X’ shaped tokens, 2.5inches x 2.5 inches
- 1.5mm high density greyboard
- Matte Varnish
- Linen Texture
- Full CMYK on front and back
- Packaging: Rubber Band

Pawns and Mat
- 6 wooden pawns, 1 inch tall
- Red, Green, Yellow, Blue, Black, White
- 1 custom orange crystal, .8 inches tall
- Transperant Plastic
- 1 player mat, 2.5 inches x 7 inches
- 1mm high density greyboard
- Matte Varnish
- Linen Texture
- Full CMYK on front and back
- Packaging: Pawns and crystal in plastic bag

Figurine
- 1 plastic flying machine
- 1 compass (sand storm meter) and stand
- 4 plastic flying machine parts(not pictured)

Rule Booklet
- 7 inches x 8 inches
- Saddle-stitched binding
- 70lb text paper for cover and interior pages
- 8 pages
- Gloss varnish
- Full CMYK
Did we answer all of your questions?
Contact UsFreshly updated customer reviews from TrustPilot
Strategy Board Game
PrintNinja recommends keeping the following guidelines in mind when you design a strategy game.
Board games, also referred to as tabletop games, contain a board and components that move around the board based on a set of rules. While all board games share that definition, that is where the similarities end. Games have no standards for size, components, and materials because each game is designed and built around its playability. To give you a sense of measurements and material, below are specs that would recreate the board game Risk.
If you’re interested in reading more about creating board games, be sure to check out our custom board game hub. This part of our site contains all the information you need to know about creating a board game – beyond just the standards listed here, this hub also contains detailed information on all the types of materials and packaging types we offer for your game. We’ve also analyzed board card games to figure out what makes them work – and how you can apply these principals to your custom card game. There’s lots more to explore, like special features you can add-on to your card game to make it stand out. Check it out for more information on how to design a strategy game!
Strategy Board Game Specs
Box
- 15.7 inches x 10.5 inches x 2.5 inches
- 1.5 mm high-density paperboard
- Full CMYK
- Packaging: Shrinkwrap
Organizer
- 7 compartments
- Vacuum formed plastic
- Black
Game Board
- 20 inches x 30 inches, 1/4 fold
- Full CMYK on front and black gameboard backing
- 2mm high-density paperboard
- Gloss finish
Playing Cards
- 43 cards, 2.2 inches x 3 inches
- 300 gsm Blue Core
- Gloss varnish
- Packaging: Shrinkwrap with easy pull tab
Miniatures
- 300 total pieces
- 60 Horseman: 12 blue, green, red, yellow, black
- 40 Cannons: 8 blue, green, red, yellow, black
- 200 Infantry soldiers: 40 blue, green, red, yellow, black
- Packaging: Plastic bags
Dice
- Three black 6 sided die with white pips
- Two red 6 sided die with white pips
- Packaging: Plastic bags
Instruction Book
- 6 inches x 9 inches
- 85lb gloss interior and cover paper weight
- 12 interior pages
- Saddle-stitched binding
- Full CMYK
Ready to Price Your Game?
Fill out our board game quoting tool and we’ll follow up with you within one business day to get any additional details we need to quote your game.
Get StartedFreshly updated customer reviews from TrustPilot
Survival Board Game Industry Standards
PrintNinja recommends keeping the following guidelines in line when you design a survival game.
Survival board games usually depend on a team to work together in order to make it out of a life-threatening situation or for one person to survive longer than the rest of the players. These games often have many resources used to give you health, clues for survival, or recipes to craft instruments. Mixtape Massacre is a horror survival game that encompasses a lot of the common pieces these games contain and we’ve diced it to pieces below.
If you’re interested in reading more about creating board games, be sure to check out our custom board game hub. This part of our site contains all the information you need to know about creating a board game – beyond just the standards listed here, this hub also contains detailed information on all the types of materials and packaging types we offer for your game. We’ve also analyzed board card games to figure out what makes them work – and how you can apply these principals to your custom card game. There’s lots more to explore, like special features you can add-on to your card game to make it stand out. Check it out to learn more about how to design a survival game.

Survival Board Game Specs
Two-Piece Box
- 20 inches x 20 inches
- 1.5mm high density paperboard
- Matte lamination
- Full CMYK
- Organizing Insert:
- 20pt coated 1-sided gloss cardstock
- 3 compartments
- White

Game Board
- 12 inches x 12 inches
- 1.5mm high density paperboard
- 1/4-fold
- Matte Lamination
- Full CMYK on front and black gameboard backing

Playing Cards
- 40 cards 5 inches x 3 inches
- 30 cards 3.5 inches x 2 inches
- 10 cards 4 inches x 6 inches
- 300 gsm Blue Core
- Gloss Varnish
- Full CMYK on front and page
- Packaging: Shrinkwrap and plastic bag

Characters
- 10 custom shaped characters, 2 inches tall
- 1.5mm high density greyboard
- Matte Varnish
- Full CMYK on front and back
- 10 red plastic card stands
- Packaging: plastic bag

Knife and Pegs
- 6 knifes, 10 inches x 2 inches
- Custom cut into butcher knifes
- 1.5 mm high density greyboard
- Full CMYK on front
- Matte varnish
- 6 hole drills
- 6 inch slit along blade to hole cards
- 24 red plastic pegs
- Packaging: plastic bag

Tokens
- 60 square punch-out tokens, 1 inch diameter
- 10 hexagon punch-out tokens, 1 inch diameter
- 1.5mm high density greyboard
- Matte Varnish
- Full CMYK on front and back
- Packaging: plastic bag

Dice
- 4 d6 dice
- Three black, one red
- .55 inches
- Custom engraved black dice
- White pips on red dice

Rule Booklet
- 8.5 inches x 11 inches
- Saddle-stitched binding
- 85lb text paper for cover and interior pages
- 8 pages
- Gloss varnish
- Full CMYK
Ready to request a game quote?
Configure my gameFreshly updated customer reviews from TrustPilot
Instructions and Rule Booklets
PrintNinja recommends you keep the following guidelines in mind in order to design an instruction manual.
A game cannot exist without standardized rules for a group of players to follow. There are many ways to display instructions with your game, the most popular being a booklet, as seen below. For board games, you could also print the instructions on the inside of the box. A cost-effective option for card games is to print the rules on your tuck box or on an extra card included in your deck.
If you’re interested in reading more about creating board games, be sure to check out our custom board game hub. This part of our site contains all the information you need to know about creating a board game – beyond just the standards listed here, this hub also contains detailed information on all the types of materials and packaging types we offer for your game. We’ve also analyzed board card games to figure out what makes them work – and how you can apply these principals to your custom card game. There’s lots more to explore, like special features you can add-on to your card game to make it stand out. Check it out!

Instruction Manual Design Standards
Rule Booklet
- Size: No standard size, photo shows 6 inches x 9 inches
- Cover Paper Weight: No standard weight, photo shows 70lb text
- Interior Paper Weight: No standard weight, photo shows 70lb text
- Finish: Gloss
- Binding: Saddle-stitched
- Interior Page Count: No standard count, but page counts need to be a multiple of 4
Ready to Price Your Game?
Fill out our board game quoting tool and we’ll follow up with you within one business day to get any additional details we need to quote your game.
Get StartedFreshly updated customer reviews from TrustPilot
Brand Book
A brand book contains guidelines and standards that explain how your brand works. These books include content that is important to your business, such as information your company history, culture, logos and color palette, and values. These books can serve as great promotional pieces that convey your company’s image, message and products/services. They are also helpful tools to give to new members of your business to teach them about your company and give them a crash course in what they need to know to be a member of the team. Finally, they can be given to freelance designers and artists as a design guide – again, working as a sort of crash course to help people quickly understand what your brand stands for and how to represent your brand visually. Brand books are a great investment as you develop your business!

Brand Book Standards
-
- Binding: Case bound (hardcover) or perfect (softcover)
- Size: No standard size, photo shows 11 inches x 8.5 inches
- Cover Finish: Gloss lamination or varnish
- Interior Paper Weight: 105lb text
For a heavier book use 135lb text
- Interior Paper Coating: Gloss
Freshly updated customer reviews from TrustPilot
Calendars
PrintNinja recommends following these industry standards when you print your custom calendar.
The purpose of calendars can go far beyond tracking important dates and events. For businesses, artists, and organizations, they also make excellent marketing tools. Calendars are unique because they allow you to show off your projects through a medium your clients or fans will use daily. You can also choose the right design options to support your project’s specific objectives.
Wall calendars, for instance, appeal to a broad range of audiences and provide ample space for showcasing your artwork or designs. With 24 interior pages (28 including cover and inside cover pages), standard 12-month calendars create many opportunities to advertise your business or side project with your most captivating images. You can even highlight your favorite visuals in a spread at the center of the calendar to give purchasers something they can display long after the year ends. If you’re not sure where to start, here are some industry standards for your consideration:
12-Month Wall Calendar Industry Standards
- Binding: Saddle stitch or wire bound
- Size: 12 inches x 12 inches
- Cover Paper: 10pt gloss
- Cover Finish: Gloss varnish
- Inside Paper: 105lb gloss
Every option listed above is customizable, so you can select the features that reflect the scope of your project. For example, while saddle stitch binding is more traditional, wire bound calendars have an open format and are easier to fold. You can also adjust the inside and cover paper types and cover finish to bring your calendar to life within budget. Ultimately, every decision is entirely yours to make!
Ready to get started?
We have pre-populated our calendar pricing calculator with these industry standards so quoting is a breeze. You can also customize just about anything, from size to paperweight, and so much more.
Get Your Price
Standing Flip Calendar
Looking for something a little smaller? Standing flip calendars are the perfect alternative to wall calendars. These sleek yet attractive wire bound options are ideal for desks, reception counters, and virtually any other small space where a quick glance at the date might be helpful. Design the pages around a theme to match your brand or personal style, and allow the standards below to guide you.
- Binding: Wire bound
- No standard, photo shows 6 inches x 8 inches
- Cover Paper: 14pt cover
- Cover Finish: No standard, photo shows uncoated
- Inside Paper: No standard, photo shows 10pt cover uncoated
Like what you see?
If you would like to create a standing flip calendar, start by requesting a custom quote. If you like the options listed above, let us know and we will quote your project using these specifications. We can customize just about anything, so let us know as much detail as possible and we’ll start working on your custom quote.
Get Your Custom QuoteCard Games
We recommend keeping in mind the following standards when you design a card game.
The card and tabletop game industry has exploded in popularity in recent years, with independent game creators leading the charge. People can’t stop gaming! Thanks to the self-publishing revolution, we’re seeing a renaissance in games across every genre. Ready to create the next best card game?
If you’re interested in reading more about creating card games, be sure to check out our custom card game hub. This part of our site contains all the information you need to know about creating a card game – beyond just the standards listed here, this hub also contains detailed information on all the types of materials and packaging types we offer for your game. We’ve also analyzed popular card games to figure out what makes them work – and how you can apply these principals to your custom card game. There’s lots more to explore, like interviews with card game creators who have printed with PrintNinja, and special features you can add-on to your card game to make it stand out. Check it out!
Card Game Design
Visit the pages below to see our recommended printing options.
Poker Card Deck Industry Standards
Poker cards are familiar and instantly recognizable, with a specific shape, size, and finish. Use these guidelines to make poker decks fit for the casino sets of 52 cards with four suits and reverse artwork, or to accompany a board game. Whether you’re interested in poker decks as a brand giveaway or for your original game, we can help you print a professional and durable deck.
If you’re interested in reading more about creating card games, be sure to check out our custom card game hub. This part of our site contains all the information you need to know about creating a card game – beyond just the standards listed here, this hub also contains detailed information on all the types of materials and packaging types we offer for your game. We’ve also analyzed popular card games to figure out what makes them work – and how you can apply these principals to your custom card game. There’s lots more to explore, like interviews with card game creators who have printed with PrintNinja, and special features you can add-on to your card game to make it stand out. Check it out!
Traditional Cards
Poker Deck Design, Dimensions and Size
Traditional Cards
- Card Size: 55 cards, 2.5 inches x 3.5 inches (poker size)
- Card Material: 300 gsm blue core
- Finish: Gloss linen
- Tuck Box Size:2.5 inches x 3.5 inches x .81 inches
- Tuck Box Material: 10pt. coated 1-sided cardstock box
- Tuck Box Finish: Gloss varnish
Custom Card Game
Custom Card Game
- Card Size: 162 cards, 2.2 inches x 3.4 inches
- Card Material: 300 gsm blue core
- Finish: Gloss varnish
- Tuck Box Size: 5.9 inches x 8 inches x 0.9 inches
- Tuck Box Material: 10pt. coated 1-sided cardstock box
- Tuck Box Finish: Gloss varnish
- Organizing Box Insert: 3.6 inches x 7 inches
- Instructions: 3 inches x 4 inches folded 12 inches x 16 inches unfolded
Ready to create your card game?
Get StartedParty Card Game Industry Standards
Party games are meant to be played in large social gatherings for entertainment and Apples to Apples might be the most popular party card games. Some common characteristics of these games are team-based play, easy for players to learn quickly, and a lot of player interaction with each other. Apples to Apples components follow industry standards for party card games.
If you’re interested in reading more about creating card games, be sure to check out our custom card game hub. This part of our site contains all the information you need to know about creating a card game – beyond just the standards listed here, this hub also contains detailed information on all the types of materials and packaging types we offer for your game. We’ve also analyzed popular card games to figure out what makes them work – and how you can apply these principals to your custom card game. There’s lots more to explore, like interviews with card game creators who have printed with PrintNinja, and special features you can add-on to your card game to make it stand out. Check it out!

Party Card Game Design
- 7.5 inches x 7.5 inches x 2 inches
- 1.5mm high density paperboard
- Full CMYK
- Plastic Handle
- Organizing Insert:
- Black vacuum formed plastic
- 3 compartments

Playing Cards – Party Card Games
- 270 red bridge cards, 2.25 inches x 3.5 inches
- 90 green bridge cards, 2.25 inches x 3.5 inches
- Divided into 3 decks
- 280 gsm Grey Core
- Square Corners
- Gloss Varnish
- Full CMYK
- Packaging: Shrinkwrap

Folded Instructions of Party Card Games
- 9.5 inches x 9.5 inches, unfolded
- 85lb text gloss varnish paper
- One flat sheet folded twice, 4 panels
- Full CMYK
Matching Card Game
When players hear ‘matching card game’ they think of the traditional Crazy Eights, Old Maid, Go Fish and while those games have all played a part in our life, matching games can take more complex forms. Pirate Deck, outlined below, is a matching game where you find yourself on a pirate ship in search of treasure. Below are common measurements and material used in matching card games – minus the booty!
If you’re interested in reading more about creating card games, be sure to check out our custom card game hub. This part of our site contains all the information you need to know about creating a card game – beyond just the standards listed here, this hub also contains detailed information on all the types of materials and packaging types we offer for your game. We’ve also analyzed popular card games to figure out what makes them work – and how you can apply these principals to your custom card game. There’s lots more to explore, like interviews with card game creators who have printed with PrintNinja, and special features you can add-on to your card game to make it stand out. Check it out!
Card Game Design

Matching Card Game Design
- 6 inches x 4.3 inches x 1.4 inches
- 1.5mm high-density paperboard
- Full CMYK
- Organizing Insert:
- 20pt coated 1-sided gloss cardstock
- 2 compartments
- White

Playing Cards
- 54 poker cards, 2.5 inches x 3.5 inches
- 300 gsm Blue Core
- Gloss Varnish
- Full CMYK
- Packaging: Shrinkwrap

Coins and Bag
- 25 plastic coins, 1 inch diameter
- Custom design
- Packaging: Faux velvet bag
- Screen printed skull and crossbones

Rule Booklet
- 3.46 inches x 5.43 inches
- Saddle-stitched binding
- 85lb text paper for cover and interior pages
- 8 pages
- Gloss varnish
- Full CMYK
Freshly updated customer reviews from TrustPilot
Card Instructions
Card games tend to be packaged in a tuck box or a small two-piece box because of the small about of components needed to play the game, which correlates often to an easier set of rules. Below are a few different guidelines you can follow to design instructions for your card game.
If you’re interested in reading more about creating card games, be sure to check out our custom card game hub. This part of our site contains all the information you need to know about creating a card game – beyond just the standards listed here, this hub also contains detailed information on all the types of materials and packaging types we offer for your game. We’ve also analyzed popular card games to figure out what makes them work – and how you can apply these principals to your custom card game. There’s lots more to explore, like interviews with card game creators who have printed with PrintNinja, and special features you can add-on to your card game to make it stand out. Check it out!
Card Game Instructions Design
- 2.5 inches x 3.5 inches, folded
- No binding
- 85lb text paper
- 16 panels, front and back
- 7 folds
- Gloss varnish
- Full CMYK
Rules on Card
- One extra poker card,2.5 inches x 3.5 inches
- 300gsm Blue Core
- Gloss varnish
- Full CMYK on front and back
Freshly updated customer reviews from TrustPilot
Catalogs & Magazines
PrintNinja recommends keeping the following guidelines in mind when you design catalogs and magazines.
Catalogs and magazines come in many different forms, and can be used for many different purposes. These multi-page books are a great way to get your products, services, or even collection of your writing in the hands of your consumers and fans. Catalogs and magazines share a lot in common when it comes to specifications – they also share in common that they’re usually delivered in bulk mail order to customers (which impacts the dimension of the final product). While literary journals are almost the exact opposite in size, paper, binding and the path they take to get into consumer’s hands is slightly different – they are usually distributed through bookstores or independent websites. However you’re getting your product to your customers, we can help you print it to the perfect specifications for you. We can even add special features like foil stamping or embossing/debossing. Read on to learn more about the industry standards for different types of catalogs and magazines and how to design them!
Catalog and Magazine Industry Standards
Choose an option to see our recommended printing options for each style:
Freshly updated customer reviews from TrustPilot
Catalog Industry Standards
PrintNinja recommends keeping the following guidelines in mind when you design a catalog.
The famous Sears mail-order “Big Book” catalog from the 1900’s was the beginning of retail catalogs. Still around today, the catalog shows how important it is to get products in front of consumers. Most catalogs today are not as large and bulky – due to shifting patterns of consumer purchasing because of the invention of the internet – but do have some common standards in size and material. No matter what kind of item or service you’re selling, we can help you print the perfect catalog that will serve as a great tool for your business. Read on to learn about the industry standards and how to design a catalog for your business!

Design A Catalog
Saddle-Stitched Catalog
- Binding: Saddle Stitched
- Size: 8.5 inches x 11 inches
- Cover Weight: 105lb text
- Cover Finish: Matte or gloss
- Interior Paper Weight: 70lb text
- InteriorPaper Coating: Gloss

Perfect Bound Catalog
- Binding: Perfect (softcover)
- Size: 8.5 inches x 11 inches
- Cover Weight: 12pt cover
- Cover Finish: Gloss or matte lamination
- Interior Paper Weight: 105lb text
- Interior Paper Coating: Gloss
Ready to print your catalog?
Contact UsFreshly updated customer reviews from TrustPilot
Magazine Industry Standards

PrintNinja recommends keeping the following standard dimensions in mind in order when you design your magazine.
Magazines aren’t just a top source for the latest celebrity news. They can also be used to showcase updates, trends, and events in a particular subject or industry. Whether for business or personal interests, you can print your own magazine featuring a collection of articles and illustrations to leverage your expertise.
Like books and newspapers, magazines typically are printed following a certain set of standards. Consider the last time you walked past the newsstand or magazine aisle, and recall how most magazines bear similar features in terms of size, binding, and coating. PrintNinja can publish your magazine to the same industry standards to achieve a professional look and feel.
Magazine Industry Standards
- Binding: Perfect (softcover) or saddle-stitched
- Size: 8.5 inches x 11 inches
- Cover Weight: 12pt cover
- Cover Finish: Gloss or matte varnish
- Interior Paper Weight: 85lb text
- Interior Paper Coating: Gloss
While the above specifications suit most magazines, PrintNinja also has dozens of additional options to upgrade your magazine in the way you see fit. Variant covers, for instance, allow you to feature different artwork in the same issue, while embossing and spot gloss can accentuate a specific area to wow your readers. You can also customize your cover with options like stock type and finishes according to your visual goals and budget.
PrintNinja’s premium magazine printing services deliver each project with the utmost level of quality and attention to detail. Since we print and ship from China, our services are best-suited for quarterly, biannual, or annual publications. Options are available at accessible price points, so whether you’re printing an annual report to showcase company performance or a quarterly journal for a club or charity, you can stretch your dollars to produce a high-quality publication for less.
Ready to print your magazine?
Get an instant priceFreshly updated customer reviews from TrustPilot
Literary Journal Industry Standards
PrintNinja recommends keeping the following guidelines in mind when you design a literary journal.
Literary journals and literary magazines are collections of writing from several different authors, all housed in one volume. They are often anthologies of short stories, excerpts of longer pieces, poetry, criticism, essays, or author profiles of new writers. While they don’t have a standard size, most resemble magazines and are put out in a semi-regular cycle. They are often printed on uncoated paper to stand apart from their glossy superficial cousins.
Just because these journals are meant to appeal to your mind doesn’t mean they shouldn’t also appeal to your eye. Modern journals mix it up with full color artwork, hard cover binding, and unique sizes. Some even add specialty options like foil stamping or embossing/debossing. No matter what you want your literary journal or magazine, PrintNinja can help you print a product that does the art inside justice.

Design a Literary Journal
- Binding: Perfect (softcover)
- Size: 9.5-10 inches x 6.75 inches
- Cover Paper: 12pt cover
- Cover Finish: Matte varnish or lamination
- Inside Paper: 70-85lb text Uncoated
Calculate the price of printing a literary journal with these specifications
CalculateFreshly updated customer reviews from TrustPilot
Lookbook Industry Standards
PrintNinja recommends keeping the following guidelines in mind in order to design a lookbook.
Lookbooks are the younger sibling of magazines and catalogs. They contain a collection of photos to show off a company’s product in a creative light, which makes for great marketing material when you get them in the hands of potential customers. Lookbooks are different from magazines in that there are no articles (or very few) and they are not quite catalogs because the goal is not to sell based on prices. Lookbooks provide a great way to encourage customers to check out your online shop, explain your business style, and keep your company top of mind when that customer hangs onto your lookbook.
Design a Lookbook

- Binding: Perfect (softcover) or saddle-stitched
- Size: No standard size, photo shows 11.5 inches x 8 inches
- Cover Weight: No standard weight, photo shows 105lb text
- Cover Finish: No standard finish, photo shows matte varnish
- Gloss is more desirable if you have full color photos you want to pop.
- Interior Paper Weight: No standard weight, photo shows 85lb text
- Interior Paper Coating: No standard coating, photo shows matte
- Gloss is more desirable if you have full color photos you want to pop.
Ready to print a lookbook?
Get an instant priceChildren’s Books
PrintNinja recommends keeping the following information in mind when designing a children’s book.
Children’s books come in a wide variety of shapes and sizes in order to suit the creative needs of the story. Some are small with thin uncoated paper, some are large with thick gloss paper, and some are completely somewhere in between. If you browse the aisles of your local library or bookstore, you’ll find children’s books in all types of shapes, colors, and sizes. Children’s books, more than anything, lend themselves to whatever format and materials you prefer – and we offer a ton of different options for you to choose from! If you need a place to start, read our recommendations below; the sizes can be either portrait (for example, 8″ x 10″) or landscape (10″ x 8″). Of course, you can totally disregard our instructions and be make your own guidelines – children’s books are probably one of the best formats to have some fun with while creating your printing project with PrintNinja.
Make a Children’s Book Design
Choose an option below to see our recommended printing options for each style:
Freshly updated customer reviews from TrustPilot
Design A Hardcover Children’s Book
PrintNinja recommends keeping the following standards in mind when you design a hardcover children’s book.
Hardcover children’s books are a step up from softcover books in terms of durability. They’re able to stand up to more wear and tear than softcover books while being able to provide a higher page count than board books, making them a perfect choice for young readers who have moved past board books but are still learning to read. If your project’s reading level is for toddlers, than we recommend board books.

Design A Hardcover Children’s Book
- Binding: Case bound (hardcover)
- Size: No standard size, photo shows 8 inches x 10 inches
- Cover Paper: Hardcover
- Cover Finish: Gloss lamination
- Inside Paper: 105lb text gloss
Calculate the price of printing a hardcover children's book with these specifications
CalculateFreshly updated customer reviews from TrustPilot
Design A Softcover Children’s Book
PrintNinja recommends keeping the following standards in mind when you design a softcover children’s book.
Softcover children’s books are a great choice for your book project for middle readers – for those in-between times when children have graduated from board book and hardcover books but are still not ready for full novels.
At PrintNinja, we use a perfect binding process for softcover children’s books. In PrintNinja’s perfect binding process, the collated signatures of the book block are sewn together using the smyth sewing technique. Smyth sewing uses thread to first sew through the folds of each signature and then sew the entire group of signatures (book block) together, resulting in a durable binding that can be opened relatively wide – something to consider when you design a softcover children’s book: wider opening can allow you to more effectively utilize your page space. Next, a tech will place the sewn book block into a clamp that tightly holds the body together while it moves through the binding process. Glue is applied to the spine and run through a heating process, after which the cover is wrapped around the book block. Finally, the bound books are trimmed down to size using a special cutting machine that trims all 3 edges in the same process.

Perfect Bound Children’s Book
- Binding: Perfect (softcover)
- Size: No standard size, photo shows 5 inches x 8 inches
- Cover Paper: 10pt cover gloss
- Cover Finish: Gloss lamination
- Inside Paper: 85lb text gloss
Calculate the price of printing a perfect bound children's book with these specifications
CalculateFreshly updated customer reviews from TrustPilot
Board Book Industry Standards
PrintNinja recommends keeping the following standards in mind when you design a board book.
Board books are simple short children’s books catered to very young children. Built to withstand baby drool and heavy usage, they are printed on heavy boards and bound in a unique way to accommodate the bulky pages that the little ones can’t tear. Board books often have very few pages, and may even be a condensed version of a longer children’s book. Often, special features are added to include the child’s participation in the story. Flaps that reveal hidden pictures, textures that they can feel, or die-cuts that interact with the story are some of the options authors include. Board books also have rounded corners for a safe edge that babies can handle on their own. You can have a lot of fun while designing a board book, but we’ve outlined a few guidelines below that most board books follow.

Design A Board Book
- Binding: Specialized board book binding
- Size: Between 3 inches and 7 inches
- Cover Finish: Gloss or matte lamination
- Page count: Between 8 and 36 pages
Calculate the price of printing a board book with these specifications
CalculateFreshly updated customer reviews from TrustPilot
Design A Pop-Up Book
PrintNinja recommends keeping the following standards in mind when you design a pop-up book.
Pop-up books are a great tool to get young children interested in reading – with their special features and interactivity, they are almost a mix between a toy and a book. There are may different paper engineering techniques needed to create pop-ups: flaps, pull tabs, glue dots, valley folds, mountain folds and more. Even with the variety of pop-up formations these books share similar specifications in order to make the pop-ups pop: the pages within the book need to be thick enough to support the pop-up structure. This is why we recommend 10pt cover paper for the inside paper of your book.

Pop-Up Book Design
-
- Binding: Case bound (hardcover)
- Size: No standard size, photo shows 8 inches x 8 inches
- Cover Paper: Hardcover
- Cover Finish: Gloss lamination
- Inside Paper: 10pt cover uncoated
Interior paper has to be thick so it can hold pop-up forms.

-
- Binding: Case bound (hardcover)
- Size: No standard size, photo shows 7.5 inches x 9.5 inches
- Cover Paper: Hardcover
- Cover Finish: Matte lamination
- Inside Paper: 10pt cover uncoated
Interior paper has to be thick so it can hold pop-up forms.
Freshly updated customer reviews from TrustPilot
Comic Books

PrintNinja recommends designing your custom comic book to fit these dimensions.
The comic book industry has seen a huge spike in self-published and creator-owned works in recent years. One of the many reasons for this is the large number of formats possible to help bring your story to life. Single issue comics, graphic novels, manga; no matter your genre or art style, comics are a great way to share your universe with other fans. Nowadays, there are more printing options for comics than ever before. If you’re interested in trying to match what you see on the shelves of your local comic shop, then visit the pages below for our recommended printing options.
PrintNinja Knows Comics
Whichever genre you’ve chosen to work in, our printing services allow your story unfold in one of the best-loved mediums the publishing world has to offer. Whether you’ve settled on the style of a modern single-issue comic book or you’re drawn to the look and feel of manga volumes, PrintNinja allows you to customize your project with practically endless available options – check out the links below to see comic book dimensions for various genres.
Formats
- Modern Single Issue Comic Books
- Golden Age and Silver Age Single Issue Comic Books
- Trade Paperbacks / Graphic Novels
- Manga
- Webcomic Anthologies
Make A Modern Comic Book
This video will show you how to make a modern comic book in Adobe InDesign, Photoshop, and Illustrator. We’ve also included a transcription of the video below so that you can follow along. Enjoy!
00:00 – Introduction
Hi, my name is Sam Schauer, and I’m the prepress manager here at PrintNinja. Today I’m going to walk you through how to create a custom book template in Adobe InDesign, Photoshop, and Illustrator. For this video, I will be creating a modern comic book, but you can use this video to create a book in any custom size you’d like.
Before we get started, I wanted to go over some resources we have available on our website. First, let’s look at what the industry standards are for modern comic books. Starting from our homepage, www.printninja.com, let’s click on the Printing Resources section. From there, we’re going to look at the Printing Industry Standards section. Here, you can find industry standards for all different types of books and games. We’re going to look at the comic book section and then reference the Design a Modern Comic Book section. Here, you can see the standard comic book trim size is 6.625 inches x 10.25 inches. While watching this video, you can also reference our interior page set of guides to follow along. That’s located in the File Setup section, under Creating Your Document. Here you can find file setup guides for InDesign, Illustrator, and Photoshop. First, we will talk about setting up your document in InDesign.
01:34 – Adobe InDesign
We’ll start by opening Adobe InDesign and creating a new document. Select Print, and then enter the trim size of your book in the width and height fields. For this video, we’ll be making a modern comic book, so I will enter 6.625 inches x 10.25 inches for the page size. Next, we’re going to enter the number of pages in our file. In our file setup guide, you will see that your number of pages in your file should be the page count of your book, plus two additional pages for the front and back inside covers. However, since this will be a saddle-stitched book, I’m going to add two more pages to account for the front and back outside covers as well. For other binding types, the covers spread will be created separately, but for saddle-stitch books, the covers spread will be formatted identically to my interior pages, so I can add those pages to this document.
I’m going to make a four-page book, so I’m going to enter eight pages to account for the front and back covers, and the front and back inside covers, in addition to my four interior pages. Next, I’m going to check facing pages so I can create my artwork in spreads. I’m also going to start on page two so that all of my eight pages will be in spreads. This will allow me to create my front and back covers as one full spread if I would like to have my artwork connect across the gutter. I’m not going to add any columns to my document, but you can always adjust your columns after the document has been created, if that will help when designing the book. Following along with our interior page setup guide, I’m going to set my page margins to .125 inches. These margins will indicate the ⅛ safe zone on all sides of my spread. Any important text and graphics must be at least .125 inches inside the trim line to ensure they won’t be trimmed off during production. Lastly, I am also going to set my bleed to .125 inches on all sides of the spread. Any artwork that touches the edge of the page must extend ⅛ of an inch past the trim line to account for minor trimming variances when designing pages for offset printing. Make sure that the slug is set to 0, and then click create.
Ok, so here’s my document. I can zoom out and see that my file consists of four spreads with eight total pages. The first spread is going to be my cover spread. With the back cover on the left, and the front cover on the right. The second spread is going to be what I see when I open the cover of my book. The front inside cover will be on the left, and the first interior page, or page one, will be on the right. The third spread will be the next spread of interior pages, with page two on the left and page three on the right. The fourth and final spread will be the end of my book, with the last interior page, or page four, on the left, and the back inside cover on the right.
04:52 – Adobe Photoshop
Next, we’re going to create our document in Adobe Photoshop. We’ll start by opening Photoshop and creating a new document. Select Print, and then enter a file name for your document. Make sure to include the page number in your file name, since we will need to create a different file for each page or spread. In this video, I’m going to create my front and back covers as individual pages, and my interior pages as spreads. Therefore, I’m going to name my first file “Front Cover.” However, you can always create your front and back covers as a full spread if you would like your artwork to connect across the gutter. Next we’re going to enter the page size of our document. Unlike InDesign and Illustrator, Photoshop does not support adding bleed, so we will have to add 0.125 inches on all four sides of our page to make sure the bleed area is included in our document. Since our modern comic book will have a trim size of 6.625 inches x 10.25 inches, I’m going to enter 6.875 inches as the width, and 10.5 inches as the height. You can see that the total page size is going to be 0.25 inches larger on both dimensions than the final trim size of my book. Make sure that the image resolution, also referred to as PPI or DPI is set to 300. Anything below 200 PPI is considered low resolution and may result in a pixelated image. Next, set your color mode to CMYK. While both 8-bit and 16-bit are acceptable, most people choose to work in an 8-bit color mode. I would also recommend leaving your background content as white or setting it to transparent.
Next, open the advanced options. Always make sure that the color profile setting is set to “Do not color manage.” I also recommend keeping your pixel aspect ratio set to square pixels. Once your settings are correct, go ahead and click Create. Now I’m going to create the first interior spread of my book. This spread will contain the front inside cover on the left, and the first interior page, or page one on the right. To do that, I will go to File>New to create a new document. I am going to name this file “spread one.” This time, I’m going to set my page dimensions to the bleed size for a full spread. To do that, I’m going to double my page width, and then add the 0.125 inch bleed area on both sides. For my 6.625 inch book, that comes to 13.25 inches, plus 0.25 inches for the bleed, totaling 13.5 inches wide. My page height will remain 10.5 inches. Make sure the rest of your settings are the same as before, and click create. Now I’m going to create the next two spreads of my book. Spread two will be page two on the left, and page three on the right. Spread three will be page four on the let and the back inside cover on the right. The last document I’m going to create will be for my back cover. Once again, I’m going to set my dimensions for an individual page, which will match the settings of the first spread I created for my front cover. Now I have all eight pages of my book created as three full spreads and two individual pages for my outside covers. The eight pages consist of my front and back cover, the front and back inside cover, and the four interior pages.
09:58 – Illustrator
In the last part of this video, we’ll be going over how to create our modern comic book in Adobe Illustrator. To get started, we’ll open Illustrator, and click Create new document. Select Print, and then enter the page size of your document. For my modern comic book, I’m going to enter the final trim size of 6.6.625 inches wide x 10.25 inches tall, since that is the size of each individual page. For this video, I’m going to create my front and back covers as individual pages, and my interior pages as spreads. Next, enter .125 inches as the bleed size on all four sides of the page. Note that some earlier versions of Illustrator may not support adding bleed to your document. If that is the case for you, just make sure to add 0.25 inches to the width and height to include the 0.125 inch bleed area on all sides of your document. Next, open the advanced options settings, and select CMYK color as your color mode, and high or 300 PPI, as the raster effect settings. You can leave the preview mode as default and click create. Now I have the front cover of my document created. Next, I’m going to create additional artboards for the interior pages of my book as spreads. To do that, go to Window>Artboards to open the artboards panel. You can see that the front cover is listed as artboard one. You can also rename your artboards by double-clicking on the title.
I’m going to start by creating a new artboard. When I create a new artboard, it’s going to match the dimensions of the artboard I currently have selected. Since my first artboard is sized for an individual page, I’m going to have to adjust my artboard dimensions to create a two-page spread. To do that, I can go to the artboard tool, and select artboard two. Now I can adjust the new artboard by entering the correct width for a full-page spread. To get the full spread width, all I have to do is double my page width. Since my modern comic book will be 6.625 inches wide, the full spread width will be 13.25 inches. You can see that when I make my artboard wider, it’s now overlapping with my front cover. You can use the rearrange all button to adjust the spacing between your artboards so they no longer overlap. Now I have my front cover as an individual page, and an additional spread for my front inside cover on the left, and my first interior page or page one on the right. I’m going to create two additional spreads by selecting artboard two and clicking Create new artboard twice. Artboard three will be page two on the left and page three on the right. Artboard four will be my last interior page, or page four, on the left, and my back inside cover on the right.
I’m going to now create one last artboard for my back cover, which in this case I’ll be creating as an individual page. However, you can always create your front and back cover as a two-page spread if you’d like your artwork to connect across the gutter. In order to create my last artboard as an individual page, I’m going to select artboard one, and then click Create new artboard. I’m going to select the new artboard in the list and move it to the end to make sure I don’t get confused about which artboard is which. As I mentioned earlier, you can also rename your artboards by double-clicking the title to make it easier for you. If I zoom out, I can now see all five artboards that I have created, consisting of two individual pages for my front and back covers, and three full spreads for my inside front cover, inside back cover, and my four interior pages.
15:00 – Thank You!
Thank you for following along, and I hope the resources in this video will help you when designing your own book. As I mentioned earlier, you can use this video to create a book at any size you like. Just substitute the modern comic book dimensions with the trim size of your own book. Before I let you go, I wanted to show you where you can find our cover setup guides to help design your cover spread for binding types other than saddle stitching. Starting from the home page of our website, once again we’ll click on the printing resources section. From there, go back to the file setup checklist. Now select the book printing file setup guide, and then click cover file setup guides. Here you will find setup guides for all the binding types we offer. There are many more resources available on our website to help you with every stage of creating a custom book, so be sure to explore on your own – and you can always reach out to us by using the contact us button for any questions.
Modern Single Issue Comic Book Industry Standards
PrintNinja recommends following these guidelines to design a modern comic book.
Comic books have changed a lot since the Golden Age, both in the look of the printing as well as the feel of the paper. Modern printing techniques allow for a much wider range of color and saturation, and current comics have taken advantage of this by adding a glossy finish to the pages to allow the colors to pop more. This coating also helps preserve the comic’s quality for a longer period of time. Ultimately the feel of your comic is entirely up to you, but here are some recommendations if you wish to match the comics you see at your local comic shop.
Design a Modern Comic Book
Modern Comics
- Binding: Saddle-stitched
- Size: 6.625 inches x 10.25 inches
- Cover Paper: 85lb text gloss
- Cover Finish: Gloss varnish
- Inside Paper: 55lb gloss (DC/Marvel) or 70lb gloss (Image)
Ready to create your comic book?
Get an Instant PriceGolden Age and Silver Age Single Issue Comic Books Industry Standards
PrintNinja recommends the following standards to design Golden and Silver Age comics.
While modern comic books all follow a standard format, in the Golden Age and Silver Age comic book sizes tended to vary between publishers, which now makes collecting comic books from different publishers a worthwhile and interesting hobby to pursue. Comic books were also seen as a much more disposable form of entertainment instead of the collector’s items they have become. Not a lot of thought was given to preserving them, which was reflected in the flimsy newsprint that they were printed on. This process continued as recently as the late 90s before switching to higher quality stock. Printing on a thin, uncoated paper stock will help mimic this vintage comic feel, while still giving your comic book a sturdier structure and a longer lifespan than printing on newsprint would achieve.

Golden and Silver Age Comics Standards
We recommend keeping these standards in mind when designing Golden and Silver Age comics.
- Binding: Saddle-stitched
- Size: varies, usually closer to 6.75 or 7 inches x 10.375 inches
- Cover Paper: 70lb text
- Cover Finish: Matte varnish
- Inside Paper: 55lb text uncoated
Ready to print your comic?
Get an instant priceTrade Paperback Sizes & Graphic Novel Industry Standards
In the world of comics, trade paperbacks refer to collections of stories reprinted in a new format. Oftentimes, they encompass a single story arc adapted from an original comic book. While you’re free to apply printing options to your trade paperback project as you see fit, there are some standards many publishers choose to follow. Even though the practice of collecting comics into trade paperbacks and graphic novels is still fairly new, the widely-recognized formatting standards for trade paperbacks have changed a bit since it began.
Typically, the size of the trade paperback is designed to match the original comic collected, but sometimes smaller digest-size editions are also printed. Additionally, while older collections were printed on uncoated paper, newer volumes often feature a gloss coating.
Here at PrintNinja, we know printing trade paperbacks and graphic novels demands the utmost level of precision to create a product you’re fully satisfied with. That’s why we include so many different choices for customization. Whether you prefer gloss or matte covers, have a specific size preference, or would like to tailor your trade paperback in another way, we’re here to make your project come to life exactly as you envision it.
However, if you’re looking to emulate the most common specifications, or if you want some guidance on where to start, here are two industry standards for your consideration:

Modern Trade Paperbacks & Graphic Novels
- Binding: Case bound (hardcover) or perfect bound (softcover)
- Size: 6.625 inches x 10.25 inches
- Cover Paper: Hardcover or 10pt cover
- Cover Finish: Gloss or matte lamination
- Inside Paper: 70lb text gloss or matte
Ready to get started?
We have pre-populated our trade paperback pricing calculator with these industry standards so quoting is a breeze. You can also customize just about anything, from size to paperweight, and so much more.
Get Your Price
Traditional Trade Paperbacks
Looking for something a little more old school? Traditional trade paperbacks tend to be a slightly larger size than modern trade paperbacks, and use uncoated paper.
- Binding: Case bound (hardcover) or perfect bound (softcover)
- Size: Varies. We recommend 6.75 x 10.375 inches
- Cover Paper: Hardcover or 10pt cover gloss or matte
- Cover Finish: Gloss or matte lamination
- Inside Pages: 70lb text uncoated
Ready to get started?
We have pre-populated our traditional trade paperback pricing calculator with these industry standards so quoting is a breeze. You can also customize just about anything, from size to paperweight, and so much more.
Get Your Custom QuoteFreshly updated customer reviews from TrustPilot
Design A Manga
PrintNinja recommends keeping these industry standards in mind when you design a manga to print with us.
Manga volumes (or “tankoubon”) in Japan tend to come in a variety of sizes and formats (the most common being 5.04″ x 7.17″ or 5.83″ x 8.2″), but when companies like Tokyopop and Viz started translating them for U.S. consumption they came up with a standard size for most releases as a compromise between the different formats. The options on this page are standard for U.S. manga editions.
In addition to the standard American printing order, PrintNinja can also print your project in the reverse order common with Japanese manga. Just make sure that when you design your manga for printing, you submit your files in order as though you were looking at the volume with the binding on your left, so the first page in the proper reading order would be the last page in your PDF.

Manga Industry Standards
Keep these common features in mind when you design your manga:
- Binding: Perfect bound
- Size: 5 inches x 7.5 inches
- Cover Paper: 10pt cover gloss or matte
- Cover Finish: Gloss or matte lamination
- Inside Pages: 70lb text uncoated
Ready to create your manga?
Get an instant priceDesign A Webcomic Anthology
PrintNinja recommends following these guidelines to design a webcomic anthology.
Though they get their start online, many webcomic creators eventually reach the point where they want to collect their pages in a printed collection. Printing your webcomic in an anthology is a great way to let fans of your comics keep your comics in physical form. Webcomics come in all shapes and sizes, from four-panel comic strips to standard comic book pages to long intricate webpages. The printed anthologies mirror these formats and ultimately the size of the collection depends on what fits the original art the best. Many creators wish to mimic the look and feel of graphic novels and select their paper stocks accordingly, though oftentimes they will go slightly thicker for a sturdier-feeling book. You will have many material options when designing your webcomic anthology with PrintNinja, but we’ve listed a few particularly popular options here.

Webcomic Anthologies Industry Standards
Keep these industry standard features in mind while designing your webcomic anthology.
- Binding: Case bound (hardcover) or perfect bound (softcover)
- Size: Based on the size of the webcomic
- Cover Paper: No standard
- Cover Finish: Gloss or matte lamination
- Inside Paper: 70lb text or 85lb text, any coating
Ready to price your webcomic anthology?
Get an Instant PriceFreshly updated customer reviews from TrustPilot
Novels
PrintNinja recommends keeping the following guidelines in line when you design a novel.
The quintessential printing project, novels have evolved considerably since the first printing press. The page size tends to vary depending on the publisher but can usually be found in the range of 5.5″ x 8.5″ to 6″ x 9″ (please see our page size guide for measuring hardcover books). Mass Market Paperback books, which are usually around 4.25″ x 6.75″, are also a popular option. The paper stock also tends to be the thinnest possible for the binding type to keep costs down, since there isn’t a lot of printing on each page compared to full color art books. As with any book format, though, the specifications are not set in stone and you will always find books with their own unique size and feel – something to keep in mind for when you design a novel and print it with us.

Hardcover Novel Standards
- Binding: Case bound (hardcover)
- Size: 6 inches x 9 inches
- Cover Paper: Hardcover
- Cover Finish:Gloss or matte lamination
- Inside Paper:70lb text uncoated

Softcover Novel Standards
- Binding: Perfect (softcover)
- Size: varies, usually around 5.5 inches x 8.5 inches or 6 inches x 9 inches
- Cover Paper: 10pt cover gloss or matte
- Cover Finish: Gloss or matte lamination
- Inside Paper: 55lb text uncoated
Ready to print your novel?
Get an instant priceFreshly updated customer reviews from TrustPilot
Photography and Art Books
PrintNinja recommends keeping the following guidelines in mind when you design a photographic art book.
Books, contrary to popular belief, aren’t always pages and pages of tiny text. Photographic art books are a great option to compile your visual art and to monetize your work without having to sell individual pieces – additionally, you’ll be able to add and compile additional context to each of your pieces that you might not be able to provide otherwise. They can also be a great accessory to gallery stints or to go alongside exhibits. Popular in museum gift shops, they can be a great souvenir to remember a specific museum visit by. Plus, they serve as great decorations for your home.
This industry standards section highlights book genres with a higher photo to text ratio – these types of books, obviously, have a slightly different production process and different design considerations than other types of printed material, like novels. Select a type below to help choose your book’s size, material, and binding, and to learn what you need to understand when you design a photographic art book.
Photographic Art Book Types
Freshly updated customer reviews from TrustPilot
Photography Book Industry Standards
PrintNinja recommends keeping the following guidelines in mind when you design a photography book.
A picture is worth a 1,000 words – which means photography books speak the loudest! These books contain full-page photos with very little text other than bylines, the name of the artwork and location. As with any type of art, there are many creative directions you can go in and that holds true with photography books when it comes to finishes and size – a photography book can be just as beautiful as the photos it contains within it. We can help you print the photography book of your wildest dreams! However, if you still want some guidelines, below we’ve assembled the few industry-standard specs that photobooks have.

Photography Book
Photography Book Standards
- Binding: Case bound (hardcover)
- Size: Close to square to easily include both horizontal and vertical photos
- Photo shows 9.125 inches x 8.225 inches.
- Cover Finish: No Standard Finish
- Gloss makes full color photos pop, but photo shows a matte finish.
- Interior Paper Weight: 105lb text
- Interior Paper Coating: No Standard Coating
- Gloss makes full color photos pop, but photo shows a matte coating.
Do you already know your book specs?
Get an Instant PriceFreshly updated customer reviews from TrustPilot
Art Book Industry Standards
PrintNinja recommends keeping the following guidelines in mind in order to design an art book.
Art books are as unique as the artists themselves so it is difficult to agree on a standard, especially since most artists strive to work outside of the box! Generally, art books are a collection of an artist’s work. These books make the perfect portfolios as they are portable, interactive, and easily shareable. Many art books use specialty cover, paper, and packaging features because the book is a work of art in itself.

Hardcover Art Book Standards
- Binding: Case bound (hardcover)
- Size: No standard size, photo shows 12.5 inches x 9 inches
- Size can be landscape or portrait.
- Cover Finish: No standard finish
- Interior Paper Weight: No standard text weight
- Interior Paper Coating: Gloss
- Gloss makes full color photos pop.
- Dust Jacket

Perfect Bound Art Book Standards
- Binding: Perfect (softcover)
- Size: No standard size, photo shows 11 inches x 8.5 inches
- Size can be landscape or portrait.
- Cover Finish: No standard finish
- Interior Paper Weight: No standard text weight
- Interior Paper Coating: Gloss
- Gloss makes full color photos pop.
Ready to create your art book?
Get an Instant PriceFreshly updated customer reviews from TrustPilot
Coffee Table Book Industry Standards

A coffee table book is an outstanding medium for showing off some of your most eye-catching visuals. Typically, coffee table books consist of photographs, illustrations, or art accompanied by small amounts of text. For photographers, landscapers, architecture firms, and similar types of specialists, these stunning oversized hardcovers are must-have business tools that can boost sales and inspire clients. They’re also a great way for independent creators to sell photography or artwork. Using the standards outlined below, PrintNinja can turn your collection of images into a captivating coffee table book to enchant your customers, visitors, or anyone else in your network.
Recommended Specs for Coffee Table Books
- Binding: Case bound (hardcover)
- Size: Oversized (larger than 8.5 x 11)
- Cover Finish: Gloss lamination
- Interior Paper Weight: 105lb text or 135lb text
- Interior Paper Coating: Gloss
- Dust Jacket
As with all of our projects, the standards listed here are provided as a guideline to help frame your printing decisions. Additional specialty printing options, such as embossing and foil stamping, are also available to help your most striking focal points pop off the page. Or, if you’d like to deviate from standard sizing, you can do so without having to worry about extra fees for custom trims. Cover features, including finishes, stock options, and accessories such as dust jackets, allow you to further customize your coffee table book to flawlessly capture the spirit of your project.
No matter which options you settle on, you can rest assured your end product will be a visually stunning collection of larger-than-life images. PrintNinja proudly offers offset printing, by which colors deeply saturate the page to do your artwork or photography the justice it deserves. Coupled with full bleed, which takes your images all the way to the edge of the page at no extra cost, our exceptional print quality will lend itself to the perfect conversation-starter to support the interests of your business, side project, or hobby.
Ready to create your coffee table book?
We have pre-populated our coffee table book pricing calculator with these industry standards so quoting is a breeze. You can also customize just about anything, from size to paperweight, and so much more.
Get an Instant PriceFreshly updated customer reviews from TrustPilot
Cookbook Industry Standards
PrintNinja recommends keeping the following guidelines in mind when you design a cookbook.
Cookbooks contain collections of recipes. Most have a theme, such as barbeque 101, easy noodle recipes, or Emeril Lagasse’s kitchen. Many traditional cookbooks are bound with spiral or wire so the book can lay completely flat when open – a convenience that’s much appreciated when you have an overflowing measuring cup in one hand and a sauce-covered spatula in the other. Modern cookbooks have “kicked it up a notch” with hardcover or perfect binding and expanding on the basic premise of recipes by adding photos, ingredient shopping tips, preparation tricks, and commentary. Printing your own cookbook is a great way to compile a series of recipes – perhaps from your restaurant, or from your blog. Here are some design tips to make sure your cookbook is both functional and beautiful:

Traditional Cookbook
- Binding: Spiral or wire
- Size: No standard size
- Cover Weight: 10pt cover
- Cover Finish: Gloss lamination
- Interior Paper Weight: 70lb text
- Interior Paper Coating: Uncoated

Modern Cookbook
- Binding: Perfect (softcover) or case bound (hardcover)
- Size: No standard size
- Cover Finish: Matte varnish
- Interior Paper Weight: 70lb text
- Interior Paper Coating: Uncoated
Ready to create your cookbook?
Get an Instant PriceFreshly updated customer reviews from TrustPilot
Jigsaw Puzzles
PrintNinja recommends keeping the following guidelines in mind when you design a jigsaw puzzle.
Jigsaw puzzles are an enjoyable pastime for children and adults alike to test their ability to understand context clues using mere fragments of color. In the old days, jigsaw puzzles were created by painting directly onto a flat wooden board and then cutting that board into interlocking pieces with a jigsaw. Nowadays, however, puzzles are manufactured by glueing or laminating large image prints to sturdy greyboard that is then die-cut to create those same interlocking pieces. The pieces are usually packaged together in a plastic bag that is placed inside of a large cardboard box with the completed image printed on the front for reference. The difficulty of a puzzle tends to increase dramatically with the number of pieces, as well as the intricacy of the image, so leave the 1000 piece sets to the adults – something to keep in mind when you design a jigsaw puzzle.

Jigsaw Puzzle Standards
- Size: Contingent on puzzle piece number
- Material: 1.5mm greyboard
- Finish: Matte linen or matte lamination finish
Sample Sizes
- 100 Piece Size: 15″ x 10″
- 200 Piece Size: 16.1″ x 10.8″
- 500 Piece Size: 19.7″ x 15.7″
- 1000 Piece Size: 27.6″ x 19.7″
- 1500 Piece Size: 31.5″ x 23.6″
- 2000 Piece Size: 39.4″ x 27.6″

Jigsaw Packaging
Box
- Size: Contingent on puzzle size
- Material: 1.5mm paperboard or cardboard
- Finish: Matte linen or gloss lamination finish
Plastic Bag
- Size: Contingent on number of pieces
- Material: Clear plastic
Are you interested in printing a custom jigsaw puzzle or packaging?
Contact UsFreshly updated customer reviews from TrustPilot
Schoolbooks
PrinNinja recommends keeping the following instructions in mind in order to design a schoolbook.
Schoolbooks, educational textbooks, and annual yearbooks, are a part of everyone’s school and learning experiences. That means it’s important to get their design right! If you’re looking to print textbooks or yearbooks for your educational institute, you’ve come to the right place. You’ve probably noticed these books have a standard size, and they even have common paper and binding that you can find below – following our guidelines will help you make your schoolbooks look like they belong on the bookshelf of any classroom or library. We recommend printing your books in either softcover or hardcover formats – depending on the use of your book: for instance, textbooks can be either softcover or hardcover, while yearbooks tend to be hardcover – something to keep in mind when you design a schoolbook.
Even though schoolbooks have standard designs, that doesn’t mean they have to be boring! There are ton of special features that you can add to your schoolbooks to make your textbooks or yearbooks stand out from the crowd. No matter what type of schoolbook you’re printing, we can help. Read on to learn how to design a schoolbook.
Schoolbook Industry Standards
Freshly updated customer reviews from TrustPilot
Textbooks
PrintNinja recommends keeping these guidelines in mind when you design a textbook.
Textbooks, also called schoolbooks or course books, are typically used in the educational system as a teaching tool and generally contain more text than photos, depending on the subject matter. While the text is important, oftentimes, the photos are just as important, even if there are less of them – the photos may be diagrams or charts, or they may include visual content that is hard to describe through words only. They usually take the form of a hardcover or perfect-bound book, and they tend to have a very high page count. The standard size for textbooks varies widely, but you will find two examples below. Whatever you want your textbook to look like, PrintNinja can help you get your final product looking fantastic. Read on to learn how to design a textbook!

Hardcover Textbook Standards
- Binding: Case bound (hardcover)
- Size: 9.3 inches x 6.3 inches
- Cover Finish: Uncoated
- Dust Jacket
- Interior Paper Weight: 55lb text
- Interior Paper Coating: Matte

Perfect Textbook Standards
- Binding: Perfect (softcover)
- Size: 9.5 inches x 8.2 inches
- Cover Finish: Gloss lamination
- Cover Weight: 10pt cover
- Interior Paper Weight: 55lb text
- Interior Paper Coating: Gloss
Freshly updated customer reviews from TrustPilot
Yearbook
PrintNinja recommends keeping the following guidelines in mind in order to design a yearbook.
Yearbooks are annual records of school accomplishments, highlights, and the students themselves. They not only serve as fun reminders of the school year, but are also important records of the school’s history. They are often large casebound books so they can stand the test of time on the shelves of proud alumni. Yearbooks also offer a great opportunity to use specialty options, like embossing, foil stamping in a variety of colors, or faux leather. Read on to learn how you can design a yearbook that alumni will fondly look at for years to come!

Yearbook Standards
- Binding: Case bound (hardcover)
- Size: 8.5 inches by 11 inches
- Cover Finish: Gloss lamination
- Specialty Options: Embossing, gold foil stamping, and faux leather
- Interior Paper Weight: 105lb text
- Interior Paper Coating: Gloss
- Interior paper is typically glossy to make the photos pop.
- The endsheets are uncoated so students can write easily
Like What You See?
The best way to start planning your yearbook project is by using our instant price calculator. Don’t forget to save your quote! It’s valid for 90 days.
Get StartedFreshly updated customer reviews from TrustPilot
Beyond Printing
PrintNinja has plenty of resources that go beyond the printing basics. Here, you’ll find a variety of helpful tools to help you with everything post and pre-printing. These resources will be especially helpful to you as you move into the final stages of your printing project.


Not quite ready for advanced concepts yet? Don’t worry – we have plenty more information on the basics of offset with PrintNinja in our Printing Academy section – think of it as a primer on everything you need to know to understand how your project will be created when you choose PrintNinja. There, you’ll learn everything you need to understand the offset process – from information on the difference between CYMK and RGB color structure, to what a press actually looks like, to how your order will be shipped out and fulfilled. At PrintNinja, we want to be transparent with our customers about the process – because the better you understand the process, the smoother your project will go!
The Self-Published Author’s Guide to Finding a Children’s Book Illustrator
Combining narrative and imagery unlike any other medium, children’s books have the potential to captivate and inspire readers both young and old. Finding an illustrator to bring your vision to life, however, can be a different story entirely. We’re here to help guide you through every step of the way, from finding an illustrator to negotiating a contract.
How do you find an illustrator?
With the rapid growth of self-publishing and online resources, it’s now possible to find freelance artists entirely online. Two great places to start are the Society of Children’s Book Writers and Illustrators and ChildrensIllustrators.com. Both include online portfolio directories that you can browse by style, medium, topic, and even region to find excellent illustrators for hire.
With so many options at your fingertips, the question is not where to find illustrators, but how to choose. It’s important to know what you’re looking for. This may seem backward—you’re not an artist, how can you know what kind of art will work for your book? But knowing what you like will focus your search and ensure you get the results you want.
Paint, pencil, pen—each medium has a different look and feel. Browse your local library to see if you’re drawn to any specific medium. Then consider the different artists’ styles, which Bradley defines as that “difficult-to-define thing that makes the work of one illustrator different from others.” It’s what makes a fairy tale feel different than an ABC book. The key will be to find an artist working in a medium and style that feels right for your story.
How much does it cost?
The short answer is, it depends! There’s no hard and fast rule. Illustrators’ rates are based on their experience and training as well as the amount of time and materials involved. In order to properly estimate your project, you’ll need to know how many illustrations you need which will depend on the number of pages in your project. (Use our guide to page counts to determine the number of pages you need in your book.)
You may be thinking, okay, that’s all well and good, but how much does it actually cost? Bestselling author Joanna Penn estimates that the average pay for a 32-page picture book is $3,000 – $12,000, meaning a 32 page book with 20 illustrations equates anywhere from $150 to $600 per illustration. Publishing expert Anthony Puttee estimates a slightly lower standard rate of about $120 per illustration. It really depends on your illustrators hourly rate and the number of hours it takes for them to complete an illustration, which will depend on the complexity of what you’re asking for. It’s also worth noting that an illustrator who is willing to work at an extremely low rate is not likely to provide the quality and professionalism you want for your project.
Nuts and bolts: getting the contract right
“A contract,” says literary agent Susan Hawk, is “the best way to make sure that the agreement between author and illustrator is clear.” The contract lays out exactly what you’re getting for your money, how you’ll be working together, and what will happen if anything goes south.
The core of your contract is the project schedule. This should include the exact date for each deliverable, the payment schedule, and a plan for what will happen if a deliverable or payment is late. Don’t forget to specify feedback periods and the exact number of revision rounds expected.
Your contract will also cover legal details like crediting, copyright, and royalties. In self-publishing, the author usually pays a flat fee for the illustrator’s services, rather than ongoing royalties. When the project is complete and payment has been made in full, the contract specifies that the copyright for the images is transferred to the author to publish, market, and sell their book. The artist may retain some rights to use the images in their portfolio or website. There’s usually also a clause stating that if illustrations are reused for other products, such as merchandise, the illustrator gets a certain percentage of the profits as royalties. The contract will also usually include crediting, such as requiring that the illustrator’s name appear on the book cover.
If you’re feeling overwhelmed by the legal details, Jeanette Bradley provides a useful sample schedule and contract to help you out. It’s perfectly okay to negotiate different details with your illustrator, as long as it’s all spelled out in the contract.
Keys to a fruitful partnership
“Illustrators think in pictures,” Jeanette Bradley says, while writers think in words. This sentiment describes the potential difficulty of explaining your artistic vision and why it’s extremely important to work collaboratively. It’s great to meet in person if you can, so that you can both point and gesture when words fail. If not, use technology: if you just can’t quite picture what your illustrator is describing, ask them to make a quick sketch, snap a picture, and text it to you.
Do try to be as concrete as possible. In constructive feedback, every detail you can give is helpful. Bradley gives a useful example: instead of saying “I don’t like this page,” you might try, “I’m not sure what is bugging me about Grandma on page 10, but she feels a little creepy to me.” Giving your illustrator constructive feedback early on will help guarantee you’re satisfied with the results.
Joanna Penn offers some important final advice: “Trust in the illustrator you hired to breathe life into your story.” Constructive feedback is important, but confidence and a degree of creative freedom will go a long way toward fruitful collaboration.
How long will it take?
Expect the process to take a minimum of 3-4 months for a 32-page picture book. If you have a tight deadline, expect the overall cost to go up accordingly. “Allowing at least 6 months for the illustration process is a reasonable time frame,” Jeanette Bradley says. Busy illustrators or those who work in more time-intensive mediums may require longer. Once you start, the contract will be critical to keeping your project on schedule. That’s why every deliverable—including your feedback and revisions—needs to be accounted for.
Design considerations
Consider the final design of your book from the start. It’ll help you calculate your overall budget, and it will help ensure that your contract with your illustrator is clear and complete. Our handy calculator will help you estimate how factors like page size and finish can affect the overall cost of your project.
Be sure you know how you want the text to integrate with the illustrations. If your text will simply sit under each image, you’ll probably be able to lay the book out yourself in software like InDesign using our detailed tutorials. If you’d like your text integrated within your illustration communicate with your illustrator what you’re envisioning.
Likewise know if your illustrator is going to digitize their artwork or mail you physical copies that you’ll digitize yourself. When you submit your files, you’ll want to make sure the color is optimized from print. Review our offset color requirements for any questions or concerns you may have.
Picture books have been proven to play an important role in child development, fostering imagination and building reading skills. Vivid illustrations will not only engage kids, they’ll also help sell your book. Hiring the right freelance illustrator is an important investment in your success, and you shouldn’t feel overwhelmed at the prospect. We’re here to help every step of the way, so get in touch today.
Crowdfunding Toolkit for Games
Crowdfunding can be overwhelming for first-time creators – that’s why we’ve put together a crowdfunding toolkit to help you plan, launch, and execute your campaign.
Crowdfunding is an excellent way to get your game funded, build a list of pre-orders, and take your board or card game to market. Most of the resources in our crowdfunding toolkit focus on Kickstarter because it’s a strong marketplace for new games—games attract more money on Kickstarter than any other category. But choosing a platform is an important decision, and it’s not one-size-fits-all. Before you get started, this article from The Crowdfunding Formula offers a helpful breakdown of the differences between Kickstarter and Indigogo. We recommend reading it and considering the options carefully before making a final decision.
Ready to get started? We will guide you every step of the way, all the way from calculating your funding goals through delivering your final product.
Want to take this information on the go? Download this content as an Ebook to read on your tablet.


Kickstarter Marketing Basics–How to Drive Traffic to Your Campaign

Once you’ve done the work of creating your campaign page, it’s time to get to work on marketing your Kickstarter.
After you launch your campaign, you’ll have just a matter of days to hit your goal. Attracting backers, convincing them to donate, trying to get media attention and social media shares will take a lot of upfront work.
Most of your Kickstarter marketing work should be done well in advance of your launch date. A successful start increases your chances of being promoted by Kickstarter as a popular campaign, which is free advertising to other Kickstarter visitors. Additionally, early backers will stay engaged through your updates and share your campaign with their friends and communities.
Marketing your Kickstarter campaign begins months before the launch itself, and we’ll walk you through the important steps you should take.
Create a Landing Page
A landing page is a website where you can direct traffic during your campaign’s lifespan. Your landing page is essential for building excitement before you launch, and selling after your campaign finishes.
There are plenty of inexpensive, no-code-required website building tools with beautiful landing page templates, including Wix, Squarespace, Launchrock, and Shopify. Choose a short, easy-to-remember domain name, like yourgame.com. Get your landing page running as early as possible, ideally at least three months before launching your campaign. That way, as you tell friends, family, and strangers about your game, you have somewhere to send them. Having a strong homepage is an essential part of Kickstarter marketing.
Tips for Landing Page Design
Above all, keep it simple. The more unnecessary clutter is on your landing page, the less likely it is that visitors will do what you want them to do: join your mailing list or contribute to your Kickstarter.
No matter what your brand, style, or experience level is, try these top tips to make an effective landing page:
- Keep your page as simple as possible. Usability is more important than the look of your website. A single, scrolling page is plenty and will keep visitors from getting lost in complicated navigation.
- Simple color schemes work best, and a white background always looks great.
- White space (empty space on the page) helps visitors stay focused and highlights your most important content.
- Choose a maximum of two fonts, one for your headers and one for the rest of your text. A good rule of thumb is to have one serif font, and the other sans serif. You can also just trust the designer of your site template and use the default fonts they’ve chosen.
Let’s look at a real-world example, Utter nonsense!, and break down their page elements:

- Catchy Header: “Utter Nonsense is a card game where players combine silly accents with even sillier phrases to create sayings that are just plain ridiculous.” It tells you what the game is, gives a general sense of gameplay, and makes you want to learn more.
- Product Description: Each version of the game gets a concise description, and the game rules are listed near the bottom of the page to give a sense of gameplay.
- Call-to-Action: Because the game is already on the market, the primary CTAs are all for purchasing: “Shop!” in the top menu bar, and “Buy Now” next to each game edition.
- Design: The entire page matches the design of the game itself, with the game illustrations worked into the page. The simple color scheme – white, grey, and yellow – and uncluttered design make it easy to find important information and CTAs.
- Other elements: Links to reviews, press information, events, and social media, are all included but less prominent than the game description and CTAs. The page content and game descriptions are irreverent, reinforcing the character of the game.
Maximize Your Email Sign-Up
Until your Kickstarter launches, the number one goal of your landing page is to capture email addresses. Incentivize visitors to join by offering a free downloadable copy of the game, an early-bird special, insider access to your creative process, or entry for a chance to win your game after it launches. After they sign up, give them a chance to share the page on social media or email it to a friend. Remember, the easier it is, the more likely it is that they’ll do it. The more emails you collect, the more people you can reach out to when you’re ready to launch.
Getting the Word Out
Once you have a landing page, you’re ready to start spreading the word about your game. There are plenty of avenues to get your game in front of different audiences, and you should have a strategy in place and the work done well before your launch. Remember, once you have your landing page you are ready to market as much as possible, to get people interested and signed up well before your campaign launches.
Gaming Communities
If you’re involved in a gaming community, whether online or in person, use it as a platform to bolster both financial and promotional support. As a general rule of thumb, don’t join a gaming community solely for the to promote your game, and don’t ask for anything you wouldn’t give to another member of the community.
Local hobby stores often have board game nights where you can meet people who love games and learn what their tastes are. Online communities like Indie Game Alliance are another great option. Ask group members to playtest your game and give feedback: getting people involved early may make them feel invested in your game and more likely to give or help promote it later.
Treat Kickstarter as a community as well, and spend time getting to know other Kickstarters and donating to your favorites. When people look at your campaign, they’ll see that you’ve been active, and it’s also a great way to get to know what other successful campaigns are doing right.
Social Media
Social media is a great promotional tool for getting organic, unpaid interest, as well as reaching strangers with similar interests through paid advertising. Just like your landing page, your game pages and posts should be succinct and eye-catching.
These platforms work best if you’re already active and have built a following. If not, providing consistently high-quality content is important for attracting and engaging followers. Don’t promote your game with every post; instead, use the 7:1 rule. For every seven third-party posts (retweets or article shares), you can have one promotional post.
Tweets have short lifespans: within a few minutes, your tweet may not be visible on a follower’s feed without scrolling down. Post frequently, but make sure your content is interesting enough that followers won’t get annoyed and unfollow you. Aim for six or seven tweets per day and always include a photo if applicable.

Here are some examples of game makers with great Twitter content:
It can be difficult to generate reach on Facebook without paid advertising. The algorithm that creates Facebook newsfeeds for your followers prioritizes the content that they’re most likely to interact with, so a new post might not reach them if they’re not already liking or sharing your content. The rule on Facebook is quality over quantity. You want to get as much engagement as possible on each post – likes, comments, and shares – to increase the likelihood that more of your fans will see it.
If you want to dive deeper into Facebook marketing for your Kickstarter, start with this article on boosting your organic reach.
Media and Press
Media attention can be helpful, but it requires a lot of work. Be ready to invest time to find the right media outlets, establish a connection, and then leverage that press coverage.
Research
First, pinpoint the outlets you want to reach out to. They might be a mix of traditional media outlets, blogs, and thought leaders, those authoritative people in your market who have large individual followings.
No matter what, they should be relevant to your project and have a high readership. This includes gaming sites, but you should also think outside the box. If your game has a theme, try to find sources that aren’t gaming specific, but are obsessed with zombies, cats, dwarfs, or whatever else your game is about.
Always read the sources you’re interested in to understand what stories they find newsworthy and what their perspective is. Follow them on social media and engage with them in a genuine way. Instead of writing “Great post!”, contribute to the conversation.
Build a Relationship
Journalists get plenty of pitches every day. Try to connect with them outside of the inbox to maximize your chances of getting their attention when you do pitch. Blog comments and social media are great options, as are trade shows, events, and networking parties. Meeting face-to-face sets you apart from the crowd.
Make an Offer
The best way to get noticed is to provide the journalist with something that will help them. Instead of simply pitching your game, present a newsworthy topic that fits the journalist’s interest. For example, if you consider yourself an expert in making games, offer your time for an interview on a specific part of the process that might be interesting to them.
You should also offer anything you have that they might want. Do you have a large following who you could share the article with? Do you have a website where you can link to the author’s page? Do you have a blog where you could trade a post for a post?
No matter how strong your offer is, be sure that you make it as easy as possible for the journalist to follow up. Send them a concise media kit that answers all the basic questions they may ask about your game and your campaign, including key dates, goals, and website links.
Four Hour Work Week has a handy Kickstarter prep article about reaching the press, including the free templates that helped make their Kickstarter successful.
Game Reviewers
Game reviews can be a great way to promote your game. Find sites that are reviewing games similar to yours, then request a review, hopefully timed to support your Kickstarter launch: on launch day, or, if you have multiple reviewers, spaced throughout the campaign. You’ll need to send a prototype, so be sure you have enough on hand to accommodate all of your reviewers.
Written Reviews


Video Reviews


Paid Reviews


Friends & Family
Friends and family are a great resource, and you shouldn’t feel shy to ask for their help. Send an email letting them know that you’re about to launch and why you’re excited about your project. Instead of asking for pledges, ask them to help promote your campaign. Make it easy for them by including a sample post, a link to your landing page, and a great photo of the game.
Kickstarter Updates
If you’ve successfully built up your mailing list and social media presence, you’ll get a lot of backers in the first few days of your campaign. After that, activity can drop off quickly, and updates will remind your backers about your campaign and encourage them to promote it to their social networks, friends, and communities.
Your updates will go out after your campaign launches, but should mostly be planned before you begin. Kickstarter shared a list of 50 ideas to get you thinking. Create a calendar of updates that you’ll want to send in the first few days, middle, and end of your campaign, as well as when you approach specific goals: certain percentage marks, your funding goal, and your stretch goals. Then write them out, add photos, and proofread. In the middle of the campaign, you’ll only have to copy and paste them into Kickstarter and hit send, freeing you up to focus on answering messages and promoting on social media.
Are you ready to launch? Your traffic checklist.
By the time you launch, you should have already done a lot of homework on Kickstarter marketing. These steps don’t just make your life easier, they increase the chances that you’ll hit your goal.

Image courtesy of Essayontime
Landing Page
- 1. Live landing page, for at least three months
- 2. Clear “join mailing list” call-to-action
- 3. “Thank you for subscribing” auto-email and social media share button
- 4. Curated email list from everyone who signed up on your landing page
Social Media
- 1. Active social media accounts, for at least three months
- 2. Pre-written social posts you plan to share during your campaign
- 3. Active engagement with media and thought leaders
Media
- 1. List of media outlets and journalists that fit your game’s theme
- 2. Actively engage with your list through social media and attending events
- 3. Personalized written message to send far in advance of your launch
Reviewers
- 1. List of reviewers that fit your game’s theme
- 2. Personalized email to send to each reviewer far in advance of your launch
- 3. Game prototype(s)
- 4. Calendar to make sure all your reviewers get a chance to interact with your prototype
- 5. Calendar of your ideal dates for each reviewer to publish their review
Pre-Written Updates
- 1. Basic Kickstarter updates to keep backers excited and in the loop
Other
- 1. Email to send to your team with instructions on how to promote the Kickstarter and of course thanking them for all their help!
- 2. Press Release
Download this content as an Ebook and read on your tablet.
Determine Your Kickstarter Funding Goal
If you’re still struggling coming up with your Kickstarter budget, we can help – this article is a comprehensive tutorial on how to determine your Kickstarter funding goal.
Calculating your Kickstarter budget can be one of the most difficult parts of crowdfunding. To succeed, you need to set a funding goal that will cover your expenses. Without an accurate estimate of all of your budget, unforeseen costs could sabotage your success. We’re here to share our expertise on planning project costs and help you estimate your Kickstarter funding goal step by step.
Use our Kickstarter Calculator
Get a head start on actualizing your budget using our handy Kickstarter Calculator. You can input your estimated production costs, reward tiers, shipping costs, and other details as you go. We’ll combine that information with other resources, like the average distribution of backers and the average number of international backers, to estimate your total goal.

Collect quotes–lots of quotes.
The first step in estimation is finding out how much your game will cost. Determine what components your game includes, whether it’s cards, a game board, or other pieces. Then ask for quotes with a variety of units—500, 1,500, 2,000—to determine the breaking point at which your per-game cost is feasible for your customer. Start by getting your price for your custom game from our quote form.
A smaller order will have a higher per-unit cost, and a larger order will have a lower per-unit cost. Let’s say the 500-unit cost is $19.50 per game, while the 2,000-unit cost is $10 per game. Your game will be much easier to sell at the lower cost, and knowing your minimum manufacturing quantity will help you set your overall campaign goal: you’ll need $20,000 to cover manufacturing 2,000 copies, plus the additional costs of shipping, other rewards, and everything else you’ll need (don’t worry, we’ll go over each one of those in detail!).
When you request a game quote from PrintNinja, your quote is broken down by component. Take a look at what pieces are most expensive, and decide whether you need to adjust. For example, if a single piece is driving up the cost too much, you might swap it out for another material.
Estimate Shipping Costs
It’s easy to forget, but shipping adds up fast. You can always select to have the backer pay shipping, but most of our creators prefer to advertise free shipping and work the shipping cost into the overall price of the reward. Backers like seeing the total number upfront, rather than being surprised by a shipping cost after they’ve selected their reward.
Start with the most expensive item to ship, and calculate that cost:
Packaging + Handling Fee + Postage = Total Shipping Cost
Weight is the biggest factor, followed by size. Rewards that can fit into your game box or even be printed on the box itself will significantly cut shipping costs. Inexpensive to ship ideas include art posters, extra cards, extra miniatures, specialty printing (like foil or glow-in-the-dark), or working the backer’s likeness into the game as a character.
Make a list of the packing supplies you’ll need and their costs: boxes, bubble wrap, packing tape, labels, stickers, and anything else you may need.
Then, look at shipping costs. If possible, assemble a sample box for each reward tier. Pack them up, weigh them, and calculate your postage costs using the USPS postage calculator. Be sure to double check whether postage rates are set to increase within your production timetable and factor that in. If you’re interested working with an external fulfillment partner, continue reading in our shipping to backers section.
Find Your Magic Number

Subtract the money you’ll never see.
Kickstarter applies a fee of 5% of the funds you raise, plus a payment processing fee of a little over 3%. Depending on your location and what you raise, there may be taxes to factor in as well. To be safe, assume that roughly 10% of the money you raise will never reach your bank account.
Add it all up.
Add up the cost of producing your board game and bonus rewards, the cost of packing materials, your estimated shipping costs, and Kickstarter fees, and you’ll have a rough total for your funding goal. Again, this is where our Kickstarter Calculator can help ensure you’re not missing any costs.
Once you have a rough estimate, continue to research. Look at similar Kickstarters, including successful and unsuccessful campaigns. How does your goal compare? If your calculated goal seems reasonable, it never hurts to round up for a little extra padding. If your goal is higher than what similar campaigns tend to achieve, you may need to consider finding ways to lower costs and recalculate. It’s important to be flexible and focus on what will make your campaign most likely to succeed.
Download this content as an Ebook and read on your tablet.
Kickstarter Reward Ideas
If you need some great Kickstarter reward ideas, we’ve got you covered. Read on to find out how to determine the best rewards for your campaign.
If you look at the most successful tabletop game campaigns on Kickstarter, you’ll find the common denominator is well-executed reward tiers. Creators who are new to Kickstarter often believe they’ll see better results by offering as many reward tiers as possible. If there’s an option that exactly suits every potential backer, you’ll maximize the number of backers you get, right?
Studies have shown that too many choices paralyze buyers and make them less likely to make a purchase. We recommend limiting your rewards to about five relevant, low-maintenance options.
Learn from the Best
Now that you have a rough estimate of your production cost for the game itself, you need to determine the structure of your reward tiers. We looked at 20 successful board game and card game Kickstarter campaigns to get a sense of the average distribution of tiers. This is a small sample, but it’s a good way to get started. We encourage you to research successful campaigns for games similar to yours to get a sense of how backers in your category tend to spend.
- First takeaway: You don’t need a huge number of reward tiers. The average campaign offers five, but three or four are plenty. Focus on quality of reward, not quantity of tiers.
- Second takeaway: $25 is the most popular reward size on Kickstarter. There are a lot of people willing to spend that much on a reward, and it’s a fair price for most games.
Now, let’s dig a little deeper into what we found:

In the 20 board and tabletop games we looked at, 90% offered a tier between $21-$30, 75% offered a tier between $11-$20, and 85% offered a tier between $1-$10. This is a small sample of campaigns, but indicates that most rewards are on the less-expensive end of the scale.
Some campaigns also offered a higher tier reward in the $71-$80 range, and a few offered an even more expensive luxury tier.
Based on our (small sample of) data, we’d recommend four tiers in these ranges:
- $1-$10
- $11-$20
- $21-$30
- $91-$100
Do what makes sense for your campaign and your audience. Most backers are willing to spend $11-$30 on a game, but not every game can reasonably be manufactured and sold at that price. Use this data and insights from Kickstarter games similar to yours to predict the distribution of backers you can reasonably expect.
Costs to Consider
It’s easy to come up with a long list of potential rewards for your campaign: t-shirts, patches, buttons, stickers, posters, bobbleheads. The difficult part is narrowing down that list to rewards that will make sense for your campaign. There are two sides to the problem: figuring out what rewards people will want, and figuring out what rewards you can afford to produce.
Product Cost
Start by getting quotes from custom printers or manufacturers. Keep in mind that producing small quantities of any product will have a higher per-item price tag, but producing large quantities might leave you with leftovers. Keep your list of rewards short. As you plan, keep in mind that each reward will need to sell in high enough quantities to cover production costs.
Shipping
Try to limit yourself to rewards that can ship inside of your game box, or at least in the same package. If you need to ship two packages to the same address, you’re wasting time and resources. Get creative by offering rewards that enhance the game’s appearance, like specialty foil or glow-in-the-dark printed editions.
Next, estimate how much it will cost to ship each reward based on the weight it will add to your package. You can keep track of shipping costs using our Kickstarter Calculator.
Time and Labor
Be realistic about how long it will take to hand-make rewards. Limit handmade rewards by quantity, or price them in high enough tiers to justify the time investment.
Target Your Audience
Once you’ve got a sense of what rewards you can afford, consider your audience. Who are your backers? Depending on your game and target audience, your potential supporters will have different reasons for backing you. Come up with a strategy that satisfies each of those groups without overextending and offering too many rewards.
Don’t forget you created your campaign so you could make a game. Your game should be the backbone of your rewards structure, with the rest of the rewards designed around it.
Five Kickstarter Reward Ideas
Ready for some specifics? These rewards will keep shipping costs low, keep your campaign simple, and cover all your bases with different groups of backers.
Digital gratitude
Some friends will want to just throw in a few bucks. Be sure you have an inexpensive reward that shows your appreciation without too much work on your end, whether it’s an email, a thank-you list on your website, or a digital copy of your game which can be print and cut out to play.
Your Game
Most backers who fund your project will do so because they’re interested in your game. Make it your main reward, at an accessible price that covers your production and shipping costs.
You can expand on this reward by adding multi-packs, variations, or expansions as higher tier rewards. Some popular games offer exclusive Kickstarter editions, which urges backers to act fast.

Exclusive Access
Kickstarter backers tend to be early-adopters who like to support artists and creators, and offering them exclusive access can be a great incentive. A behind-the-scenes blog, exclusive live stream, or private event welcomes backers into your creative process and personalizes your game, making them more likely to remember you and back your future projects.

Original Art
Original art can be powerful, incorporating your backers into your process and producing a unique memento. Exclusive sketches and drawings are a low-cost option, but be sure to estimate how much time it will take.
Creating a character based on a backer is a popular top-tier reward in tabletop games. had great success with a $399 “Become a hero!” reward. If you’re the artist, you pay for your material and time. If you’re not the artist, factor in paying your artist a fair price for their additional work.
Carefully Considered Merchandise
Creators often go straight to merchandise, but it’s the most difficult type of reward to get right. Friends and family might buy and wear your t-shirts as a sign of support, but garnering the same kind of support from a wider audience may be tricky. On top of that, design, printing, and shipping costs tend to be high, especially if you have to order a smaller quantity. Include merchandise only if you’re confident that it’s well-designed, won’t break the bank, and is something your backers will want.
Our Sample Reward Structure
It’s tempting to create reward tiers that seem like your backers are getting a lot for a small contribution, but reward tiers are designed to incentivize your backers and to help provide you money to fund your game. Be unapologetic about covering the cost of your game and rewards, and factor in packaging and shipping costs.
We’ve given you a lot to think about, but looking at a sample structure can help clarify your ideas. Remember, this is just a guideline, and your campaign should be customized based on your costs, audience, and strengths.

$1: Digital high-five.
A digital-only reward for people who are interested in supporting you without the commitment.
$15: Your game.
A copy of your game without all the bells and whistles.
$25: Your game + an expansion pack.
Maybe that’s an extra deck of cards or extra character pieces.
$80: Special limited edition.
Your game, with a glow in the dark box, foil-printed decks, or a limited edition board.
$350: Your backer, in the game.
A card or playing piece based on your backer’s likeness included in the base version of your game that all backers receive.
Remember that you don’t want to overwhelm your backers. Depending on your game and skillset, you might swap out the limited edition for some custom artwork or behind-the-scenes access, but it’s best to limit your overall list to just a few items.
Remember, if you’re receiving exceptional support or a lot of special requests, you can always add more rewards as the campaign progresses.
Download this content as an Ebook and read on your tablet.
Stretch Goals: What Are They, And Do I Need Them?

While creators and backers alike generally celebrate Kickstarter’s all-or-nothing funding model, there’s no clear consensus on stretch goals.
Some backers are excited to get a “vote” in the final version of a product, while others see these additional goals as greediness on the part of the creator. From the creator’s side, some see stretch goals as an unpredictable factor that can disrupt a well-planned budget, while others view them as a useful marketing tool and an integral part of funding projects.
The truth is, whether or not you should use stretch goals depends on your campaign and how you want to manage it. Whatever decision you make, it’s critical that you decide before you launch so you can accurately factor your stretch goals into your budget.
We’ll go over the most important considerations to help you decide whether you need stretch goals, how to manage them, and how to plan your campaign.
How do stretch goals work?
As you raise more money and generate more pre-orders, the per-unit printing cost for your game decreases. For example, let’s say that your all-or-nothing goal is $20,000, which is the amount you need to reach to produce your game and rewards. But if you hit $30,000, you’ll be printing enough copies that each one is less expensive—allowing you to add extra cards, higher-quality pieces, or a foil-stamped board.
Unlike your funding goal, stretch goals do not need to be met to produce your game. However, you’ll still need to budget for design, manufacturing, and shipping, because unlocked upgrades shouldn’t cost backers more money.
Stretch goals have a few different purposes and benefits. Be careful, though: if your stretch goal is just to make more money, or to get more backers, you’re doing it for the wrong reasons. Like everything else, stretch goals need to be well-planned, thematically appropriate, and you need to be invested in the idea.
-
Produce a better product.
The main reason to add stretch goals is to enhance the value of your game by upgrading the materials, size, number of pieces, or design of your game.
-
Motivate backers to promote your game.
If your backers want those upgrades, they’ll be motivated to give more or promote the campaign to their friends to help you meet the goal. This enthusiasm may even give you a better chance at reaching your initial goal, whether or not you reach the stretch goals.
-
Reduce risk by making expensive elements optional.
Your primary goal is getting your game funded, and you may have eliminated expensive optional items in order to set an achievable all-or-nothing goal. For example, you may have always wanted foil-stamped cards, but didn’t want to risk the entire game’s success on an element that won’t make or break the game experience. In this case, foil-stamped cards are the perfect stretch goal, which if funded, will enhance the game overall, without risking the entire game’s funding.
-
Keep the excitement going.
Introducing a great upgrade can excite backers and potential backers, even if you’ve already met your initial goal. That positive word-of-mouth translates into more backers and more funding.

When should I reveal stretch goals?
Again, this depends on your game and how you want to market it. If you choose to make the goals visible from the start, you’ll have a better chance at getting backers to make higher donations the first time they reach your page.
On the other hand, if you wait to unveil your goals mid-way through your campaign, you may inspire existing backers to help promote your campaign or “top off” their contribution.
You may also consider sharing one stretch goal at a time to keep backers and visitors focused, versus making all goals and funding amount visible in case your larger stretch goals are more interesting to your audience than the first few.
How should my goals be unlocked?

The most popular approach relies on the funding value of the campaign—when the campaign reaches benchmark amounts, like $25,000, $50,000, and $75,000, new stretch goals are unlocked. This method gives you the greatest control over the stretch goals and makes it easy to estimate funding and ensure that you can afford the included upgrades.
- Time-based stretch goals: Create a sense of urgency by unlocking upgrades if a funding goal is reached within a certain amount of time. For example, you could announce that your foil-stamped card upgrade will only be unlocked if you reach $30,000 within five days after meeting your initial funding goal.
- Backer counts: Unlock upgrades when the project reaches a specific number of backers rather than a dollar amount. It can be trickier to estimate cost for these rewards, since you won’t know in advance what funding level each backer will choose, but it can work well for simple, inexpensive upgrades.
- Social media goals: Set a goal to reach a certain number of likes, shares, or retweets. This can be an effective marketing method, as it encourages your backers to share the campaign with friends, but be careful not to add anything that you won’t be able to afford if those likes don’t translate directly into contributions.
Monetary goals are the safest route, as you can calculate the exact price of the reward upgrades and know with certainty that you’ll be able to afford the upgrade. But using a mix of methods can also be effective, as each type of goal can be used for different marketing purposes to increase your total contributions.
What should I give my backers?
Stretch goals come in two basic forms: rewards that improve the quality of the printed game by upgrading the game’s materials, or those that extend gameplay with additional components.
We looked through the most funded games on Kickstarter to put together a list of ideas:
Game upgrades:
- Upgraded artwork on game cards
- Metal coins instead of wood
- Miniatures instead of meeples
- Plastic tokens instead of wood
- Two-sided game board instead of standard
- Increase size of tokens from 16 to 20mm
- Game box covered in fur
Game extensions:
- Extra cards or other expansion packs
- Specially designed dice bag
- Book of game lore
- Quick-reference guide
A few words of caution here. First, don’t offer stretch goals that should be core components of your game. Backers don’t want to feel that if you don’t hit your stretch goals, they’ll get an incomplete, unplayable version of the game.
Second, approach stretch goals with the same careful planning as the rest of your budget. You’ll need to fully cover the fulfillment, Kickstarter fees, labor, and production time necessary to produce and ship more copies of your game than you initially expected, as well as bigger, fancier, or heavier versions of the core game.
So, are stretch goals right for me?
While you shouldn’t shy away from asking for more money, stretch goals aren’t right for everyone. Skipping stretch goals can make your life simpler and less stressful, as you can focus on promoting your campaign and producing your game.
To be effective, your stretch goals have to be something your backers will be excited about. Balancing high-enthusiasm with low-cost is tricky. By the time you start your campaign, your stretch goals should be as well thought out as each of your rewards, even if will be announced partway through the campaign. Adding a stretch goal impulsively can jeopardize the production of your game and the fulfillment of your Kickstarter rewards.
Now that you’ve got the nuts and bolts of your campaign worked out, you’re ready to start designing your Kickstarter page.
Download this content as an Ebook and read on your tablet.
Design Your Kickstarter Page for Success
Crowdfunding a game takes a lot of time and patience – but if you design your Kickstarter page well, you’ll be setting yourself up for success.
You’ve put a lot of work into your game, countless hours playtesting, tweaking elements, and getting every piece of art just right. However, if your Kickstarter page doesn’t reflect how great your game is, you won’t be able to share it with the world.
The main goal of your Kickstarter page is to communicate to potential backers what your game is and why they should help fund it. Just like your game, your page design should be cohesive, captivating, and concise. The more work you put into designing your Kickstarter page, the more likely you’ll be to reach your funding goal.

Make Your Page Memorable
Your page header should feature a simple, concrete message front and center. Write a clear value proposition that shows what makes your game unique and helps you stand out from the crowd. Here are a few headers that draw us in and make us want to learn more:
- Pyramid Arcade – 90 Pyramids, 22 Games, Endless Fun!
- Mint Works – The pocket-sized worker placement game
- ~ SANTORINI ~ Learn it in 30 seconds, play it for life!
- Machine of Death: The Game of Creative Assassination
- Burgle Bros. – A Cooperative Heist Board Game
- Coupe – bluff & deception in the world of The Resistance
- Someone Has Died – a silly game about serious business
Other games have names so unique they stand alone:
Tell Your Story
The introductory paragraph of your page is where you need to tell your story to make an impact on your backer. While designing your Kickstarter page, make sure you answer questions people will want to know: Why did you create this game? What inspired it? Why will people enjoy playing it? Be genuine, and don’t be a salesman.
Kit Hickey of Ministry of Supply offers some great advice:
- Spend a LOT of time thinking about what your story is. For example, we spoke to over 150 people about how our Apollo shirt would improve their life. This enabled us to tell our story in a way that showed this wasn’t just a shirt: instead, it is something that really would make you feel more confident throughout your day, enable you to perform better and become a part of your daily life.
Now that you have your backers attention, the rest of your content should meet two goals:
- 1. Help backers understand your project.
- 2. Instill confidence that you’ll follow through with your project.
There are some elements that you’ll want to include:
- Describe gameplay in detail, and add a demo video to help readers learn how to play your game. Be sure to describe your characters and, if possible, include a downloadable rule booklet, even if it’s a prototype, so your reader can get a holistic understanding.
- Grammatically correct, well-articulated copy, that describes who you are, your background, and your commitment to your project will instill confidence in your ability to deliver as a game designer.
- Concise descriptions of rewards make backers comfortable that they understand what they’ll get by supporting your project.
- Bold sub-headers that outline each section of your page and break up large blocks of text.
- A realistic budget and an honest assessment of risks show that you’ve put thought and effort into developing both your game and your campaign.
Keep in mind that you show the quality of your project through how you write as much as through what you write. Carefully review and revise your text, spending at least as much time editing as you did writing the first draft. When you have a polished, high-quality draft, get a second opinion to provide feedback.
Your Photos and Video Matter
The first thing backers see is your project image, both at the top of your page and as your project’s thumbnail throughout Kickstarter. It should represent your game and look good as both a large image and a thumbnail. If you’re stuck, it’s never a bad idea to use art from your game or a high-quality photo of the game itself. For more ideas, check out Kickstarter’s How to Make a Great Project Image.
Just as with your text, photos should support the goals of helping backers understand what they’re buying and instilling confidence in you as a creator. Pay a lot of attention to your game’s details while designing your Kickstarter page: show off your cards, dice miniatures, and other components. Show those images side-by-side with your test versions or playtesting groups to show the evolution of your game and the time you’ve put into development.
Images on Kickstarter automatically resize to fit the width of the campaign column, and tall images can easily fill your screen from top to bottom, which can be just as overwhelming as a sprawling block of text. Try to choose images that are wider than they are tall.
Good Examples


Do I Need A Video For My Kickstarter Page?
We get asked this a lot, so we’ll just say it: yes, you have to add a video.
Alright, you don’t technically have to add a video, but you really should: projects with video are much more likely to succeed than those without, according to Kickstarter’s analysis.
If you’re not a video production expert, don’t be afraid. You can produce a perfectly good video with a little planning and a few hours on the weekend. Check out Kickstarter’s simple tips for creating a budget-friendly video. Even if you don’t have professional equipment, the following tips can help you make a good first impression.
- Camera
The camera on the back of your phone or tablet is perfectly acceptable to use, and you can take it a step further with an inexpensive video-enhancing app. While filming, stabilize your elbow or use a tripod to ensure a smooth image. - Audio
An external audio-recording device can improve audio quality, but if you can’t afford one, just make sure you record indoors in a quiet room. - Lighting
Good lighting makes your video look more professional, which in turn makes your project look trustworthy. If outside, film outside on a sunny day with the sun behind the camera. Indoors, try using the three-point lighting method with house lamps. - Location
Choose a clean space with few distractions and tidy up before you hit record. A white background can work, but you may want to film in your creative workspace with some of your artwork or collectibles in the background to show off your passion and personality. - Length
Keep your video to 1.5 to 2 minutes to increase the odds that someone browsing the page will watch the whole thing. You can always add a second video further down the page, like gameplay demo. - Editing
Edit your video using free programs like iMovie or Windows Movie Maker, and avoid using distracting cuts like dissolves or wipes. If your video shows photos of your artwork, make these more interesting by zooming in or out or panning across the image. - Music
Music isn’t a necessity, but if you want to, consider adding music that matches the mood and message of your project and won’t be too distracting. Don’t use any songs that you don’t have the license for; instead, use Creative Commons music or purchase stock music for your project. - Be Yourself!
Get your face in front of the camera. It’s the easiest way to make an impression on the viewer. Introduce yourself and tell your story, describe gameplay, and explain where the money will go. Most of all, be you! - Get Inspired
Before you film, watch as many Kickstarter videos as possible. Pay attention to which ones you like and don’t like, and apply them to your efforts.
Click a thumbnail below to watch some of our personal favorite Kickstarter videos.


Finishing Touches
Be meticulous about designing the visual layout of your Kickstarter page. Read and reread your page’s content and visual flow, and ask a friend to review it as well. If you’re successful, potential backers will have all the information they need to decide to contribute. More importantly, you’ll have communicated your project’s quality and credibility.
Still need more advice? Stonemaier Games has successfully run several Kickstarter campaigns, and they have an extensive and detailed list of tips on the anatomy of a great Kickstarter project page.
Download this content as an Ebook and read on your tablet.
After Your Campaign Closes: Staying in Touch and Shipping Kickstarter Rewards
Once your campaign wraps up, it’s time to produce your game and ship your Kickstarter rewards! Despite the best of intentions, only 65% of Kickstarter projects ship on time, the remainder led astray by unexpected manufacturing, packing, and shipping delays. Plan for on-time delivery with the following important steps and turn first-time backers into lifelong fans.
Welcome Latecomers
After your campaign closes, there’s still an opportunity to get more backers. Interested supporters might arrive to the party a little too late, so be sure to add a buy now button to your Kickstarter page and your landing page to capture latecomers.
Keep in Touch
After your campaign, invested backers want to know how your project is progressing. Stay active and engaged, responding to comments and posting on social media. Some good ideas are to post a thank-you video on Kickstarter or to send monthly updates about your production schedule.
If you’re overwhelmed by questions about the production schedule or reward details, add an FAQ section to your website where you can direct backers for more information.
How to Deliver Bad News
As your expected fulfillment date approaches, you’ll need to tell your backers whether they’ll receive their rewards on time. If you’ve been sending regular updates on your progress, this information—good or bad—shouldn’t come as a surprise.
Backers understand that you’re an independent creator, using Kickstarter to produce a brand new game. They’ll be patient with unexpected delays as long as you’re transparent about the cause of the delay, how you’re addressing it, and when they can expect to receive their rewards.
If possible, include a silver lining along with any bad news. ReVault nailed the bad news sandwich—good news, bad news, good news—in this update about their manufacturing issues.

Send a Survey
Use Kickstarter’s survey after your campaign ends to collect information you need to ship rewards. For example, if one tier includes a t-shirt, you’ll need to ask what size the backer wears. Keep it simple and direct.
You cannot use surveys to collect marketing information, like “How did you hear about us?” If you’d like to do that, you’ll need to use a third-party survey tool and send it via a thank-you email, campaign update, or email list message.
Measure Twice, Send Once
You can only send one survey to each tier, and there are no do-overs, so be sure you’re getting exactly the details you need. Start by making a list of all of the information you’ll need to collect for each reward item: shipping address, t-shirt size, preferred sticker color, etc. Then, create and send your surveys one tier at a time, adding the exact questions you need to ask for the included reward items.
Tackle the simplest tier first, so you can get the hang of it before sending more complicated surveys. If you accidentally leave something out, you can always send a message to the backers of that tier through the Backer Report.
Enable Address Changes
Allow backers to update their address information after submitting in case they move between filling out the survey and receiving their reward. You’ll save time, and you’ll avoid losing money on returned packages. When you start shipping, you can always disable address changes to prevent last-minute confusion.
When to Send Your Survey
Timing surveys can be complicated. Too early, and it’s possible backers will move. Too late, and you might not have enough responses to start shipping on time. A good rule of thumb is to send backer surveys when you’re confident in your shipping schedule, and at least a week before shipping will start.
Avoid the Holiday Season while Shipping Kickstarter Rewards
It can seem like a great idea to deliver your rewards during the holiday season, but while it might generate excitement, it can make fulfillment and shipping unnecessarily complicated and delays more likely.
During the holiday season, it can be difficult for shipments from the manufacturer to get through the clog of products entering ports, putting them behind schedule before they even get to UPS or FedEx. Additionally, because backers may be relying on them as holiday gifts, they’ll be more frustrated and less understanding about delays, putting you in a very unpleasant position. Especially for a first campaign, we recommend taking the easier route and targeting fulfillment in another part of the year.
Should You Handle Fulfillment, or Outsource It?
Professional fulfillment companies specialize in shipping, receiving, packing, inventory, warehousing, and customer service. Taking that on by yourself is a viable option, and many creators have success with that route. However, it’s worth noting that you don’t have to go it alone and that external partners can offer important advantages.

Why Fulfillment Companies Might Save You Money
Companies that ship large volumes of items receive special postage deals with USPS and FedEx that cut shipping costs by as much as 50%. While you’re paying for their services to package and ship your orders, you’re saving on shipping costs as well as saving time.
If you go this route, ship your items directly to the fulfillment warehouse. You can save on international orders by finding a fulfillment company that has an international warehouse location so that you don’t have to pay customs duties on packages that are just going to leave the country again. PrintNinja partners with a fulfillment company that can help you pack and ship your orders.
Do It Yourself
If you decide to handle fulfillment yourself, remember that you’ll never have full control over every aspect of the process. You’ll be depending on the shipping services of other companies, and there can be unexpected delays at any point in the process, so leave yourself some breathing room when estimating timelines. Backerkit has great tips on DIY fulfillment, and we’ll break down the process step-by-step here.
Of course, doing it yourself doesn’t mean you have to do it alone. Have friends over for packing parties—complete with pizza and beer—where you stuff boxes and apply labels. Handle one tier at a time, so you don’t lose track, and try to get it all done as quickly as possible.
Choosing Shipping and Packaging Options
The packaging material and shipment method you select for your rewards are closely linked because the choice you make for one will influence the price of the other. No matter what, pick packaging that will protect your game and get it to your backers undamaged. Make these decisions as early as possible, using the weight and dimensions of your prototype or proof copy as a guide, so that you can build these costs into your reward structure.
In many cases, USPS flat rate shipping is a great option because the packaging is free and the total cost is easy to calculate—there are no surprises with flat rate, no matter the weight or distance. For shipping card games or small board games domestically, the padded flat rate envelope (12-1/2″ x 9-1/2″) is great. If you have a larger game, the small flat rate box (5-3/8″ x 8-5/8″ x 1-5/8″) may work, or they even have a board game flat rate box (23-11/16”x 11-¾” x 3”).
Flat rate shipping works best for heavier items, but there are plenty of other options out there. Depending on weight and size, it may be less expensive to purchase boxes and shipping separately, so do your research to choose the method that will work best overall. Stamps.com has a comparison guide for USPS options, and UPS and FedEx also offer shipping estimate tools.

Shipping Labels
Now that you have packing materials squared away, you’ll need to print out labels for each package. Get a free USPS account or use a third-party service like Stamps.com to purchase postage and generate the shipping labels you’ll need. Then print them on sticky labels or clear packing envelope inserts from your home printer.
Free Pick-Ups
USPS allows you to schedule a free pick up at your residence. Try to have each tiered rewards packaged and picked up together so you can better keep track of when your backers should be receiving their items.
Now that your games have been packed up tight, shipped to your backers, and are being enjoyed by players around the world, it’s time to talk next steps. Where does your game go after Kickstarter?
Download this content as an Ebook and read on your tablet.
Selling Your Game Post-Kickstarter: 13 Essential Next Steps
After you fund your game, you’ll have to figure out how to sell it post-Kickstarter. Don’t worry – we’ve provided all the information you need to know to sell your game online or in stores.
You put a lot of work into your Kickstarter campaign, and it paid off! You met your funding goal, but now it’s time to make sure your game gets into the hands of new audiences. Depending on your goals and strengths, you can take direct sales into your own hands, find partnerships with other companies to sell for you, or both. Here are things to consider when planning your game’s post-Kickstarter life.

Selling your game post-Kickstarter via your page
Your Kickstarter page continues to exist after your Kickstarter campaign ends, and will rank high in Google results for your game’s title. Be sure that any new visitors will know where they can find your game after the campaign has closed.
Once you hit your funding deadline, though, you won’t be able to edit your Kickstarter page. Update it on the last day of your campaign to include a link to your online store and landing page so that that future visitors can find your game and updated information anytime.
Setting Up a Web Store
Make your game available on your website as soon as your campaign ends via a web store. Even if you can’t begin selling copies of your game immediately, set it up to accept pre-orders, and link to it from your landing page, Kickstarter, and social media. [Click to Tweet]
There are a number of simple, inexpensive online e-commerce solutions you can use to set up your store:
-
- Shopify is known as the best e-commerce platform for independent sellers. Most site-building tools have Shopify plugins, or you can use Shopify’s tools to build an entire website.
- If you’re already using Squarespace for your landing page, it’s simple to add a store with their built-in e-commerce tools.
- WooCommerce is a WordPress plugin that can transform any WordPress website into a selling machine. Like WordPress, WooCommerce itself is free to use, but you may need to pay for crucial plug-ins for payment processing.
To find the solution right for you, check out Ecommerce-Platforms.com’s comparison chart.
Spread the Word
After your Kickstarter closes, you still need a way to keep getting the word out about your game.
Keep soliciting reviews from game review websites and keep looking for opportunities to work with bloggers and journalists. List your product on sites that showcase crowdfunded products, like Outgrow.me and Amazon Launchpad. Remember that your story doesn’t stop after the Kickstarter ends, and you can keep pitching articles to local journalists and bloggers on your game, your Kickstarter campaign, and new projects.
Get Your Game Into Stores
Online sales are great, but they’re not the only channel available to you. If you have a healthy stock of games, you’ll want to get them into stores and in front of potential players.
Retail Packaging Standards
Retailers have packaging standards that your game needs to meet. Make sure your packaging includes:
-
-
- Barcode
- Icons for play time, number of players, and ages
- Game designer’s name
- Licensing and credits
- Images of all pieces included in the game box
- Barcode
- Legal Information (Copyrights, Made in China, Child Safety)
-
Pricing
Stores have limited shelf space, and they want to make a reasonable profit on any game they stock. You need to set an MSRP (Manufacturer’s Suggested Retail Price) that will work for both you and the stores.
Set it carefully, because a too-low MSRP can make it hard to turn a profit or recoup your investment. Conversely, a too-high MSRP can make it challenging to sell copies. Research similar games in your category to make sure your MSRP is reasonable and be sure you know exactly how much money you need to make on each copy.
For most board games, the MSRP is priced at five times the manufacturing cost. So, if your game costs $10 to print, your MSRP will be $50. Distributors and retailers will then purchase your game at a percentage of the MSRP—40% of MSRP for distributors, 50% for retailers—and sell the game at MSRP. For example, if your MSRP is $50, a retailer will purchase it from you for $25 and sell it for $50. You’ll make a profit of $15, and the retailer will make a profit of $25.
Trial Periods
Most retailers will offer you a trial period to see how well your game does in their store. When your game hits the shelves, announce to your fans (or friends and family) asking them to purchase your game at these locations to reduce the risk that the retailer will reject your game.
Preparing to Pitch Your Game
Because you’ve already gone through a successful Kickstarter campaign, you’re well-armed to pitch your game to retailers and distributors. Practice giving a short pitch that incorporates your selling features, details about your game, and the positive feedback you’ve gotten from players. Know the key statistics, including MSRP and current sales, like the back of your hand.
It can’t hurt to get your name in their head before you pitch. Encourage your fans to ask for your game at local retailers.
Find a Distributor
There are two ways to get your game into stores: working directly with stores, or going through a distributor. Distributors like Southern Hobby and Alliance Game Distributors have relationships with retailers across the country, and take care of warehousing, packing, shipping, and invoicing orders. Stores like working with them because they’re reliable and professional, and game makers like working with them because they can get games into more stores in more locations.
Read as much information as you can about a distributor before approaching them. Make sure that your game is an appropriate fit with other games that they carry and that you can meet all of their terms. For example, if they have a required minimum of available units that you can’t meet, they won’t be interested in carrying your game.
Work Directly with Retailers
You don’t have to go through a distributor to get your game on shelves. By working with retailers directly, you may have to work harder for each sale, but you can build relationships that are both emotionally and financially rewarding.
Local Game Stores
Start with local game stores. Connecting with your local game shop builds community and can cut down on shipping costs if you deliver copies in person. If you’re not already familiar with the store, visit first to make sure it’s the right fit for your game.
Either in person or over the phone, ask to schedule an appointment with the store’s buyer to show them your game. When meeting with the buyer, be sure to have your elevator pitch down, be professional and polite, and be ready to leave a copy of your game with them. If they don’t say yes on the spot, ask them if you can follow up in a week. Keep in mind that store owners and managers are very busy. Try to be direct about your needs while being respectful of theirs.
Not-so-local Game Stores
You can’t walk into every store in the country, so it’s important to do background research and be as personal as possible with your sales pitch. Contact stores by email, then follow up with a phone call or a handwritten postcard—perhaps one with your game’s art printed on the front?
If you have fans or friends in other cities, enlist them as your street team. Mail them a stack of promotional postcards or fact sheets about your game, and ask them to visit their local game stores. Instruct them on the key points you want them to convey, and be sure to incentivize them with something special like a signed piece of original art. Follow up with the stores via email or over the phone.
Events and Conventions

Stores and distributors like it when you take an active role in promoting your game, because it shows that you’re committed to making sure it sells. Audiences like meeting game creators, and are more likely to buy a game from a member of their community. Schedule a demo day at your local game store, or if you’re planning on visiting a city, contact shops in advance and schedule a demo or two.
Gaming conventions like Gen Con are great places to spread the word about your game, whether you’re going as an attendee or paying for a booth. Most conventions devote some space to open gaming tables where you can demonstrate your game. You can also meet other game makers, game publishers, and distributors. Come stocked with business cards, fact sheets, copies of your game, and your elevator pitch.
Game Publishers and Beyond
Some crowdfunded games have been picked up by game publishers for the next phase of their life. Fully-realized games save publishers time and money, and they feel secure knowing there’s already an audience for the game.
Like distributors, publishers each have their own interests and guidelines for submitting your game, so be sure to research them well. Randy Hoyt, a small, independent publisher that runs Foxtrot Games, has good information on submitting games on his informative site.
Selling your game can be hard work, but it’s worth the investment to get your game out into the world. With creativity, planning, and dedication, you can build a network of fans, partners, and businesses who help your game find its way into homes far and wide.
Download this content as an Ebook and read on your tablet.
Kickstarter Promotion
Kickstarter Promotion: Printing Made Possible With Crowdfunding
If you’re crowdfunding your project, PrintNinja has a Kickstarter promotion offer for you.
From comic books and tabletop games to zines, crowdfunding has made productization imaginable like never before. To date, over 35,000 games alone have launched on Kickstarter.
We love indie creators. We’ve printed over 200 crowdfunding projects, and have been floored by the masterfully created projects we’re lucky to have been a part of.
Ninja Tip: If you’ve successfully funded your campaign there may be a tax advantage to spending your campaign funds within the calendar year. See what Kickstarter has to say about it here. You can spend your campaign dollars with PrintNinja even if your artwork won’t be ready until the following year!
See For Yourself


What People Are Saying About Us.
“First time printing a whole book. It was an artbook with illustrations from 52 different people, so… quality needed to be beyond superb. So I was worried as hell, with no idea of what to do. I went with PrintNinja because I have backed or seen lots of Kickstarter projects that went with them. And now I know that is like that for a reason. PrintNinja are the very best when it comes to printing. They not only did a magnificent job, but also were with me at every step and took care that I stayed calmed all the time. Today I have finally received the product and it’s gorgeous. Risking to seem a bot, I must say that I just can’t find a complain about these guys. Thanks!”
Indie G Zine
Their quotes come quick. They step you through the details of everything. Compared to other companies we contacted, it feels like Print Ninja can do anything in printing where the other guys wanted us to take our product and fit it into one of their molds. End product was excellent! Customer service great and fast. We will definitely keep printing our current project and our upcoming projects through them!
Legends of Rakasa
We ordered a thousand copies of our graphic novel to fulfill a successful Kickstarter, and PrintNinja was there for us the entire way from start to finish. They were a pleasure to work with and we will definitely be going through them again!
Land of the Rising Dead
Choose PrintNinja For Your Crowdfunding Project
For the last decade, we’ve provided publisher-quality printing to indie creators around the world. Though offset printing is the most economical printing option, transforming an idea into a product takes resources, and many of our customers turn to crowdfunding campaigns to fund their products.
If you’re running a crowdfunding campaign, consider partnering with PrintNinja.
By partnering with us and advertising our banner on your crowdfunding page, you’ll get:
- A free 5% overrun of your order. If you order 1000 copies, that’s an extra 50 copies!
- Support on social media, showcasing your project to our network of indie creators.
Follow these steps to get started:
- Save a quote! Outlining your budget is key to planning a successful Kickstarter, get started by quoting your project.
- Our Kickstarter budget calculator can help you get started mapping out your funding and stretch goals.
- Download the banner of your choice below and upload it in the “Project description” or “Risks and challenges” section of your Kickstarter campaign. See a past example of this on this Kickstarter campaign, Storytime – A Little Art Book, by Joey Spiotto.
- Hyperlink the banner to this URL: https://goo.gl/hbmQ4V.
- Hyperlink the badge by selecting the chain icon.
- After you have successfully added the banner to your campaign, email us to let us know you’d like to take part in our social media program. We will need a link to your campaign, any relevant images, and your quote number.


Select your banner below:
We have a lot of experience with creators on Kickstarter, Indiegogo, and GoFundMe and we want to help you succeed. We’ve compiled our best tips and tricks, including a budgeting tool, in our crowdfunding Ebook.
Warehousing and Fulfillment
PrintNinja is proud to partner with a proven, experienced, award-winning order fulfillment company, eFulfillment Service to offer warehousing and fulfillment to PrintNinja customers. We choose EFS as a partner because of their friendly terms for new customers, straightforward and competitive pricing, and their stellar reputation. Our partnership allows for us to get a reduced price for PrintNinja fulfillment customers and also allows us to make the logistics of the process seamless.
Your Own Inventory Portal
EFS allows you to monitor your inventory levels, orders, and shipments with their web-based software. You can stay up-to-date with inventory counts and have 24/7 access. EFS integrates with most popular shopping carts allowing you to fulfill your website orders quickly and efficiently. They also handle Kickstarter fulfillment orders and can ship rewards directly to your backers if you’re looking for a short-term engagement.
You may divert part or all of your order to the EFS warehouse which is located in Traverse City, MI to take advantage of their services. This will require a custom shipping quote (mention split shipping to EFS) and may add up to three weeks to the shipping time of these books (copies going elsewhere will take the normal amount of time).
See full EFS shipping details and rates.

Warehousing / Storage
Many customers don’t have the space to store thousands of books, so using an outside warehouse is a great way to relieve some of that burden. eFulfillment Service provides a low-cost inventory storage solution, and their friendly pricing means that you pay only for the amount of storage space you use, whether it’s 10 pallets, a few cartons, or just 1 cubic foot. EFS requires no minimums and does not penalize you if your inventory is stored for too long or if you want it back. They charge a reasonable fee of $0.08 per cubic foot of storage per week.

Bulk Fulfillment and Kickstarter
eFulfillment Service can provide on-going eCommerce order fulfillment services for your order as well as one-time fulfillment for Kickstarter orders and other crowdfunded orders. This is a great way to get your customers or Kickstarter backers their copies without having to drop hundreds of packages off at the post office. You can provide EFS with a list of addresses to send your books or games to multiple ways using their proprietary Fulfillment Control Panel. The FCP provides detailed, real-time reporting to provide merchants with an up-to-date overview of their SKU counts, orders, shipments, tracking information and more.
Getting Started with eFulfillment Service
New customers can begin a relationship with eFulfilment Service by submitting a “Get a Quote” form on their site. Make sure to mention that you are PrintNinja customer in the “How Did You Hear About Us?” field to get accesss to discounted pick & pack fees.
Media Mail
Requirements to Ship
Your project must meet the following criteria in order to ship it as Media Mail. If you try to ship Media Mail without meeting the requirements listed below you open yourself up to hefty fines.
- Package must weigh less than 70lbs
- Media shipped must be educational material: books, CDs, DVDs
- Your printed project may not contain advertising
- Books must be at least 8 pages
What Doesn’t Qualify
- Games – Board and Card
- Catalogs
- Magazines
Media Mail packages are subject to inspection so if you think you may breach any of these requirements, play it safe and ship First Class or Priority instead.
Cost and Turnaround Time
USPS changes postage rates regularly so we recommend checking the media mail postage cost on their site rather than a third parties. Remember this is just the postage cost, it does not cover packaging cost or handling if you are using a fulfillment service.
Turnaround time is slower than other shipping services, but if you’re looking for cost effective then 2-10 days may be a good trade off.
What Classifies as Advertising
Advertising includes paid advertising and the publishers‘ own advertising in display, classified, or editorial style. Catalogs and magazines do not qualify for media mail because of the nature of their purpose being advertising.
Books can contain announcements of other books, this does not count as advertising. For example, if your project has a page announcing your sequel then you can still ship using media mail.
First-Class Mail
First-Class Mail postage is determined by your project’s size, shape, and weight making this the best shipping option for lightweight packages. Comics, catalogs, and magazines are typical printed work we ship via First-Class Mail domestic as it must be no more than 13 oz. However, First-Class Mail International packages must be no more than 4lbs.
Size Requirements
When measuring your large envelope, length is classified by USPS as the longest side. If your project can fit in the following packaging specifications it can ship First-Class.
- Envelope must be rectangular
- Height must be at least 3-1/2 inches
- Length must be at least 5 inches
- Thickness must be at least 0.007 thick
- Height cannot be more than 6-1/8 inches
- Length cannot be more than 11-1/2 inches
- Thickness cannot be more than 1/4 thick
First-Class Mail Domestic (United States)
Domestic First-Class packages must weigh under 13 oz to qualify for this service, along with meeting the packaging requirements above. We recommend referencing USPS’s First-Class postage chart before shipping as they may change postage costs throughout the year. Keep in mind, this is just postage cost, these prices do not include packaging or handling if you plan on using a fulfillment service.
First-Class Mail International
Packages going to an International destination(any location outside the United States) can be shipped using First-Class Mail International. The package must meet the size requirements listed above and cannot weight more than 4lbs. Pro Tip: if your package weighs close to 4lbs you should compare the cost of priority mail flat rate as it’ll usually save you a few dollars.
USPS has made finding the postage cost a bit simpler by grouping countries together based on their shipping demand, then assigning a First-Class International postage cost to each group. Once you identify which group your destination falls in and you know the weight of your package, you can find your International postage cost.