PrintNinja - online printing made easy for creators
Custom Game File Setup
Below you will find custom game guidelines to help you appropriately set up your artwork files – whether it be for a card game only or a complex, multiple component board game.aigns.
Custom Game File Setup Guidelines
Have you already placed your custom game order? Great!
The next step is to upload your files for our prepress experts to review. The following custom game guidelines will help you accurately set up your various game components. As a general rule, the margins, recommended image resolution, and color requirements for each printed component (instructions, cards, tokens, etc) are the same. They experience the same production variances and can be up to 1/8” off-center on some copies. For information on this, please reference our offset printing guidelines.
Playing Cards
One Common Back
Ideally, a whole deck is submitted as one multi-page PDF with each face of each card on its own page. If the cards share a common back, then you can include just one copy of that artwork. Please see the below link for an example of how a deck should be submitted with one common back for a 20-card deck.
Multiple Backs
You can go about this one of two ways:
1. Submit one multi-page PDF with each common back placed before its unique card faces. This is the best way to submit artwork as this will indicate to us how you would like the cards ordered in the deck for the final print run. Please see the below link for an example of how a deck should be submitted with three common backs for a 20-card deck.
2. Submit multiple multi-page PDFs with each common back as the first page of each PDF and the unique card faces associated with that common back following. If you do this, you will need to communicate to your prepress manager the order of the cards in the deck for the final print run.
For example, say you are printing a 20-card deck with three common backs. You can submit a total of three PDFs for the card artwork: PDF #1 should be titled “Card Back 1”, PDF #2 should be titled “Card Back 2”, and PDF #3 should be titled “Card Back 3”.
Suggested File Types for Playing Cards
While we generally print using PDFs, if individual image files such as JPEGs or TIFs are all that is available, we can accept those as well.
Poker-Sized Card Template
See the below link for “poker-sized” card template. Be sure to pay close attention to the instructions on the template.
If you require a custom card size, please follow the noted instructions in the below “Gobawk” graphic. For example, if you are looking to print a 3” x 5” card, your document size should be 3” x 5” including the 0.125” bleed area on all four sides. Be sure to keep all crucial text and graphics at least 0.125” inside the trim line of the document to ensure nothing crucial will be trimmed off during production. Additionally, be sure to extend any artwork that touches the trim line to the edge of the bleed area.

Tuck-Box Templates
Please see below for all available tuck-box templates for blue core, poker-sized decks. If you find your project utilizes a different card size or playing card stock, or if you have multiple components to be included in the tuck-box, you will need to place an order to receive your custom template.
- https://stage.printninja.com/standard-poker-card-tuck-box-templates
Note that boxes increase in size for every 5 cards.

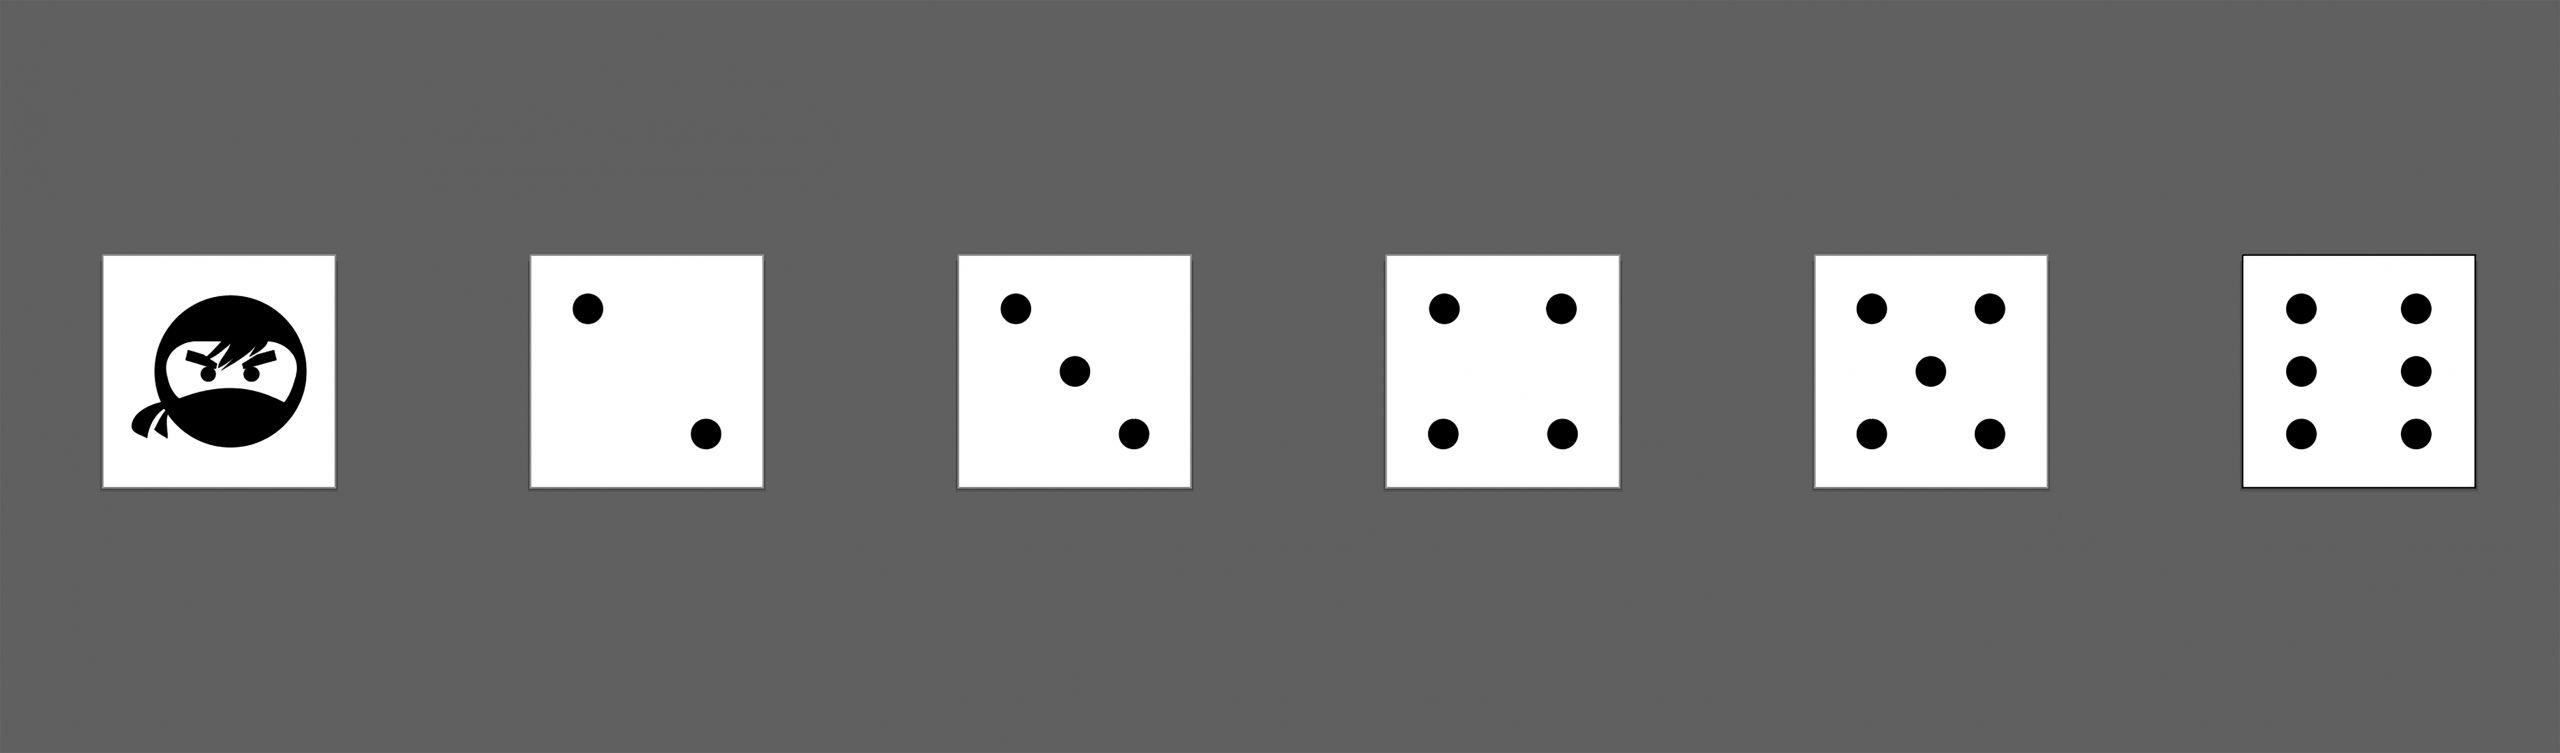
Custom Dice
If your dice will be custom engraved, please see below for the file set up requirements:
- We will need each face as a separate vector file (Illustrator file). The engraved artwork should be 100% black on a white background.
- Size the artwork to the size of the ordered die face. For example, the artboard should be .63” if you are ordering a standard .63” die.
- Engraved lines/strokes should have a minimum width of .3mm and should be at least 2mm away from the edge of the dice.
Please see the below image for an example of how custom engraved artwork should look when uploaded to us:
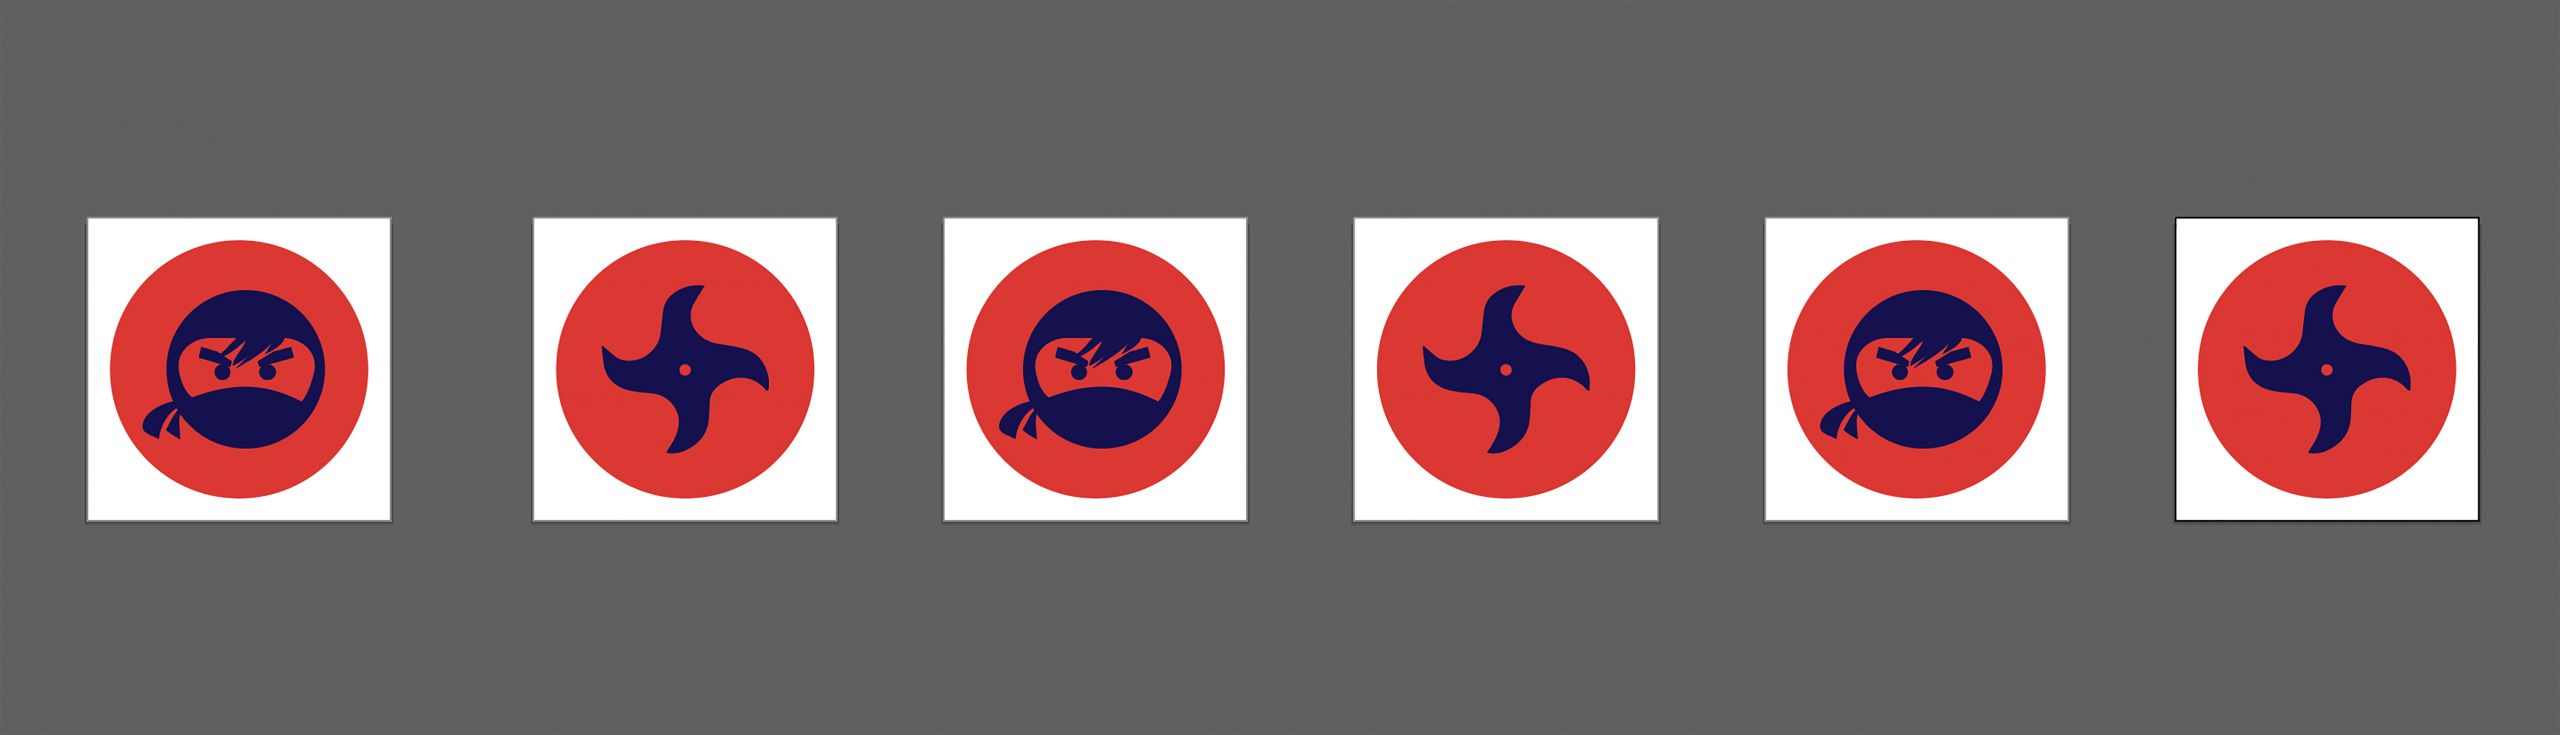
If your dice will be custom silk screened, please see below for the file set up requirements:
- Silk screening can only be done on D6 or D12 die.
- Artwork is required to be in vector format (Illustrator file).
- Spot color required for artwork.
- The printable area is only to 3mm away from the edge of the die. For example: For a 20mm die, the maximum printable area is 17mm x 17mm.
Please see the below image for an example of how custom silk screened artwork should look when uploaded to us:

Punch-Outs and Tiles
For circular or rectangular/squared shapes, you can send files for punch-out tokens or tiles either as one page of art for the whole punch-out board/tile or as individual files for each separate token/tile (similar to sending files for playing cards). PDF format is recommended.
For both methods, please include two versions if you have selected one-sided printing:
- One version with just the art for printing (including bleed).
- One replicated version with a visible stroke indicating the intended trim around each token or tile – “magenta” is recommended for the stroke color. Our vendors will use this second file as reference to ensure accuracy during production.
Please include four versions if you have selected double-sided printing:
- One version with just the art for printing (including bleed) for the FRONT OF THE TOKEN/SHEET/TILE.
- One replicated version with a visible stroke indicating the intended trim around each token or tile for the FRONT OF THE TOKEN/SHEET/TILE. Our vendors will use this second file as reference to ensure accuracy during production.
- One version with just the art for printing (including bleed) for the BACK OF THE TOKEN/SHEET/TILE.
- One replicated version with a visible stroke indicating the intended trim around each token or tile for the BACK OF THE TOKEN/SHEET/TILE. Our vendors will use this second file as reference to ensure accuracy during production.
Please see below for additional print-ready requirements:
- Punch-outs that have an extremely small diameter will require using a different material than the standard greyboard (thick card or cover stock), so they will be less durable. The smallest punch-out tokens we can use on grayboard are 15mm, though we recommend 20mm to be safe.
- Punch-outs need to be spaced 5 mm apart from one another when printing on a sheet.
- 1/8″ bleed is recommended for punch outs/tiles = 3.175mm. Bleed between punch-outs can overlap.
- For custom punch-out or tile shapes, please be sure to send along your artwork to your account manager , as they will need to confirm the shape can be manufactured as-is.
Please see the below image for an example of print-ready punch-out sheet artwork with one-sided printing:

Please see the below image for an example of print-ready artwork for one tile with one-sided printing:

Game Boards
As noted in our board game quote form, there are several “folding” options for the game board component: single, double, triple, quad, and triple-double. Be sure to keep what folding selection you have ordered in mind when designing your artwork. Please note: The wrapped edge will overlap the image on the board 1/8 of an inch – so be sure to compensate.
If you are ok with the folding options as noted in the board game quote form, you will only need to submit one PDF of the board game artwork.
If you have a custom preference on how your game board will fold, please include two versions of the art file:
- One with only the art for printing (including bleed)
- One with cut/fold lines/strokes on top of the image for reference. Folding lines should be solid and cutting lines (for boards that fold more than once) should be dotted. PrintNinja will use this second file as a reference to make sure the boards are properly assembled.
The document size for your artwork should match the ordered board size, but should also include the necessary bleed – .125” on all four sides. So, for example, if you are printing a 15” x 15” game board the artwork should be 15.25” x 15.25” when uploaded to us as these dimensions include the bleed.
Please see the below image for an example of print-ready board game artwork for a basic quad-fold:


Two-Piece Boxes
We will provide a custom template for your two-piece box within 2-3 business days AFTER you place your order – we cannot provide custom templates ahead of time due to their custom nature and the amount of labor involved.
Once you receive your template, two-piece box artwork should be submitted in two versions:
- One version should have the artwork correctly sized for the printed box (including bleed).
- One replicated version with the guidelines overlaid on top of the art. PrintNinja will use the first file for printing and the second file as a reference to make sure the box art lines up correctly.
Screens
As noted in our board game quote form, there are several “folding” options for the screen component: double, triple, and quad. Be sure to keep what folding selection you have ordered in mind when designing your artwork.
The document size for your artwork should match the ordered screen size, but should also include the necessary bleed – 0.125” on all four sides. So, for example, if you are printing a 17” x 11” screen the artwork should be 17.25” x 11.25” when uploaded to us as these dimensions include the bleed.
Upon request, we are able to provide a custom template for your screen. Alternatively, you can create your own template following the information included in this section. The screen artwork should be submitted in two versions:
- One version should have the artwork correctly sized for the printed screen (including bleed).
- One replicated version with guidelines indicating the trim and fold lines overlaid on top of the art. PrintNinja will use the first file for printing and the second file as a reference to make sure the screen art lines up correctly.
You can reference this PDF file as an example of a custom template for a 17” x 11” double-fold screen.
Notepads
As noted in our board game quote form, there are several “printing” options for the note pad component: full-color, black and white, or blank. Be sure to keep what option you have ordered in mind when designing your artwork.
If you have selected to print in full-color or black and white, the document size for your artwork should match the ordered pad size, but should also include the necessary bleed – 0.125” on all four sides. If no bleed is required in the artwork, the file can be prepared to the trim size.
So, for example, if you are printing a 4” x 5” notepad and have artwork that should extend to the trim, the artwork should be 4.25” x 5.25” when uploaded to us as these dimensions include the bleed.
You should only upload a one-page PDF for the notepad artwork regardless of the number of pages in the pad, as only one design can be printed per pad.
Please see the below image for a print-ready example of full-color notepad artwork:

Playmats
The document size for your artwork should match the ordered playmat size, but should also include the necessary bleed – 0.125” on all four sides. So, for example, if you are printing a 8” x 12” playmat the artwork should be 8.25” x 12.25” when uploaded to us as these dimensions include the bleed.
Please see the below image for a print-ready example of playmat artwork:
Instructions
Folded Sheet
If you select folded sheet instructions you will receive one individual sheet, printed single or double sided, that is folded down to fit inside your packaging. Our production team will determine the best way to fold your sheet to fit in your packaging unless you provide specific instructions for how you would like your sheet to be folded.
The document size for your artwork should match the ordered sheet size, but should also include the necessary bleed – 0.125” on all four sides. So, for example, if you are printing a 8.5” x 11” sheet the artwork should be 8.75” x 11.25” when uploaded to us as these dimensions include the bleed.
If you have selected single sided printing for your sheet, you should only upload a one-page PDF. If you have selected double sided printing for your sheet, you should upload a two-page PDF.
You can reference this PDF file as an example of a custom template for a 5” x 7” instruction sheet that will fold down to fit inside a poker-size tuck box (2.5” x 3.5”):
Booklet
The default binding option for instruction booklets is saddle stitching. We are also able to print perfect bound instruction books, but this section will discuss file setup for saddle stitched instruction booklets.
The document size for your artwork should match the ordered booklet size, but should also include the necessary bleed – 0.125” on all four sides. So, for example, if you are printing a 2.5” x 3.5” booklet the artwork should be 2.75” x 3.75” when uploaded to us as these dimensions include the bleed. Alternatively, you can submit your artwork as two-page spreads which would require 5.25” x 3.75” artwork including the bleed on all four sides of the spreads.
Your page count (beginning with the front cover and ending with the back cover) must be a multiple of four.
You can reference this PDF file as an example of a custom template for a 2.5” x 3.5” 8-page instruction booklet.
Accordion
If you select accordion instructions you will receive one long sheet with equal size panels folded down to the ordered size.
You have two options when setting up your artwork file:
- Submit each panel individually: The document size for your artwork should match the ordered accordion size, but should also include the necessary bleed – 0.125” on all four sides. So, for example. If you are printing a 2.5” x 3.5” accordion the artwork should be 2.75” x 3.75” when uploaded to us as these dimensions include the bleed.
- Submit each side of the complete sheet: The document size of your artwork should match the full spread width of your accordion, but should also include the necessary bleed – 0.125” on all four sides of the complete spread. So, for example, if you are printing a 2.5” x 3.5” 8-page accordion the artwork should be 10.25” x 3.75” when uploaded to us as these dimensions account for a 4-panel spread and include the bleed on all four sides of the spread.
You can reference this PDF file as an example of a custom template for a 2.5” x 3.5” 8-page accordion.

Example File Setup
As mentioned above, some components (like boxes or punch-out tokens) should be submitted both with and without fold lines. Here is an example of a hexagon punch-out token. The file on the left is just the artwork that will be used for printing; the file on the right is the reference file with trim and bleed lines.